App-Only Auth Connect to SharePoint Online with MSAL and Azure KeyVault


Now that SharePoint Online CSOM is now works with .NET Framework, I thought I would put together a demo using Visual Studio code that connects to SharePoint.

A previous colleague and still good friend of mine Vardhaman Deshpande in June wrote a blog post showing how to connect to SharePoint Online using MSAL. It is so well written that really writing another blog about it seems a little pointless, so I have taken his blog a little further by connecting to a KeyVault in Azure and grabbing the certificate directly from there.

.NET Standard CSOM of SharePoint Online now uses OAuth for authentication. This means an Access Token needs to be grabbed and passed to every call that is made to SharePoint Online. We will do this by grabbing the AppID and Certificate from the KeyVault and then get the Access Token through ConfidentialClientApplicationBuilder. The Access Token will then be passed into the ClientContext so all calls are made with the Access Token to SharePoint Online.

Walk-through Demo

The demo I have put together can be found at my GitHub repository. By using a Azure AD App Registration and a client certificate, I will walk-through the steps here to set up the following:

  • Create a Resource Group in Azure
  • Create a KeyVault
  • Create a Certificate and Store it in the KeyVault
  • Create an Azure AD App registration
  • Store the ClientID in the KeyVault Secrets
  • Grant Azure AD Application permission for SharePoint – Sites.FullControl.All
  • Console code that connects to SharePoint Online.

Setup

To perform all the steps above as a manual walk-through would take a lot of time to go through. Also, where I can automate things I do. Therefore in the GitHub project under the PowerShell Folder there is a PowerShell file called Install-AzureEnvironment.ps1.

This uses AZ Cli and running the below script will create the above for you in your Azure environment. Replace “Contso” with the name of your tenant.

az login
$tenantName = "contso"
# Defaults to UK South
.\Install-AzureEnvironment.ps1 -Environment $tenantName -Name "SharePointMSAL"
# If wish to change location
#.\Install-AzureEnvironment.ps1 -Environment $tenantName -Name "SharePointMSAL" -Location:'<Location>'

The above will create the following Azure Resources (using the example of Consto as tenant name)

  • Resource Group: Contso-SharePointMSAL
  • App Registration: Contso-SharePointMSAL (Granted with SharePoint > Sites.FullControl.All)
  • Key Vault: Contso-SharePointMSAL (Will be truncated to 24 characters if longer)
  • CertificateName stored in KeyVault Certificates: Contso-SharePointMSAL
  • ClientId stored in KeyVault Secret: ConstoSharePointMSAL

Console Application

Using Visual Studio Code, I’ve create a .NET Core 3.1 console application and added the following nuget packages. Please see my previous blog post “Basic dotnet commands to create C# project in Visual Studio Code” on how to create a Console application and add nuget packages.

  • Microsoft.SharePointOnline.CSOM
    • Used for the SharePoint CSOM calls
  • Microsoft.Identity.Client
    • Used for OAuth authentication
  • Azure.Identity
    • Used for KeyVault authentication
  • Azure.Security.KeyVault.Secrets
    • Used for getting the Secret and Certificate from the vault
  • Microsoft.Extensions.Configuration
    • Used for collecting app.config values
  • Microsoft.Externsions.Configuration.FileExtensions
    • Used for collecting app.config values
  • Microsoft.Extensions.Configuration.Json
    • Used for collecting app.config values

Next you will need to create (or update if cloned the github project) the appsettings.json file. Replace the environment and site values for your environment.

{
"environment": "<tenantName>",
"name": "SharePointMSAL",
"site": "<relative URL e.g, /sites/teamsite>"
}

Then update the program.cs file with the following code. The code has been written assuming your Azure resources using the .\Install-AzureEnvironment.ps1.

using System;
using Microsoft.Identity.Client;
using Microsoft.SharePoint.Client;
using System.Security.Cryptography.X509Certificates;
using System.Threading.Tasks;
using Microsoft.Extensions.Configuration;
using Azure.Identity;
using Azure.Security.KeyVault.Secrets;
namespace SharePointMSAL
{
class Program
{
static async Task Main(string[] args)
{
IConfiguration config = new ConfigurationBuilder()
.AddJsonFile("appsettings.json", true, true)
.Build();
string siteUrl = $"https://{config["environment"]}.sharepoint.com{config["site"]}";
string identity = $"{config["environment"]}-{config["name"]}";
string keyVaultName = GetKeyVaultName(identity);
string certificateName = identity;
string tenantId = $"{config["environment"]}.onmicrosoft.com";
string clientIDSecret = identity.Replace("_","").Replace("-","");
string clientId = GetSecretFromKeyVault(keyVaultName, clientIDSecret);
//For SharePoint app only auth, the scope will be the Sharepoint tenant name followed by /.default
var scopes = new string[] { $"https://{config["environment"]}.sharepoint.com/.default" };
var accessToken = await GetApplicationAuthenticatedClient(clientId, keyVaultName, certificateName, scopes, tenantId);
var ctx = GetClientContextWithAccessToken(siteUrl, accessToken);
Web web = ctx.Web;
ctx.Load(web);
await ctx.ExecuteQueryAsync();
Console.WriteLine(web.Title);
}
private static string GetKeyVaultName(string identity)
{
var keyVaultName = identity;
if (keyVaultName.Length > 24)
{
keyVaultName = keyVaultName.Substring(0, 24);
}
return keyVaultName;
}
private static async Task<string> GetApplicationAuthenticatedClient(string clientId, string keyVaultName, string certificateName, string[] scopes, string tenantId)
{
var certificate = GetAppOnlyCertificate(keyVaultName, certificateName);
IConfidentialClientApplication clientApp = ConfidentialClientApplicationBuilder
.Create(clientId)
.WithCertificate(certificate)
.WithTenantId(tenantId)
.Build();
AuthenticationResult authResult = await clientApp.AcquireTokenForClient(scopes).ExecuteAsync();
string accessToken = authResult.AccessToken;
return accessToken;
}
public static ClientContext GetClientContextWithAccessToken(string targetUrl, string accessToken)
{
ClientContext clientContext = new ClientContext(targetUrl);
clientContext.ExecutingWebRequest += delegate (object oSender, WebRequestEventArgs webRequestEventArgs)
{
webRequestEventArgs.WebRequestExecutor.RequestHeaders["Authorization"] = "Bearer " + accessToken;
};
return clientContext;
}
public static X509Certificate2 GetAppOnlyCertificate(string keyVaultName, string certificateName)
{
var keyVaultUrl = $"https://{keyVaultName}.vault.azure.net";
var client = new SecretClient(new Uri(keyVaultUrl), new DefaultAzureCredential());
KeyVaultSecret keyVaultSecret = client.GetSecret(certificateName);
X509Certificate2 certificate = new X509Certificate2(Convert.FromBase64String(keyVaultSecret.Value), string.Empty,
X509KeyStorageFlags.MachineKeySet |
X509KeyStorageFlags.PersistKeySet |
X509KeyStorageFlags.Exportable);
return certificate;
}
public static string GetSecretFromKeyVault(string keyVaultName, string secretName){
var keyVaultUrl = $"https://{keyVaultName}.vault.azure.net";
var client = new SecretClient(new Uri(keyVaultUrl), new DefaultAzureCredential());
KeyVaultSecret keyVaultSecret = client.GetSecret(secretName);
return keyVaultSecret.Value;
}
}
}

After the code runs it will display the site Title. In my case ‘TestAPISite’.

The important piece of code to get the certificate from Azure Key Vault is GetAppOnlyCertificate function on line 78. This is using the new Azure.Identity and Azure.Security.KeyVault.Secrets libraries.

The Azure.Identity information can be found here: https://docs.microsoft.com/en-us/dotnet/api/overview/azure/identity-readme?view=azure-dotnet

The key to authentication to the KeyVault is on line 82 using DefaultAzureCredential, as this attempts to connect using different authentication methods. Once connected, it retrieves the certificate value and creates a X509Certificate2 certificate in memory. The only confusing part of the code is using Azure.Security.KeyVault.Secrets to get the value not Azure.Security.KeyVault.Certificates.

The image below taken from the Microsoft documentation, shows how the DefaultAzureCredential will attempt to authenticate via the following mechanisms in order.

https://docs.microsoft.com/en-us/dotnet/api/overview/azure/identity-readme?view=azure-dotnet#defaultazurecredential
  • Environment – The DefaultAzureCredential will read account information specified via environment variables and use it to authenticate.
  • Managed Identity – If the application is deployed to an Azure host with Managed Identity enabled, the DefaultAzureCredential will authenticate with that account.
  • Visual Studio – If the developer has authenticated via Visual Studio, the DefaultAzureCredential will authenticate with that account.
  • Visual Studio Code – If the developer has authenticated via the Visual Studio Code Azure Account plugin, the DefaultAzureCredential will authenticate with that account.
  • Azure CLI – If the developer has authenticated an account via the Azure CLI az login command, the DefaultAzureCredential will authenticate with that account.
  • Interactive – If enabled the DefaultAzureCredential will interactively authenticate the developer via the current system’s default browser.

Note: When I first ran my code on Visual Studio Code, I kept getting an authentication issue, it was because I had Visual Studio Enterprise installed on my machine and it was picking up the authentication method selected there which was pointing to a different tenant. You can see this in Visual Studio Enterprise by going into Tools > Options
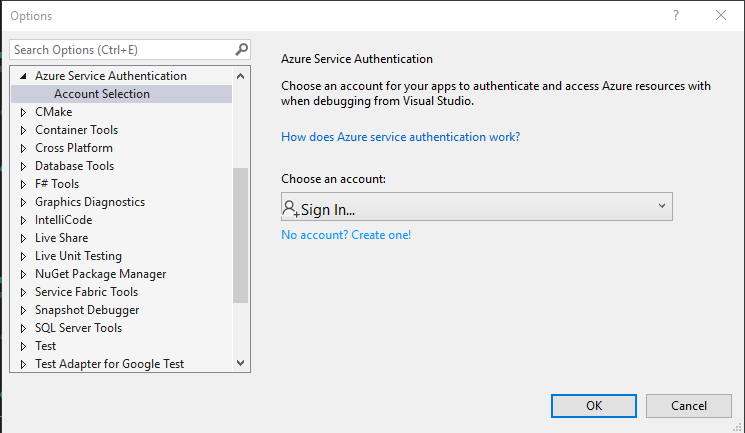
The great thing about DefaultAzureCredential, is that if this code was within a Azure Function, I could run it first on my computer, then deploy it to Azure Functions with a Managed Identity, and it would still work without any changes to the code.

I hope you find this blog post useful.

Basic dotnet commands to create a C# Project in Visual Studio Code


Since SharePoint Online CSOM is now .NET Core compatible, it means I can start doing all my C# code work in Visual Studio Code and drop the heavy weight application of Visual Studio (Community/Enterprise). Yes, I might need to wait a little longer until SharePointPnPCoreOnline become .NET Core compatible too, but I’m sure that’s not far behind.

Although I have been a developer for many years, and used VS Code for a while for PowerShell and SPFX, I haven’t done any C# projects. This made me realise that I didn’t know how to start a C# project, how to add a reference to another project, add NuGet packet etc., inside VS Code. Does this mean I’m not very good at my job because I don’t know this simple information? No. It just means I’ve never done it before.

This blog post is going to just walkthrough some of the simple steps to get yourself up and running with a C# project using Visual Studio Code. For someone who spent most of his working life inside Visual Studio Community/Enterprise, the steps inside VS Code it is all command line calls and not using GUI’s and wizards. Which sometimes feels frustrating.

The dotnet https://docs.microsoft.com/en-us/dotnet/core/tools/ commands are what we will be using.

You can jump to the relevant point in the blog post from the bookmark links below:

Preparing a Folder to work in
Creating a Solution
Creating a Project
Adding Projects to Solutions
Adding a Project Reference
Getting Intellisense to work
Writing some code
Build the Solution
Run the Project
Publishing the Project
Debugging the Project
Adding a NuGet Package
Listing the NuGet Packages
Remove a NuGet Package

Preparing a Folder to work in

  • Open Visual Studio Code inside a blank folder.
    • File -> Open Folder
    • Navigate to where you want the project to be.
    • Click New Folder and name the folder
    • Select the folder.
  • Open the Terminal
    • Terminal -> New Terminal
    • You can use Bash / Windows PowerShell / PowerShell 6 / PowerShell 7

Creating a Solution

  • In the terminal type the following to create a solution. The name of the solution is the name of the folder it sits in, you can use –name to give it a different name.
    • dotnet new sln

Creating a project

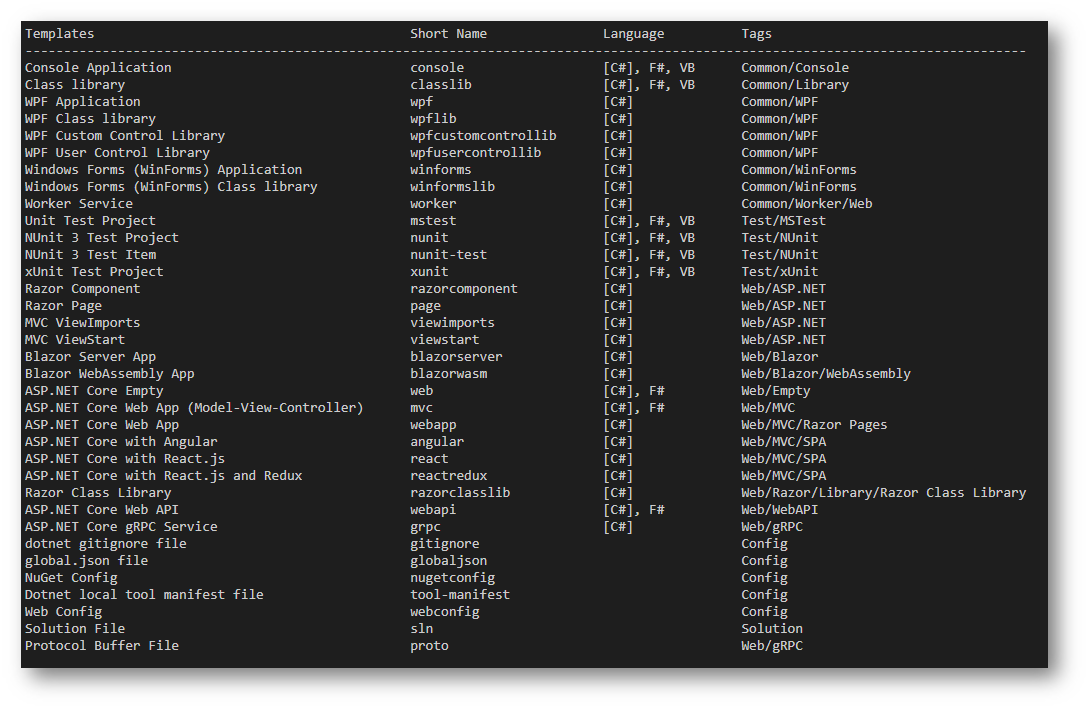
There are loads of project types you can create, and just typing dotnet new –help
shows you all the different types. Using the short name creates that type of project.

Let us create a C# Console project, —output is the folder location where the project is going to be put.

  • dotnet new console –output CSharpConsole

Let us also create a C# Library class project.

  • dotnet new classlib –output CSharpLibrary

Adding Projects to the Solution

With Visual Studio when you added a project, you automatically added these projects to the solution. This is not the case with VS Code. You must do an additional step to add the projects to the solution.

  • dotnet sln add CSharpConsole/CSharpConsole.csproj
  • dotnet sln add CSharpLibrary/CSharpLibrary.csproj

Adding a Project Reference

To add the CSharpLibrary reference to the CSharpConsole we need to call the add the reference

  • dotnet add CSharpConsole/CSharpConsole.csproj reference CSharpLibrary/CSharpLibrary.csproj

Getting Intellisense to work

When I was walking through the steps to ensure this blog post is accurate, I didn’t need to do these following steps to get the intellisense to work. They just worked. However, I’m going to still add this here in case you find the intellisense is not working for you.

  • Ctrl + Shift + p
  • Type “OmniSharp: Select Project”
    and press enter
  • Choose the solution workspace entry

Writing some code

To continue this blog post that you can follow along with , you will require some code.

  • In the CSharpLibrary project, rename the class.cs to IntLibrary.cs
  • Paste in the following code, this is a simple method that checks if the string value is greater than 5.
using System;
namespace CSharpLibrary
{
public static class IntLibrary
{
public static bool NumberGreaterThan5(this string value)
{
Int32 intValue = 0;
bool canConvert = Int32.TryParse(value, out intValue);
if (canConvert)
{
if (intValue > 5)
{
return true;
}
}
return false;
}
}
}
view raw IntLibrary.cs hosted with ❤ by GitHub
  • In the CSharpConsole project, paste the following code. This code asks the user for an input and returns true or false if the value is above 5 or not. With a console check for too many rows or empty value to quit.
using System;
using CSharpLibrary;
namespace CSharpConsole
{
class Program
{
static void Main(string[] args)
{
LibraryProject();
}
public static void LibraryProject()
{
int row = 0;
do
{
if (row == 0 || row >= 25)
ResetConsole();
string input = Console.ReadLine();
if (String.IsNullOrEmpty(input)) break;
Console.WriteLine($"Input: {input} {"Greater than 5? ",30}: " +
$"{(input.NumberGreaterThan5() ? "Yes" : "No")}\n");
row += 3;
} while (true);
return;
void ResetConsole()
{
if (row > 0)
{
Console.WriteLine("Press any key to continue…");
Console.ReadKey();
}
Console.Clear();
Console.WriteLine("\nPress <Enter> only to exit; otherwise, enter a string and press <Enter>:\n");
row = 3;
}
}
}
}
view raw program.cs hosted with ❤ by GitHub

Build the solution

The command to build the solution is:

  • dotnet build

Run the Project

To run the project you need to pass in the Project file.

  • dotnet run –project CSharpConsole/CSharpConsole.csproj

Or if you are already in the project’s directory

  • dotnet run

Publishing the Project

To publish the project to run it as an executable in this console case

  • dotnet publish –configuration release

Debugging the Project

No matter how good you are, you will need to debug code at somepoint.

  • Put a breakpoint in your code. Press F5.
  • First time you will be asked the project type. Select .NET Core. This will create a launch.json file. As this project is a console project, we need to modify the configuration within the launch.json file to make the console point to Integrated terminal, otherwise the line to clear the console will fail.
    • Change “console”: “internalConsole”
      on line 15 and change to “console”: “integratedTerminal”
{
// Use IntelliSense to learn about possible attributes.
// Hover to view descriptions of existing attributes.
// For more information, visit: https://go.microsoft.com/fwlink/?linkid=830387
"version": "0.2.0",
"configurations": [
{
"name": ".NET Core Launch (console)",
"type": "coreclr",
"request": "launch",
"preLaunchTask": "build",
"program": "${workspaceFolder}/CSharpConsole/bin/Debug/netcoreapp3.1/CSharpConsole.dll",
"args": [],
"cwd": "${workspaceFolder}/CSharpConsole",
"console": "integratedTerminal",
"stopAtEntry": false
},
{
"name": ".NET Core Attach",
"type": "coreclr",
"request": "attach",
"processId": "${command:pickProcess}"
}
]
}
view raw launch.js hosted with ❤ by GitHub
  • Press F5 to debug the code.

Adding a NuGet Package

Nearly all projects now will involve adding a NuGet package of some sort. Again with the Command line to add, which I must admit I miss using a GUI. The GUI allowed you to search, now you need to know the name of the package. I’m going to add the SharePoint CSOM package to the console application

  • dotnet add CSharpConsole/CSharpConsole.csproj package Microsoft.SharePointOnline.CSOM

Optionally you can add the version parameter to get a specific version of a package.

  • dotnet add CSharpConsole/CSharpConsole.csproj package Newtonsoft.json –version 12.0.1

Listing the NuGet Packages

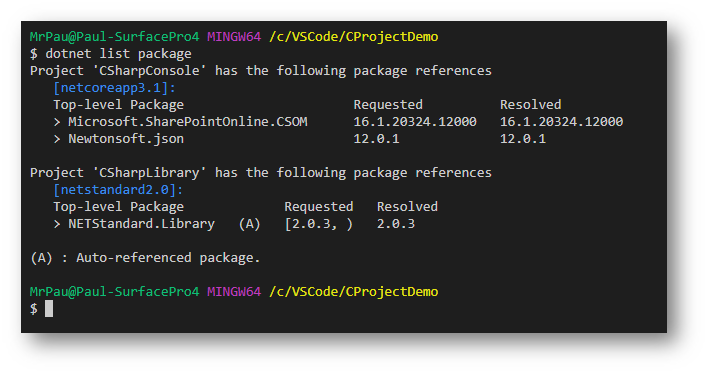
To find out which project has which NuGet packages already installed,

  • dotnet list package

Remove a NuGet Package

To remove a given NuGet Package you can type the following

  • dotnet remove CSharpConsole/CSharpConsole.csproj package Newtonsoft.json

Hopefully, that is enough to get yourself going, of course all commands have –help that explains how to use the command.

Visual Studio debugging and the Avast pop-up


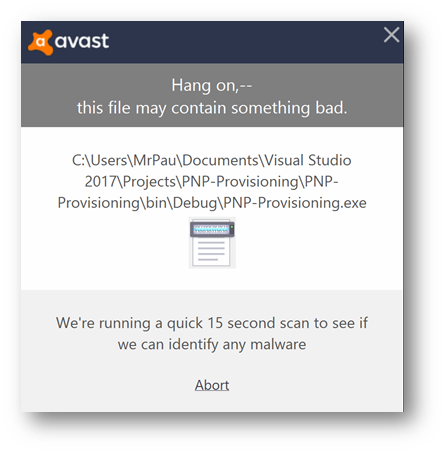
Whenever I do programming on my own laptop, because I have Avast installed, every time I try to debug a program I get the above pop-up appear in the bottom right of my screen. The debugger doesn’t attach, and the program attempts to run for up to 15 seconds, before Avast decides it’s actually OK to run, cancels the program, and then restarts it attaching the debugger. This is very annoying.

How to fix

(Update: Thanks to @AlecOstrander for pointing out that Avast has updated the location of the settings, I haven’t updated my pictures here)

Open Avast and click Menu then Settings found at the top right of the screen.

In the settings menu, under General, there is an Exclusions section.

Click browse and navigate to the folder where you store your Visual Studio Projects and select the tiny tick box next to the folder. Then click OK.


Now click OK on the Avast Settings.

When you debug your Visual Studio projects now, you will not get that pop-up that is scanning the .exe file, and the debugger will attach without any issues.

TypeScript error in Visual Studio – Cannot find module, problem with the tsconfig.json file


As much as I like to write blogs, I also like to follow and work through other people’s blogs, especially if they are step by step instructions similar to the way I think. This one particular blog was showing how to create a simple Angular Hello World app. I followed the blog to the letter and when I tried to build the app I kept getting the following error messages

  • Experimental support for decorators is a feature that is subject to change in a future release. Set the ‘experimentalDecorators’ option to remove this warning.
  • Cannot find module ‘@angular/core’
  • Cannot compile module unless the ‘—module’ flag is provided with a valid module type. Consider setting the ‘module’ compiler option in a ‘tsconfig.json’ file.

typescripterrormessage

This makes no sense, as in my tsconfig.json file I had everything setup correctly. I had set experimentalDecorators to true, so I shouldn’t have received the first error message. Couldn’t work out why it couldn’t find @angular/core as I had used the npm package manager to install it, and in my tsconfig.json file I had set the module to ‘commonjs’. I checked on other websites that I had set up my tsconfig.json file correctly.

{
compilerOptions: {
declaration: true,
emitDecoratorMetadata: true,
experimentalDecorators: true,
lib: [
"es2015",
"dom"
],
module: "commonjs",
moduleResolution: "node",
noImplicitAny: true,
removeComments: false,
sourceMap: true,
suppressImplicitAnyIndexErrors: true,
target: "es5",
typeRoots: [
"../../node_modules/@types/"
]
},
compileOnSave: true,
exclude: [
"node_modules/*",
"**/*-aot.ts"
]
}

It seems if you download TypeScript 2.0 for Visual Studio 2015 you will not be able to use a tsconfig.json file. If you are working with CommonJS module system, Visual Studio will ignore the tsconfig.json file, even though putting the tsconfig.json file within the project, Visual Studio prevents the use of the TypeScript build section of the project properties.

typescriptdisabled


The tsconfig.json file is required in Visual Studio Code, but it doesn’t seem to be required for Visual Studio. To fix your error messages, first, remove the tsconfig.json file from your project. This then makes the Typescript build on the properties page enabled. I switched the Module system to CommonJS and ECMAScript version to ECMAScript 6. This got rid of my bottom two errors, however I was still getting the message:

Experimental support for decorators is a feature that is subject to change in future release. Set the ‘experimentalDecorators’ option to remove this warning.

To fix this error:

  • Unload the project from your solution – right click the project and select Unload Project
  • Once you have unloaded the project, you can right click it again, and then edit the project file.
  • Add the following to both PropertyGroup where the condition is for debug or Release. (<PropertyGroup Condition=” ‘$(Configuration)|$(Platform)’ == ‘Debug|AnyCPU’ “> or  <PropertyGroup Condition=” ‘$(Configuration)|$(Platform)’ == ‘Release|AnyCPU’ “> )
        <TypeScriptExperimentalDecorators>True</TypeScriptExperimentalDecorators>
        <TypeScriptEmitDecoratorMetadata>True</TypeScriptEmitDecoratorMetadata>
    

  • Save your changes, then right click the project and Reload Project

Your errors should now be gone, and you can continue to build your project.

Reference

https://www.infopulse.com/blog/using-angular-2-in-visual-studio-2015-tutorial/ – The blog post that helped me!

Ensuring Visual Studio 2015 is using the latest NodeJS and NPM version


When Visual Studio 2015 uses NodeJS and NPM it uses the version local to itself, which as I discovered is annoying if:

  1. You didn’t know this
  2. Thought your PC was up to date after installing the latest NodeJS and NPM globally.

First lets ensure you have installed the latest nodejs and npm globally.

Install / Update NodeJS globally.

  • Using your browser, navigate to https://nodejs.org and download the current version of NodeJs.
  • Once you have downloaded NodeJs, ou can run the installer and work your way through the wizard.
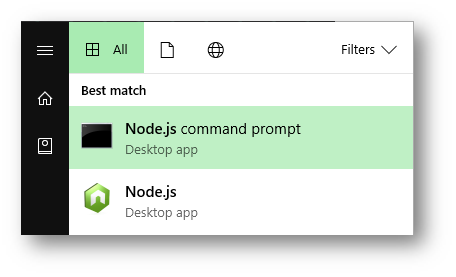
  • Once installed, you can open up a command prompt. Node.js command prompt is also available.

  • Open up the node.js command prompt and type node -v to get the node version. Should match the version you downloaded from the website.

Installing / Update NPM globally.

  • Open the Node.js command prompt
  • Type the following
npm install npm@latest -g
  • Then type npm -v to get the npm version number.

Extensions for Visual Studio 2015

I recommend getting the following extensions for Visual Studio

Click download in both links and install the extensions into Visual Studio.

After you have installed the “NPM Task Runner”, you might need to make it visible in your Visual Studio. To do this, select View > Other Windows > Task Runner Explorer or press Ctrl + Alt + Bkspace


After you have installed the “Package Installer”, when you right click on your project you will see a new link under Add
called Quick Install Package…

When clicked, you can select and install a package from the following package managers


We will use these extensions in a moment.

Checking Visual Studio Version and Updating.

We are going to create a project, and add a package using the Quick Install Package, this will create us a package.json file. We add some commands to the Scripts section, and run them in the task runner.

  • Create yourself a blank web project.
  • Right click
    the project and select Quick Install Package…
  • Select NPM and type TypeScript in the next box, can leave Latest Version and click Install.

  • After you have clicked install you should see a package.json file, which doesn’t have much in it.
{
  "name": "myproject",
  "version": "1.0.0",
  "devDependencies": {
    "typescript": "^2.1.5"
  }
}
  • Update the json file to include two scripts, getNPMVersion, getNodeVersion and updateNPMVersion.
{
  "name": "myproject",
  "version": "1.0.0",
  "devDependencies": {
    "typescript": "^2.1.5"
  },
  "scripts": {
    "getNpmVersion": "npm -v",
    "getNodeVersion": "node -v",
    "updateNPM": "npm install npm@latest"
  }
} 
  • After you have saved the json file, in the Task Runner Explorer window, click the refresh button. You should see your three scripts available to you.

  • Right click on getNpmVersion
    and click Run. The result will display in the Task Runner Explorer console window. You will note that this version is different to the version number you got at the start of this blog post through the Node.js command prompt window.
  • To Update NPM, right click on updateNPM and click Run. After it has completed, run getNpmVersion again. You should find that the version now matches the version you got earlier.
  • Right click on getNodeVersion and click Run. My version is v5.4.1
  • There doesn’t seem to be a command to update the Nodejs in visual studio. However, we can make it use the global version of Nodejs.
  • In Visual Studio click on Tools > Options. Inside Options, select Projects and Solutions > External Web Tools.
  • Add the NodeJS path. Mine is “C:\Program Files\nodejs”. Then move this to the top.

  • Go back to the Task Runner and run the command getNodeVersion you should now see the version matches the version you got earlier in the Node.js command window.

You should now be up to date.

Building SharePoint 2016 development environment – Part 16 – Installing and setting up Visual Studio


A few years ago I wrote “Build your SharePoint 2013 development machine on Windows Server 2012” series, I mainly work in the cloud now, but as the blogs was so popular, I thought I would create a new series for the newer version of SharePoint.

You can access other parts of this post below.

The last part of the 16-part series is to install and set up visual studio so you can start developing on your machine.

I’m going to use Visual Studio 2015 Community edition, this might not be suitable for you, you might have access to Visual Studio 2015 Enterprise/Professional edition. Also there is Usage agreements to the Visual Studio 2015 Community edition, which if in an organisation you might be breaking the licensing agreement.

Downloading Visual Studio Community

  1. Open a browser, and go to URL https://www.visualstudio.com/en-us/products/visual-studio-community-vs.aspx
  2. Click Download Community 2015 button
  3. Run or Save then run, the download file.
  4. Once the installer has started, select Custom then click Next
  5. On the Select Features screen, I didn’t need to select anything and clicked Next. However, you might want extra programming languages, maybe the common tools such as the Git for Windows extension.
  6. Click Install.
  7. When finished, you will be asked to reboot your machine. Click Restart Now.

Configuring Visual Studio

  1. After your server has rebooted, Sign in and open Visual Studio
  2. You will be presented with a screen to connect to your developer services, if you have any sign in now. It is worth looking into if you are planning on doing some Azure, as you can get some free credits by signing up to Visual Studio Dev Essentials https://www.visualstudio.com/en-us/products/free-developer-offers-vs.aspx. Either sign in, or click Not now, Maybe later.
  3. It will prepare Visual Studio for you on your machine as it is the first time it has been opened.
  4. First thing to do once open is check if there are any updates required. From the Visual Studio menu click Tools > Extensions and Updates… Update anything that needs updating.

Installing Office and SharePoint 2016 Developer Tools

After installing all your updates for Visual Studio, if you go and try to create a new project, you will find that there is no Office/SharePoint templates.

You will need to install this. Note: If you have already installed Microsoft Office Developer Tools for Visual Studio 2015 and Microsoft Office Developer Tools Preview for Visual Studio 2015, you will need to uninstall these first otherwise SharePoint 2016 projects will not show up in Visual Studio.

  1. In a browser go to the URL https://www.microsoft.com/en-us/download/details.aspx?id=51683 and click Download to download Microsoft Office Developer Tools Preview 2 for Visual Studio 2015
  2. Select 14.0.23930\enu\cba_bundle.exe. Once downloaded, run.
  3. Click Install
  4. After it has successfully installed, you can click Close
  5. Open Visual Studio 2015 (Don’t forget to run as Administrator)
  6. Click File > New > Project
  7. Under Templates > Visual C# > Office/SharePoint > SharePoint Solutions and you should see the SharePoint 2016 templates.

Getting around the cannot connect to the target site message.

If you continued from the last part to create a SharePoint project and tried to connect to SharePoint, you would have got the following message about SharePoint solutions only work with locally-installed version of SharePoint Foundation or SharePoint Server.

To get around this problem you have to add the URL’s to your host file.

  1. Open Notepad as administrator
  2. Open the file C:\Windows\System32\drivers\etc\hosts. (You will need to look at all files, not .txt files to see it)
  3. Add the following lines and then save the hosts file.
    127.0.0.1 dev.cfcode2016.com

    127.0.0.1 intranet.cfcode2016.com

  4. Now when you click the Validate button in Visual Studio – SharePoint Customization Wizard you will get a connection successful message.

Other programs to install

You might decide not to use Visual Studio 2015, and use Visual Studio Code as I’m aware some developers are now doing, mainly because it is a lot faster to run on the machine. You might also want to install Office products such as Word/Excel.

Removing old Checkpoints.

Now your machines are complete, you probably don’t have a reason to go back re-apply an old checkpoint. Therefore it make sense to clean them up. After all every time you take a checkpoint a new file is created on your host, and the difference between your original or previous checkpoint file is stored within this new file. If you take a look at where your Virtual Machine stores it’s hard drive, there will be multiple files, all quite large in size. Not including the folders, this takes up over 85GB of space on my host machine.

  1. Ensure that your Hyper V virtual machines are shut down.
  2. Here you can either delete just the CheckPoints you want, or delete the whole subtree. As I don’t need to keep any of my checkpoints, I’m going to select the top checkpoint and then click Delete Checkpoint subtree from the right pane.
  3. Click Delete on the confirmation dialog box.
  4. If you look back where you store your Virtual Machines its hard drive, it looks a lot less messy, and uses up less space. (Total over 47GB)

Thank you for reading this series, hopefully you found it useful.

Visual Studio Web Essentials, Minified and Source Map files


Working in the SharePoint 2013 online world I have found myself deep in the world of JavaScript files. Now as a good developer I ensure that my JavaScript files are all minified before deploying to a production server. However what happens if there is a JavaScript error on the production server. You would normally see an error like below:

Line: 1, Column: 83008. Well yeah, that’s going to be easy to solve. To makes matters worse, if I look at the cannonfodder.min.js file, line 1 looks a bit like the following:

However you could hit “Turn Pretty On” button

IE11

Chrome – (Bottom left)

Which makes the above text looks like the following:

Not exactly the file I originally wrote, as functions and variables are still minified to single letters.

One solution that I used to use was have a custom action script link, that points a piece of JavaScript code, that either adds the minified or un-minified file to the page depending if there was “jsdebug” in the query string on the page.


var Cannonfodder = Cannonfodder || {};

Cannonfodder.LoadMainJs = (function () {

    var scriptElement = document.createElement('script');

    scriptElement.setAttribute('type', 'text/javascript');

    if (window.location.href.indexOf('jsdebug') != -1) {

        scriptElement.setAttribute('src', '/assets/scripts/cannonfodder.js ');

    } else {

        scriptElement.setAttribute('src', '/assets/scripts/cannonfodder.min.js ');

    }

    document.getElementsByTagName('head')[0].appendChild(scriptElement);

}());

There is nothing wrong with doing the above, the only issue is that you are inserting the javascript file into the page with a custom action. If you wanted just to add the JavaScript link to your masterpage, or HTML page etc you couldn’t use this method.

This is where minified and source map files come in handy.


Web Essentials for Visual Studio

Before I explain further about Minified and Source Map files, let me show you a Visual Studio plugin that will do most of the work for you. It’s called Web Essentials and can be downloaded from http://vswebessentials.com/. It is available for Visual Studio 2010, 2012 and 2013. It has many features, but the feature you are installing it for, is so that it automatically minifies and creates a map file for your JavaScript files.

How to minify

Once you have installed Web Essentials extension, and have a project with a group of JavaScript files, all you need to do is select the JavaScript files, and right click.

You will see that you have a new menu item “Web Essentials” and inside this menu item, you can Create JavaScript bundle file. By clicking this you are asked to name your bundle. Once you have named your bundle and click OK, it will create 4 files based on your bundle name.

The files:

[BundleName].js – is all the JavaScript files put together into one file, that isn’t minified. This is the easy to read version. (Although not used any further)

[BundleName].min.js – is all the JavaScript files put together into one file, but this file is minified.

[BundleName].min.js.map – is the source map file. This is a file that holds information about your original files. When you query a certai line and column number in your generated minified JavaScript you can do a lookup in the source map which returns the original location. A map file can look as simple as the following.


{

 "version" : 3,

"file": "Cannonfodder.min.js",

"mappings": "AAAAA,SAASA,kBAAmB,CAACC",

"sources": ["test.js"],

"names": ["window", "src", "maps", "are", "fun"]

}


[BundleName].js.bundle – This is an XML file, also the file that groups the other 3 files. This XML file contains the files that need to be minified, also it determines the order. The bundle file looks similar to the following:


<?xml version="1.0" encoding="utf-8"?>

<bundle minify="true" runOnBuild="true" output="Cannonfodder.js">

<!-- The order of the <file> elements determines the order of them when bundled. -->

<file>test.js</file>

<file>anotherfile.js</file>

<file>mycoreutilities.js</file>

</bundle>


What is really cool about using web essentials, is any changes you make to your original javascript files, as soon as you save it within Visual Studio, the 3 bundle files are recreated/updated. ([bundle].js, [bundle].min.js, [bundle].min.js.map)


What to deploy to the server

I’ve created a basic demo to explain what needs to be deployed to the server.

What I have is a module called assets. I added 3 JavaScript files to my assets module. Then, using Web Essentials created my Cannonfodder bundle from the 3 JavaScript files. Lastly I have created a Custom Action Script link which adds “~SiteCollection/Assets/Cannonfodder.min.js” to the page for simplicity. (Save worrying about creating a Master Page for this demo)

The files highlighted in yellow are the files, I’ve included in the Elements.xml file which will be uploaded to the server.

When I hit my page, the only file that I’ve told to load on the page is the minified file Cannonfodder.min.js.


Browsers and debugging the minified file

I have deployed my sandbox solution to the server, and using Chrome I can see my original files instead of the minified files. Here I will show you how this works.

By default Chrome doesn’t load the unminfied files, even when you enable the developer tools (F12) it doesn’t automatically load the unminified files. To get this to work you need to go into the settings of Chrome, by clicking on the cog on the top right of the developer toolbar.

You need to ensure “Enable JS source maps” is turned on. Now refresh the page. In the source panel, you will now see your original files and the minified files.

With “Enable JS Source maps” turned off, you will not get the original files in the source panel. (There are more files loaded here before I took my screenshot, compared to the last screenshot)

Ok, so I can see my original files, but how does that help me? Well now I can actually put a break point on my original code, which gets hit as my page runs.

This may seem like magic, but it is to do with the final line you will find in the min.js file.


/*

//# sourceMappingURL=Cannonfodder.min.js.map

*/

This line tells the browser to read the map file if found, it can then load the original files from the map file. The mappings in the map file, allows the browser to work out exactly where in the minified file you are in the original files. So for example, if you click “turn pretty on” for your minified file, and then attempt to put a break point in this file, the actual breakpoint it makes is in your original file. You can see this by the “Breakpoints window”.


Other Browsers

Firefox in the debug tools can view the original files. Apparently according to this Microsoft Article http://msdn.microsoft.com/en-us/library/dn255007(v=vs.85).aspx IE11 with Windows 8.1 update also can do this. However I cannot see the extra buttons that Microsoft States are there to perform what I did in Chrome.

What I have


What Microsoft says I should have


The last two buttons are Just My Code and Enable source maps. If anyone works out how to get these two buttons to appear, please place a message in the comments below.

Update: I have just installed the latest updates for my Windows 8 machine and can confirm that them buttons are now there. I obviously didn’t have 8.1 installed.


Issues I’ve discovered

The main issue I’ve had when debugging my files is that in the console window, if I wanted to see a variable value, I would normally just type the variable into the console and it would give me my value. However, because the browser is actually running your minified file, and showing you the original files, your variables are not actually your variables.

What do I mean? Well, below I have put a break point on my simple displayDateandName(name) function. This breakpoint is showing my original file.

When I try and get “date” variable, it states it’s undefined. With the “name” variable it displays nothing. This is because it is running your minified file, and you can tell this by looking at the Local Scope Variable window.

You can see variables called

n: “Paul”

t: Tue Apr 08 2014 21:59:40 GMT+0100 (GMT Daylight Time)

Which if you can find it within your minified file, you will see that what these variables have been minified too

Resources

http://msdn.microsoft.com/en-us/library/dn255007(v=vs.85).aspx – IE 11 and Map Files

https://developers.google.com/chrome-developer-tools/docs/javascript-debugging#source-maps – Chrome and Map Files.

http://www.codeproject.com/Articles/649271/How-to-Enable-Source-Maps-in-Firefox – Firefox and Map files

http://vswebessentials.com/ – Visual Studio Extension Web Essentials.

http://www.html5rocks.com/en/tutorials/developertools/sourcemaps/ – HTML5Rocks Introduction to JavaScript Source Maps.


System.Security.Cryptography.CryptographicException occurred in process…


On my SharePoint development machine where I have Visual Studio each morning when I get into work because my PC is left running overnight, I get the following Visual Studio Just-In-Time Debugger appearing on my screen.

This happens because every night SharePoint 2010 recycles the OWSTIMER.EXE process every night. This is to ensure that the timer service doesn’t run into any memory problems.

Recycling the OWSTIMER process is controlled by a service timer job called “Timer Service Recycle” which runs once a day. Mine runs at 6AM.

If you reset the SharePoint Timer Service manually you can make the Visual Studio Just-In-Time Debugger pop up.

If you find this pop up annoying each day then you can disable it.

Disabling in Visual Studio.

According to Microsoft http://msdn.microsoft.com/en-us/library/5hs4b7a6(v=vs.110).aspx you can disable the Just-In-Time debugger in Visual Studio. I attempted this but it didn’t seem to work. (Maybe I needed to reboot the PC). I’m putting the instructions here just for completeness.

  • Open Visual Studio as Administrator, on the Tools menu, click Options
  • In the Options dialog box, select the Debugging folder.
  • In the Debugging folder, select the Just-In-Time page.
  • In the Enable Just-In-Time debugging of these types of code box, clear the relevant program types: Managed, Native, or Script.

Disabling using Registry

I found this method worked for me.

  • Open up the registry edit. In run type regedit.exe
  • In the Registry Editor window, locate and delete the following registry keys:
    • HKEY_LOCAL_MACHINE\SOFTWARE\Microsoft\Windows NT\CurrentVersion\AeDebug\Debugger
    • HKEY_LOCAL_MACHINE\SOFTWARE\Microsoft\.NETFramework\DbgManagedDebugger
    • HKEY_LOCAL_MACHINE\SOFTWARE\Wow6432Node\Microsoft\Windows NT\CurrentVersion\AeDebug\Debugger
    • HKEY_LOCAL_MACHINE\SOFTWARE\Wow6432Node\Microsoft\.NETFramework\DbgManagedDebugger
  • Close the Registry Editor window.

Being a developer machine, you might actually want the JIT debugger available, if that is the case then I’d recommend putting up with the pop up once a day.

Building Your SharePoint 2013 development machine on Windows Server 2012 – Part 10 – Setting Up Visual Studio


UPDATE: SharePoint 2016 development machine

I am doing a collection of blog posts, you can access the other parts of this post below.

Setting up Visual Studio

The last part of this 10 part series is to set up visual studio so you can start developing on your machine.

  1. From the Start menu, type Visual Studio 2012 and open the application.
  2. As it is the first time Visual studio 2012 has opened, you will be prompted with choose default environment settings dialog. Choose your preference. Mine is Visual C# Development Settings. For the local help documentation, I’m selected None so that I don’t fill up my virtual machine with help files that I can obtain by looking online. Click Start Visual Studio.
  3. As soon as I loaded up my environment, I got a message saying that there are Visual Studio 2012 updates from the system tray of my Server. Either click the icon in the system tray, or select from the Visual Studio menu Tools > Extensions and Updates… Update anything that needs updating.
  4. Close Visual Studio 2012.

Install Office and SharePoint 2013 Developer Tools

  1. From the Start Menu, type Microsoft Web Platform Installer. Open the Application.
  2. Once loaded, in the Search box type SharePoint press Enter.
  3. Select Add for Microsoft Office Developer Tools for Visual Studio 2012 – Preview 2
  4. Then Click Install.
  5. Click I Accept on the Prerequisties page.
  6. Once complete, you will have the Office and SharePoint tools installed for Visual Studio.

Meet IntelliCommand (Visual Studio 2010/2012 extension)


A free extension that can be downloaded from the Extension Manager within Visual Studio, that shows you all possible shortcut keys. It shows the help windows with all the possible combinations when you press Ctrl or Shift or Alt or their combinations. (hold it for about 2 seconds to see this window). Also it shows the list of possible combination when you press first combination of chord shortcut keys, like Ctrl + K, Ctrl + C (this combination comments selected text in editor).

To install, Open up Visual Studio, Click Tools -> Extension Manager. Then search for IntelliCommand inside the online Gallery.