App-Only Auth Connect to SharePoint Online with MSAL and Azure KeyVault


Now that SharePoint Online CSOM is now works with .NET Framework, I thought I would put together a demo using Visual Studio code that connects to SharePoint.

A previous colleague and still good friend of mine Vardhaman Deshpande in June wrote a blog post showing how to connect to SharePoint Online using MSAL. It is so well written that really writing another blog about it seems a little pointless, so I have taken his blog a little further by connecting to a KeyVault in Azure and grabbing the certificate directly from there.

.NET Standard CSOM of SharePoint Online now uses OAuth for authentication. This means an Access Token needs to be grabbed and passed to every call that is made to SharePoint Online. We will do this by grabbing the AppID and Certificate from the KeyVault and then get the Access Token through ConfidentialClientApplicationBuilder. The Access Token will then be passed into the ClientContext so all calls are made with the Access Token to SharePoint Online.

Walk-through Demo

The demo I have put together can be found at my GitHub repository. By using a Azure AD App Registration and a client certificate, I will walk-through the steps here to set up the following:

  • Create a Resource Group in Azure
  • Create a KeyVault
  • Create a Certificate and Store it in the KeyVault
  • Create an Azure AD App registration
  • Store the ClientID in the KeyVault Secrets
  • Grant Azure AD Application permission for SharePoint – Sites.FullControl.All
  • Console code that connects to SharePoint Online.

Setup

To perform all the steps above as a manual walk-through would take a lot of time to go through. Also, where I can automate things I do. Therefore in the GitHub project under the PowerShell Folder there is a PowerShell file called Install-AzureEnvironment.ps1.

This uses AZ Cli and running the below script will create the above for you in your Azure environment. Replace “Contso” with the name of your tenant.

az login
$tenantName = "contso"
# Defaults to UK South
.\Install-AzureEnvironment.ps1 Environment $tenantName Name "SharePointMSAL"
# If wish to change location
#.\Install-AzureEnvironment.ps1 -Environment $tenantName -Name "SharePointMSAL" -Location:'<Location>'

The above will create the following Azure Resources (using the example of Consto as tenant name)

  • Resource Group: Contso-SharePointMSAL
  • App Registration: Contso-SharePointMSAL (Granted with SharePoint > Sites.FullControl.All)
  • Key Vault: Contso-SharePointMSAL (Will be truncated to 24 characters if longer)
  • CertificateName stored in KeyVault Certificates: Contso-SharePointMSAL
  • ClientId stored in KeyVault Secret: ConstoSharePointMSAL

Console Application

Using Visual Studio Code, I’ve create a .NET Core 3.1 console application and added the following nuget packages. Please see my previous blog post “Basic dotnet commands to create C# project in Visual Studio Code” on how to create a Console application and add nuget packages.

  • Microsoft.SharePointOnline.CSOM
    • Used for the SharePoint CSOM calls
  • Microsoft.Identity.Client
    • Used for OAuth authentication
  • Azure.Identity
    • Used for KeyVault authentication
  • Azure.Security.KeyVault.Secrets
    • Used for getting the Secret and Certificate from the vault
  • Microsoft.Extensions.Configuration
    • Used for collecting app.config values
  • Microsoft.Externsions.Configuration.FileExtensions
    • Used for collecting app.config values
  • Microsoft.Extensions.Configuration.Json
    • Used for collecting app.config values

Next you will need to create (or update if cloned the github project) the appsettings.json file. Replace the environment and site values for your environment.

{
"environment": "<tenantName>",
"name": "SharePointMSAL",
"site": "<relative URL e.g, /sites/teamsite>"
}

Then update the program.cs file with the following code. The code has been written assuming your Azure resources using the .\Install-AzureEnvironment.ps1.

using System;
using Microsoft.Identity.Client;
using Microsoft.SharePoint.Client;
using System.Security.Cryptography.X509Certificates;
using System.Threading.Tasks;
using Microsoft.Extensions.Configuration;
using Azure.Identity;
using Azure.Security.KeyVault.Secrets;
namespace SharePointMSAL
{
class Program
{
static async Task Main(string[] args)
{
IConfiguration config = new ConfigurationBuilder()
.AddJsonFile("appsettings.json", true, true)
.Build();
string siteUrl = $"https://{config["environment"]}.sharepoint.com{config["site"]}";
string identity = $"{config["environment"]}-{config["name"]}";
string keyVaultName = GetKeyVaultName(identity);
string certificateName = identity;
string tenantId = $"{config["environment"]}.onmicrosoft.com";
string clientIDSecret = identity.Replace("_","").Replace("-","");
string clientId = GetSecretFromKeyVault(keyVaultName, clientIDSecret);
//For SharePoint app only auth, the scope will be the Sharepoint tenant name followed by /.default
var scopes = new string[] { $"https://{config["environment"]}.sharepoint.com/.default" };
var accessToken = await GetApplicationAuthenticatedClient(clientId, keyVaultName, certificateName, scopes, tenantId);
var ctx = GetClientContextWithAccessToken(siteUrl, accessToken);
Web web = ctx.Web;
ctx.Load(web);
await ctx.ExecuteQueryAsync();
Console.WriteLine(web.Title);
}
private static string GetKeyVaultName(string identity)
{
var keyVaultName = identity;
if (keyVaultName.Length > 24)
{
keyVaultName = keyVaultName.Substring(0, 24);
}
return keyVaultName;
}
private static async Task<string> GetApplicationAuthenticatedClient(string clientId, string keyVaultName, string certificateName, string[] scopes, string tenantId)
{
var certificate = GetAppOnlyCertificate(keyVaultName, certificateName);
IConfidentialClientApplication clientApp = ConfidentialClientApplicationBuilder
.Create(clientId)
.WithCertificate(certificate)
.WithTenantId(tenantId)
.Build();
AuthenticationResult authResult = await clientApp.AcquireTokenForClient(scopes).ExecuteAsync();
string accessToken = authResult.AccessToken;
return accessToken;
}
public static ClientContext GetClientContextWithAccessToken(string targetUrl, string accessToken)
{
ClientContext clientContext = new ClientContext(targetUrl);
clientContext.ExecutingWebRequest += delegate (object oSender, WebRequestEventArgs webRequestEventArgs)
{
webRequestEventArgs.WebRequestExecutor.RequestHeaders["Authorization"] = "Bearer " + accessToken;
};
return clientContext;
}
public static X509Certificate2 GetAppOnlyCertificate(string keyVaultName, string certificateName)
{
var keyVaultUrl = $"https://{keyVaultName}.vault.azure.net";
var client = new SecretClient(new Uri(keyVaultUrl), new DefaultAzureCredential());
KeyVaultSecret keyVaultSecret = client.GetSecret(certificateName);
X509Certificate2 certificate = new X509Certificate2(Convert.FromBase64String(keyVaultSecret.Value), string.Empty,
X509KeyStorageFlags.MachineKeySet |
X509KeyStorageFlags.PersistKeySet |
X509KeyStorageFlags.Exportable);
return certificate;
}
public static string GetSecretFromKeyVault(string keyVaultName, string secretName){
var keyVaultUrl = $"https://{keyVaultName}.vault.azure.net";
var client = new SecretClient(new Uri(keyVaultUrl), new DefaultAzureCredential());
KeyVaultSecret keyVaultSecret = client.GetSecret(secretName);
return keyVaultSecret.Value;
}
}
}

After the code runs it will display the site Title. In my case ‘TestAPISite’.

The important piece of code to get the certificate from Azure Key Vault is GetAppOnlyCertificate function on line 78. This is using the new Azure.Identity and Azure.Security.KeyVault.Secrets libraries.

The Azure.Identity information can be found here: https://docs.microsoft.com/en-us/dotnet/api/overview/azure/identity-readme?view=azure-dotnet

The key to authentication to the KeyVault is on line 82 using DefaultAzureCredential, as this attempts to connect using different authentication methods. Once connected, it retrieves the certificate value and creates a X509Certificate2 certificate in memory. The only confusing part of the code is using Azure.Security.KeyVault.Secrets to get the value not Azure.Security.KeyVault.Certificates.

The image below taken from the Microsoft documentation, shows how the DefaultAzureCredential will attempt to authenticate via the following mechanisms in order.

https://docs.microsoft.com/en-us/dotnet/api/overview/azure/identity-readme?view=azure-dotnet#defaultazurecredential
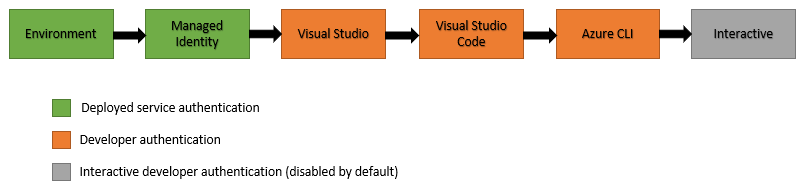
  • Environment – The DefaultAzureCredential will read account information specified via environment variables and use it to authenticate.
  • Managed Identity – If the application is deployed to an Azure host with Managed Identity enabled, the DefaultAzureCredential will authenticate with that account.
  • Visual Studio – If the developer has authenticated via Visual Studio, the DefaultAzureCredential will authenticate with that account.
  • Visual Studio Code – If the developer has authenticated via the Visual Studio Code Azure Account plugin, the DefaultAzureCredential will authenticate with that account.
  • Azure CLI – If the developer has authenticated an account via the Azure CLI az login command, the DefaultAzureCredential will authenticate with that account.
  • Interactive – If enabled the DefaultAzureCredential will interactively authenticate the developer via the current system’s default browser.

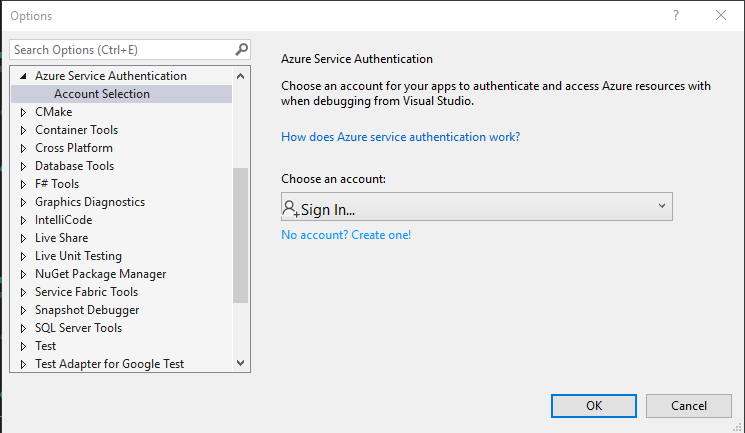
Note: When I first ran my code on Visual Studio Code, I kept getting an authentication issue, it was because I had Visual Studio Enterprise installed on my machine and it was picking up the authentication method selected there which was pointing to a different tenant. You can see this in Visual Studio Enterprise by going into Tools > Options

The great thing about DefaultAzureCredential, is that if this code was within a Azure Function, I could run it first on my computer, then deploy it to Azure Functions with a Managed Identity, and it would still work without any changes to the code.

I hope you find this blog post useful.

Viewing, Restoring and Removing Items from the SharePoint Recycle Bin – The attempted operation is prohibited because it exceeds the list view threshold enforced by the administrator.


I’ve had a script for a while that allows you to view all the items in the Recycle Bin for a Site Collection and prints out to a CSV file. Recently the environment I’ve been running this in has been throwing an error saying;

The attempted operation is prohibited because it exceeds the list view threshold enforced by the administrator“.

Getting all items out of the recycle bin.

Originally, I used the PNP Powershell command Get-PnPRecycleBinItem and it was only when I did a Google search for this issue, I found that other people were also having this problem. The PnP team have solved this issue now by adding -RowLimit parameter. If you set the RowLimit high enough you can return all items, as internally, it seems to implement a paging mechanism.

I now use the below script to export the result to a CSV file.

<#
.SYNOPSIS
Loops through the recycle bin and output a csv string.
Uses PNP Powershell.
.EXAMPLE
-URL:'https://<tenant&gt;.sharepoint.com/sites/<siteCollection>' -Stage:First -Path:.\FirstRecycleBin.csv
-URL:'https://<tenant&gt;.sharepoint.com/sites/<siteCollection>' -Stage:First -Path:.\FirstRecycleBin.csv -RowLimit:200000
#>
[CmdletBinding(SupportsShouldProcess)]
param(
# The url to the site containing the Site Requests list
[Parameter(Mandatory)][string]$URL,
[Parameter(Mandatory)][ValidateSet("First", "Second")][string]$Stage,
[Parameter(Mandatory)][string]$Path,
[int]$RowLimit=150000
)
Connect-PnPOnline -Url:$URL -UseWebLogin
Write-Host "Getting recycle bin items..."
$RecycleStage;
if ($Stage -eq "First") {
$RecycleStage = Get-PnPRecycleBinItem -FirstStage -RowLimit 150000
}
else {
$RecycleStage = Get-PnPRecycleBinItem -SecondStage -RowLimit 150000
}
$Output = @()
$RecycleStage | ForEach-Object {
$Item = $PSItem
$Obj = "" | Select-Object Title, AuthorEmail, AuthorName, DeletedBy, DeletedByEmail, DeletedDate, Directory, ID, ItemState, ItemType, LeafName, Size
$Obj.Title = $Item.Title
$Obj.AuthorEmail = $Item.AuthorEmail
$Obj.AuthorName = $Item.AuthorName
$Obj.DeletedBy = $Item.DeletedByName
$Obj.DeletedByEmail = $Item.DeletedByEmail
$Obj.DeletedDate = $Item.DeletedDate
$Obj.Directory = $Item.DirName
$Obj.ID = $Item.ID
$Obj.ItemState = $Item.ItemState
$Obj.ItemType = $Item.ItemType
$Obj.LeafName = $Item.LeafName
$Obj.Size = $Item.Size
$output += $Obj
}
$Output | Export-csv $Path -NoTypeInformation
Write-Host "Done"

Once I have the CSV file, I’m able to filter further in excel and save back to CSV to use to either Restore / Delete the items out of the recycle bin.

Restoring Deleted Items using a csv file.

It seemed that now that I can use RowLimit with Get-PnPRecycleBinItem I should be able to call Restore-PnpRecycleBinItem to restore the item. However, this isn’t the case. Even just passing the Identity of one item within the Recycle Bin, you get the same error message.

The attempted operation is prohibited because it exceeds the list view threshold enforced by the administrator“.

There is no RowLimit option on the Restore-PnpRecycleBinItem. The code must internally make a call to get all RecycleBin Items first without using RowLimit. Interestingly though, a user could go to a recycle bin, see items, and restore them if they wanted to. By looking through the network traffic, I was able to see that the GUI uses the following API to Restore Items.

POST /_api/site/RecycleBin/RestoreByIds

Passing in the following JSON body.

{
"ids": [
"b1a30d73-917a-4fdc-82f0-ba6e9881710b",
"2dbce811-cbaa-4818-a458-6ef3de70530b",
"17a0d047-efbb-4524-b7f4-32289b01cc3c",
"8c90ef0d-8b2d-468d-8b8e-f9af4c10f58b"
]
}

There can be one or many Ids.

The trouble with using REST API you need an accessToken. Using the Invoke-PnPSPRestMethod it automatically provides the AccessToken in the call.

This is what I do in the below code. Loop through every item in a CSV file to restore, and call “/_api/sites/RecycleBin/RestoreByIds” using Invoke-PnPSPRestMethod.

[CmdletBinding(SupportsShouldProcess)]
param(
# The URL of the Sitecollection where the recycle bin is.
[Parameter(Mandatory)]
[string]
$SiteUrl,
# Full Path of CSV file of Get-AllRecycleBin.ps1
[Parameter(Mandatory)]
[string]
$Path
)
function Restore-RecycleBinItem {
param(
[Parameter(Mandatory)]
[String]
$Id
)
$siteUrl = (Get-PnPSite).Url
$apiCall = $siteUrl + "/_api/site/RecycleBin/RestoreByIds"
$body = "{""ids"":[""$Id""]}"
Write-Verbose "Performing API Call to Restore item from RecycleBin..."
try {
Invoke-PnPSPRestMethod -Method Post -Url $apiCall -Content $body | Out-Null
}
catch {
Write-Error "Unable to Restore ID {$Id}"
}
}
$ErrorActionPreference = 'Continue'
$InformationPreference = 'Continue'
Connect-PnPOnline -Url:$SiteUrl -UseWebLogin
@($(Import-Csv -Path:"$Path")).ForEach({
$csv = $PSItem
Write-Information -MessageData:"Restore item $($csv.Title)"
Restore-RecycleBinItem -Id $($csv.ID)
})

Deleting Deleted Items using a csv file.

I discovered that I also get the error message when using Clear-PnpRecycleBinItem.

Again, I was able to do this in the GUI, and looking at the network traffic there is an API to delete the items.

POST /_api/site/RecycleBin/DeleteByIds

The JSON body is same format as the RestoreByIds, where it passes in one or many Ids.

The code below is almost identical to the Restore-RecycleBinItems.ps1. Passing in a CSV file with the IDs of files to delete permanently.

[CmdletBinding(SupportsShouldProcess)]
param(
# The URL of the Sitecollection where the recycle bin is.
[Parameter(Mandatory)]
[string]
$SiteUrl,
# Full Path of CSV file of Get-AllRecycleBin.ps1
[Parameter(Mandatory)]
[string]
$Path
)
function Clear-RecycleBinItem {
param(
[Parameter(Mandatory)]
[String]
$Id
)
$siteUrl = (Get-PnPSite).Url
$apiCall = $siteUrl + "/_api/site/RecycleBin/DeleteByIds"
$body = "{""ids"":[""$Id""]}"
Write-Verbose "Performing API Call to delete item from RecycleBin..."
try {
Invoke-PnPSPRestMethod -Method Post -Url $apiCall -Content $body | Out-Null
}
catch {
Write-Error "Unable to Delete ID {$Id}"
}
}
$ErrorActionPreference = 'Continue'
$InformationPreference = 'Continue'
Connect-PnPOnline -Url:$SiteUrl -UseWebLogin
@($(Import-Csv -Path:"$Path")).ForEach({
$csv = $PSItem
Write-Information -MessageData:"Delete item $($csv.Title)"
Clear-RecycleBinItem -Id $($csv.ID)
})

Fixing a Document Content Type that I could not change in SharePoint


I have come across a problem today, that initially had me stumped. A word document had a custom content type assigned to it, but it was the wrong one. The user was unable to change the content type. First, I thought it might be permissions, but I also couldn’t change the content type. The version number continued to go up, which indicates something was being saved, but the content type just wasn’t changing.

Steps to attempt to change the Content Type

  • On the library select the document you wish to change the content type for.
  • Go to the Information Panel and scroll down to Properties.

  • I first tried to change the Content type directly in the Information Panel, but it just flicked back. Next, I tried to click Edit all.

  • I clicked on the Content Type, and from the drop down I change the Content Type to Document.

  • The screen shot above, shows the document after 2 attempts of changing the Content Type. Notice how the version number has changed, but the Content Type still stuck.

How to fix

  • Open the document in the desktop version.

  • In the client application click File.
  • Note: You won’t be able to do the following if Protect Document is enabled, and you don’t have the password.
  • In the Info section, where is says Inspect Document click the Check for Issues button, then Inspect Document

  • On the Document Inspector dialog, Click Inspect

  • Once Inspected, click Remove All button under the Document Properties and Personal Information section.

  • Close the Document Inspector dialog.
  • Save the file (If Autosave isn’t on)
  • Close the Client Application
  • The SharePoint list will show that the file is now of Content Type “Document” (Or whatever is the first/default Content Type in your library) and the version number has gone up once more.

If you need to, you should be able to change the content type without any issues.

I’m not 100% sure, but I believe this is happening because the content type that has been saved within the document is corrupted/different from the same name content type with the one in the library. I believe this has happened in the user’s environment, where the document was originally in a library with an older version of the content type in a different site collection. Then moved to a newer library. The content type exists in the newer library (as we provision all our sites with PNP), but it has changed slightly, for example a column has the same name but different ID.

When you clear the content type from the document, when it is saved back to the SharePoint library, it grabs the information from the library and puts the new content type information back into the document. Going forward, there will be no more corruption or conflict. Although it might be possible to have the issue again if you move the document back to the other library in the other site collection with the older version of a content type.

Finding the related Site from Teams Private Channel Site


Private Channels gives the ability to restrict the membership further within a Team site. A person can create a private channel, like creating a public channel, except they can add owners/members to the channel from a subset of members from the Team site.

When a private channel is created, what is happening under the covers is a creation of another SharePoint site. A cut down version of a SharePoint site, using the Template TEAMCHANNEL#0. (ID: 69 for those that want to know)

As this is my first blog post about Private Channels, let me demonstrate quickly how to create a Private Channel.

How to add a private channel

  • From MS Teams click on the ellipse next to your Team name, and select Add Channel.
  • Give the channel a name, optional description, and select “Private – Only accessible to a specific group of people within the team”
  • Click Next. On the next page you can add people from the Team to have access to the Private Channel. They can be an Owner of the channel even if they are only a member within the Team.
  • The private channel will show up as a channel underneath your team, with a pad lock next to it, indicating that it is a private site. You will only see this channel if you are a owner/member of the channel.
  • The SharePoint site – which you can get to by clicking on files Open in SharePoint – has the URL made up of https://<tenant>.sharepoint.com/sites/<TeamName>-<ChannelName> and the home page of the site is the root of the Shared Document library.

Finding the related site

There are a couple of places I have found out where to get the related site.

Property Bag and Graph API

When I did a PNP Get-ProvisioningTemplate pointing at a private channel site, I discovered in the property bag there is a value called RelatedGroupId and it is Indexed.

  <pnp:PropertyBagEntry Key=“RelatedGroupId” Value=“d99aa865-cd55-46cc-b256-177975ad3e13” Overwrite=“false” Indexed=“true” />

With this value you can then get the SharePoint site of the MS Team using Graph API

https://graph.microsoft.com/v1.0/groups/<group-id>/sites/root?$select=webUrl

or

https://graph.microsoft.com/v1.0/groups/<group-id>/sites/root/weburl

Note: On the parent Team site, there is a property bag value called GroupId. It also has RelatedGroupId, which has the same value.

CSOM using the Site object

The related GroupID can also be obtained in CSOM via the Site object.

Site site = context.Site;
context.Load(site, s => s.RelatedGroupId);
context.ExecuteQueryRetry();

Showing all the private channels from the main SharePoint site

When I used PNP to obtain the Private Channel template and discovered the RelatedGroupId was in the property bag and that it was indexed, means that it is searchable. If you check the Manage Search Schema, you will find the managed property.

This means doing a simple search like below, will return all the private channel sites.

RelatedGroupId:<GroupID> contentclass:STS_Site

Using the Microsoft Search PnP Modern Search SPFX (https://github.com/microsoft-search/pnp-modern-search/releases/tag/3.8.0), very quickly I was able to display links.

For someone who only has access to one of the Private Channels, they will only see one in search.

Updating an expired Client Secret of a SharePoint Add-in using Azure-AD/Az Cli


Back in May 2016, I wrote a post to show you how to update the Client Secret of a SharePoint add-in. This used the PowerShell module MSOL. https://cann0nf0dder.wordpress.com/2016/05/18/updating-an-expired-client-secret-of-sharepoint-add-in/

The MSOL module is now (or going to be) deprecated. Therefore, I needed to find a different way of doing this, and ideally something that could be done with Azure Dev-ops pipelines. I originally started with AZ CLI. Although the Client Secret is tied to a Service Principal in Azure AD, I was unable to change the Key Credentials or Password Credentials for it.

Due to the issues I was getting with AZ CLI, I used Azure-AD module instead. See at end of blog post, how I got Az CLI to work with a workaround.

Updating Client Secret

Connect to Azure-AD

First you will need to connect to Azure-AD

#Install AzureAD
Write-Information -MessageData:"Getting if the AzureAD powershell module is available..."
if(-not (Get-Module AzureAD)) {
Write-Information -MessageData:"Installing the NuGet Package provider..."
Install-PackageProvider -Name:NuGet -Force -Scope:CurrentUser
Write-Information -MessageData:"Installing the AzureAD Powershell Module..."
Install-Module AzureAD -Scope:CurrentUser -Force
}
$Credential = Get-Credential
Connect-AzureAD -Credential $Credential

The above code ensures that you have Azure AD installed on your machine, and logs you in.

Getting the Add-in as a Service Principal

Once you have logged in, you will be able to call back your SharePoint Add-in. The SharePoint Add-in is actually a Service Principal within Azure AD, and we will grab this using Get-AzureADServicePrincipal. You can do this by using the AppId, or the AppName. The AppId is fine to use, but when you want to use the same script across multiple environments, you will need to ensure you are passing in the different AppId for each environment. THis is why I have used the Name of the Add-In. (Assuming you have given your App the same name in each environment)

$serviceprincipal = Get-AzureADServicePrincipal -All:$true -Filter "DisplayName eq 'Demo App'"
#OR If using APP ID.
$serviceprincipalByID = Get-AzureADServicePrincipal -All:$true -Filter "AppId eq 'ab739749-827d-4437-90e5-bf181c5407e0'"

Create a new Secret

Next you need to be able to create a new secret. This is done by creating random bytes and converting to a Base64String. I ensure the password is valid for an additional 2 years.

$bytes = New-Object Byte[] 32
$rand = [System.Security.Cryptography.RandomNumberGenerator]::Create()
$rand.GetBytes($bytes)
$rand.Dispose()
$newClientSecret = [System.Convert]::ToBase64String($bytes)
$dtStart = [System.DateTime]::Now
$dtEnd = $dtStart.AddYears(2)
write-output $newClientSecret

Create Key Credentials and Password Credential for the App

The SharePoint Add-In requires 2 Key Credentials (One Sign and one Verify) and 1 Password Credentials. The following script creates new ones, this allows both the old password and the new password to continue working at the same time, until you are able to update the code that uses the ClientID and ClientSecret.

Write-Information "Updating KeyCredential Usage Sign..."
New-AzureADServicePrincipalKeyCredential -ObjectId $serviceprincipal.ObjectId -Type:Symmetric -Usage:Sign -Value $newClientSecret -StartDate $dtStart -EndDate $dtEnd | Out-Null
Write-Information "Updating KeyCredential Usage Verify..."
New-AzureADServicePrincipalKeyCredential -ObjectId $serviceprincipal.ObjectId -Type:Symmetric -Usage:Verify -Value $newClientSecret -StartDate $dtStart -EndDate $dtEnd | Out-Null
Write-Information "Updating PasswordCredential..."
New-AzureADServicePrincipalPasswordCredential -ObjectId $serviceprincipal.ObjectId -Value $newClientSecret -StartDate $dtStart -EndDate $dtEnd | Out-Null

Removing the original Key and Password Credential for the App

The following code shows how to loop round the Key and Password credentials and remove the original ones. It does this by looking for any Credentials that were created before the start date of the new ones. I would only run this part of my code, once I know I have updated my application to use the new password. Not in my example here, but where I’m using it in the real world, my Client Secret is stored within a Keyvault. I would update the keyvault value (ensuring to disable the previous version).

Write-Information "Remove all KeyCredential started before $(Get-Date $dtStart -Format 'O' )..."
$serviceprincipal = Get-AzureADServicePrincipal -All:$true -Filter "DisplayName eq '$SharePointAddInName'"
$serviceprincipal.KeyCredentials | ForEach-Object{
$credential = $PSItem
if($($credential.StartDate) -lt $dtStart)
{
Write-Information -MessageData:"Removing KeyCredential $($credential.KeyId)"
Remove-AzureADServicePrincipalKeyCredential -ObjectId:$serviceprincipal.ObjectId -KeyId:$credential.KeyId
}
}
Write-Information "Remove all PasswordCredential started before $(Get-Date $dtStart -Format 'O' )..."
$serviceprincipal.PasswordCredentials | ForEach-Object{
$credential = $PSItem
if($($credential.StartDate) -lt $dtStart)
{
Write-Information -MessageData:"Removing PasswordCredential $($credential.KeyId)"
Remove-AzureADServicePrincipalPasswordCredential -ObjectId:$serviceprincipal.ObjectId -KeyId:$credential.KeyId
}
}

Connecting with AZ Cli Workaround

Using Azure Dev-Ops Pipeline, I really wanted to use AZ cli to be able to update the Client Secret of a SharePoint Add-in. Due to the error messages when I attempted to update the Service Principal Key Credential and Password Credentials, I was forced to use Azure-AD instead. So how can I uses AZ Cli.

My Dev-Ops Pipeline uses a service account, and I have ensured this service account has permissions to update the directory.

Then I can connect from Az Cli to Azure-AD doing the following:

#Once signed into Azure CLI
$Token = az account get-access-token --resource-type "aad-graph" | ConvertFrom-Json
$AzAccount = az account show | ConvertFrom-Json
Connect-AzureAD -AadAccessToken $($Token.accessToken) -AccountId:$($AzAccount.User.Name) -TenantId:$($AZAccount.tenantId)

I add the above code in the full script just after the parameter, as the pipeline will already be signed in as the Pipeline Service Principal. It will then grab the Access token to sign in with Azure AD, and then able to run the rest of the script.

Full Script

<#
.SYNOPSIS
Updates the SharePoint Add-in Secret everytime.
It expects that you are already connected to Azure AD
.EXAMPLE
.\Update-SharePointAddIn.ps1 -SharePointAddInName "Demo App"
#>
param(
[Parameter(Manadatory)]
[string]
$SharePointAddInName
)
$ErrorActionPreference = 'Stop'
$InformationPreference = 'Continue'
#Call AzCliToAzureAD.ps1 here for Pipeline.
#Create Pasword
$bytes = New-Object Byte[] 32
$rand = [System.Security.Cryptography.RandomNumberGenerator]::Create()
$rand.GetBytes($bytes)
$rand.Dispose()
$newClientSecret = [System.Convert]::ToBase64String($bytes)
$dtStart = [System.DateTime]::Now
$dtEnd = $dtStart.AddYears(2)
Write-Information "Getting service principal named: $SharePointAddInName..."
$serviceprincipal = Get-AzureADServicePrincipal -All:$true -Filter "DisplayName eq '$SharePointAddInName'"
if($null -eq $serviceprincipal)
{
Write-Error "Unable to find service principal named: $SharePointAddInName"
}
Write-Information "Updating KeyCredential Usage Sign..."
New-AzureADServicePrincipalKeyCredential -ObjectId $serviceprincipal.ObjectId -Type:Symmetric -Usage:Sign -Value $newClientSecret -StartDate $dtStart -EndDate $dtEnd | Out-Null
Write-Information "Updating KeyCredential Usage Verify..."
New-AzureADServicePrincipalKeyCredential -ObjectId $serviceprincipal.ObjectId -Type:Symmetric -Usage:Verify -Value $newClientSecret -StartDate $dtStart -EndDate $dtEnd | Out-Null
Write-Information "Updating PasswordCredential..."
New-AzureADServicePrincipalPasswordCredential -ObjectId $serviceprincipal.ObjectId -Value $newClientSecret -StartDate $dtStart -EndDate $dtEnd | Out-Null
#Update the application here.
#For example add the secret to a key vault that the application is getting the secret from.
Write-Information "Remove all KeyCredential started before $(Get-Date $dtStart -Format 'O' )..."
$serviceprincipal = Get-AzureADServicePrincipal -All:$true -Filter "DisplayName eq '$SharePointAddInName'"
$serviceprincipal.KeyCredentials | ForEach-Object{
$credential = $PSItem
if($($credential.StartDate) -lt $dtStart)
{
Write-Information -MessageData:"Removing KeyCredential $($credential.KeyId)"
Remove-AzureADServicePrincipalKeyCredential -ObjectId:$serviceprincipal.ObjectId -KeyId:$credential.KeyId
}
}
Write-Information "Remove all PasswordCredential started before $(Get-Date $dtStart -Format 'O' )..."
$serviceprincipal.PasswordCredentials | ForEach-Object{
$credential = $PSItem
if($($credential.StartDate) -lt $dtStart)
{
Write-Information -MessageData:"Removing PasswordCredential $($credential.KeyId)"
Remove-AzureADServicePrincipalPasswordCredential -ObjectId:$serviceprincipal.ObjectId -KeyId:$credential.KeyId
}
}

Unable to change Office 365 Group Membership


Was recently having a problem trying to change the group membership of a 365 Group. I was trying to add external users to the group, and through SharePoint it always redirects you to Outlook to do this.

  • Click on members top right of the screen.
  • Click Add members
  • Click go to Outlook to add Guests.
  • This should redirect you to the group information for the group, where you can edit; about this group, change membership, see emails, and files related to the group.

The problem I was getting, was that as soon as it hit the above page, it was redirecting to https://outlook.office365.com/people/. I also couldn’t see the Groups part, as highlighted below.

It made no sense that I couldn’t see it, I was a global administrator, I created the site, I was an owner of the site, I had a E5 license.

It turned out, it was a simple thing that took Microsoft Support, and several engineers a while to help me solve. Somehow my account mailbox had been converted to a Shared Mailbox. How or why this happened doesn’t matter.

By going to the Exchange admin centre, clicking on Recipients and Shared it displays all the Shared Mailboxes.

In the example above, David Mamam (a made-up person in my demo tenant) has a Shared Mailbox. If David attempted to click on the ‘go to outlook’ link in the SharePoint site, he would be re-directed to https://outlook.offic365.com/people. To fix this problem, David’s mailbox needs to be converted back to a regular mailbox.

To do this, click on the ‘convert’ link underneath the ‘Convert to Regular Mailbox’ within the Exchange admin center, as show above. The conversion takes a few moments.

Once complete, the user will be able to click the link to modify the Office 365 Group that they were an owner of.

Setting up a O365 Dev Tenant – Part 6 – Set up SharePoint Tenant


Introduction

In this series of posts, I will explain how you can set up a Development O365 Tenant quickly. Using PowerShell scripts, at the end of this process, you will have:

  • A O365 Development Tenant with 25 “DEVELOPERPACK” Licenses.
  • 25 Users assigned with license
  • A total of 274 Users added to the Tenant
    • Set up for multiple offices
    • Organisational structured
  • All users will be MFA enabled
  • All users will have photos added to their accounts
  • Enabling Office 365 Auditing
  • Setting up the SharePoint Tenant Settings and enabling Public CDN for SPFX

Unfortunately, I have found it impossible to do the following via PowerShell scripts, and these would need to be done manually. I haven’t included this information within these blog post.

  • Create a Tenant App Catalog
  • Set Organisation Details
  • Set Login Branding
  • Set Tenant Branding

Obtaining the code

I have stored my code on GitHub at the following URL for cloning. https://github.com/pmatthews05/SetupDevTenant.git

Setting up the SharePoint Tenant

SharePoint Tenant has many different settings. Here my script is just calling the PNP powershell command Set-PnPTenant. More information about each setting can be found here. https://docs.microsoft.com/en-us/powershell/module/sharepoint-pnp/set-pnptenant?view=sharepoint-ps

If you already have a SharePoint tenant that you want to have exact same settings on your environment, you just need to go to that tenant, sign into the SharePoint admin URL with PNP, and then run

Get-PnPTenant | ConvertTo-Json > .\othertenant.json

This will output a json file that will read in with my script, but you will need to add the following to “PublicCdnOrigins” and sets PublicCdnEnabled to True. as it never reads this in with this command.

“PublicCdnEnabled”: true,
“PublicCdnOrigins”: [
   “*/MASTERPAGE”,
   “*/STYLE LIBRARY”,
   “*/CLIENTSIDEASSETS”
]

Inside the Settings folder, you will find a pre-configured SPTenantSettings.json file. I have put all the parameters in alphabetical order to make it easier to read. This is a typical setup I use, but it probably isn’t what you want. Especially around Sharing. I don’t allow sharing to anonymous users (SharingCapability). I also set Direct default sharing link (DefaultSharingLinkType).

To run this script you first need to connect to the admin site, using Connect-PnPOnline.

Connect-PnPOnline -url:https://[tenant]-admin.sharepoint.com -useweblogin

Now you are connected, you can call the Set-SharePointTenant.ps1 file.

.\Set-SharePointTenant.ps1 -SettingsPath:'.\settings\SPTenantSettings.json'

There are two settings that will require a confirmation that for some reason cannot be pre applied in PowerShell. These settings are OneDriveForGuestsEnabled and OrphanedPersonalSitesRetentionPeriod.


If you are running the template I provided, once the script has finished running your Public CDN will also be turned on.

Using PowerShell, type the following and you will see that the configuration is pending. This takes up to 15 minutes before it is fully enabled. You can keep calling the below command until it no longer says Configuration Pending.

Get-PnPTenantCdnOrigin –CdnType Public

Intune and Azure Directory Premium

In lines 84-86 of Set-SharePointTenant.ps1 there are 3 settings that I have commented out (ConditionalAccessPolicy, AllowDownloadingNonWebViewableFiles and AllowEditing). These settings require Intune and Azure Active Directory Premium subscription. As this is a development tenant, there is no need to set these settings.

I hope you have found this series useful and are able to setup within a couple of days due to Microsoft back end processes a SharePoint Development tenant that you can work with. I am more than happy for anyone to help expand/improve on my GitHub project.

Setting up a O365 Dev Tenant – Part 5 – Turning on O365 Auditing


Introduction

In this series of posts, I will explain how you can set up a Development O365 Tenant quickly. Using PowerShell scripts, at the end of this process, you will have:

  • A O365 Development Tenant with 25 “DEVELOPERPACK” Licenses.
  • 25 Users assigned with license
  • A total of 274 Users added to the Tenant
    • Set up for multiple offices
    • Organisational structured
  • All users will be MFA enabled
  • All users will have photos added to their accounts
  • Enabling Office 365 Auditing
  • Setting up the SharePoint Tenant Settings and enabling Public CDN for SPFX

Unfortunately, I have found it impossible to do the following via PowerShell scripts, and these would need to be done manually. I haven’t included this information within these blog post.

  • Create a Tenant App Catalog
  • Set Organisation Details
  • Set Login Branding
  • Set Tenant Branding

Obtaining the code

I have stored my code on GitHub at the following URL for cloning. https://github.com/pmatthews05/SetupDevTenant.git

Turning on and setting permissions for Office 365 Auditing

At the URL https://protection.office.com you have access to the Security & Compliance Center. There is lots you can do in this area of O365, but I am just going to talk about Auditing in this post.

In the left hand navigation of Office 365 Security & Compliance, expand Search and select Audit Log Search. Yours should be like the screen shot above and has a yellow banner that states you need to turn auditing on. There is a button at the end, and this allows you to turn it on.

My script, Set-Office365Auditing.ps1 not only turns on the Auditing, but it assigns a group of users to have view-only access to the Audit logs.

Enable-OrganizationCustomization

Before you can run my script, the above command needs to be run first, and you need to wait a while before you can run my script below. Due to the time I was working on this blog, I ended up waiting 24 hours before I ran my next script. I’m not sure how long you have to wait.

You need to use the Microsoft Exchange Online PowerShell Module. If you haven’t already downloaded this from part 3 of this series, please follow my previous blog about how to do this correctly. https://cann0nf0dder.wordpress.com/2019/04/14/unable-to-download-the-exchange-online-powershell-module-deployment-and-application-do-not-have-matching-security-zones/

Open Microsoft Exchange Online PowerShell Module. You will need to connect first, before running the script. It allows you to control the signing in.

Connect-EXOPSSession -userPrincipalName [user.name]@[tenant].onmicrosoft.com

Now you can run

Enable-OrganizationCustomization 

Running Set-UserAccountsOnline.ps1

This script uses the Microsoft Exchange Online Powershell Module, and ViewAuditUsers.csv file. It will:

  • Create a new RoleGroup called “View Audits Only
  • Add Users from the CSV file to the RoleGroup
  • Lastly it will turn on Auditing for O365.

Before you run any code, you will need to replace [User.Name] on line 2 of the ViewAuditUsers.csv to your User Name.

Open Microsoft Exchange Online PowerShell Module. You will need to connect first, before running the script. It allows you to control the signing in.

Connect-EXOPSSession -userPrincipalName [user.name]@[tenant].onmicrosoft.com

Now you are connected, you can call the Set-Office365Auditing.ps1 file.

.\Set-Office365Auditing.ps1 -Path:'.\data\ViewAuditUsers.csv' -TenantDomain:'[mytenant].onmicrosoft.com' 

Replace [mytenant] with your tenant name.

If you now head to the Exchange admin center.

Viewing Audit Logs

At the URL https://protection.office.com you have access to the Security & Compliance Center. In the left hand navigation of Office 365 Security & Compliance, expand Search and select Audit Log Search. As you have just turned on Auditing, you might see the yellow/orange message that I have on my screen shot below.

Because you started recording user and admin activities within the last 24 hours, some activities might not show up in search results yet.

After a little while, (at least an hour) you will start receiving results when you click Search.

For a user that doesn’t have access, as you haven’t given them View Audits permission, they will get an error message when going directly to the URL.

In this blog post we have turned on the Office 365 Auditing and assigned a few users to have access. In my next and last blog post in this series, I will be setting up my SharePoint tenant admin properties and ensuring public CDN is turned on for SPFX.

Setting up a O365 Dev Tenant – Part 4 – Upload User Photos to SharePoint


Introduction

In this series of posts, I will explain how you can set up a Development O365 Tenant quickly. Using PowerShell scripts, at the end of this process, you will have:

  • A O365 Development Tenant with 25 “DEVELOPERPACK” Licenses.
  • 25 Users assigned with license
  • A total of 274 Users added to the Tenant
    • Set up for multiple offices
    • Organisational structured
  • All users will be MFA enabled
  • All users will have photos added to their accounts
  • Enabling Office 365 Auditing
  • Setting up the SharePoint Tenant Settings and enabling Public CDN for SPFX

Unfortunately, I have found it impossible to do the following via PowerShell scripts, and these would need to be done manually. I haven’t included this information within these blog post.

  • Create a Tenant App Catalog
  • Set Organisation Details
  • Set Login Branding
  • Set Tenant Branding

In my previous post, I showed you how to import user photos into exchange. As we could only add 25 user pictures due to licensing constraints, this post will show you how to upload all the pictures into SharePoint.

Obtaining the code

I have stored my code on GitHub at the following URL for cloning. https://github.com/pmatthews05/SetupDevTenant.git

Running Set-UserPhotosInSharePoint.ps1

Before running this code, I wish to give a shout out to Christopher Walker, who had a PowerShell function for resizing images in a Gist. Thank you. https://gist.github.com/someshinyobject/617bf00556bc43af87cd

This script uses the AzureADUser.csv file and the UserImages profile pictures. It will:

  • Loop through the CSV
  • Create 3 different sized images for the user
  • Upload the 3 images to Root MySite.

To run the script, you need to install PNP PowerShell. Follow the instruction here how to install if you encounter issues. https://docs.microsoft.com/en-us/powershell/sharepoint/sharepoint-pnp/sharepoint-pnp-cmdlets?view=sharepoint-ps

Basically, if you haven’t done this previously, run PowerShell as Administrator. Then type:

Install-Module SharePointPnPPowerShellOnline -SkipPublisherCheck -AllowClobber

You will need to connect first to your root MySite, before running the script. It allows you to control the signing in, for example if you didn’t make your account MFA, then you don’t need to use the command UseWebLogin and just sign in with your credentials.

Connect-PnPOnline -url:https://[tenant]-my.sharepoint.com -useweblogin

Now you are connected, you can call the Set-UserPhotosInSharePoint.ps1 file.

.\Set-UserPhotosInSharePoint.ps1 -Path:'.\data\AzureADUsers.csv' -TenantDomain:'[tenant].onmicrosoft.com' 

Replace [tenant] with your tenant name.

This script is idempotent, so you can run it again at any point if there was an issue.

Once the script is complete, if you go to the following URL you will find pictures imported into the library at the root of the mysites.

https://[tenant]-my.sharepoint.com/User%20Photos

When the code is running, you might have noticed, in the UserImages folder, there is a new subfolder called Resize. This is where all the images are copied and resized to before being uploaded to SharePoint.

Running Set-UserProfilePhotosInSharePoint.ps1

At this point, all you really have done is uploaded pictures to SharePoint, they are not tied to the user at all. The following script will update the SharePoint user profile to point to the correct image.

Firstly, before you can run this script, we need to ensure that SharePoint online has already found your users and added them to the user profile.

  • Navigate to https://[tenant]-admin.sharepoint.com
  • Click the link to the Classic SharePoint admin centre which can be found in the left-hand navigation
  • Click User Profiles from the left-hand navigation
  • Here you should be able to see the number of User Profiles registered.

As you can see from my screen shot above my SharePoint has only registered 3 user profile so far. As we have no control over this, I will need to wait until SharePoint Online has done is syncing. This can take up to 24 hours.

After checking back later I can now see that I have user profiles for all users within Azure AD.

This code sets the UserProfile property PictureURL to [tenant]-my.sharepoint.com/user photos/profile pictures/[firstname_lastname_tenant]onmicrosoft_com_LThumb.jpg and sets the UserProfile property SPS-PicturePlaceholderState
to 0. By setting the value to 0, it indicate that SharePoint online should show the uploaded picture for the user.

First you need to connect to the admin site.

Connect-PnPOnline -url:https://[tenant]-admin.sharepoint.com -useweblogin

Now you are connected, you can call the Set-UserProfilePhotosInSharePoint.ps1 file.

.\Set-UserProfilePhotosInSharePoint.ps1 -Path:'.\data\AzureADUsers.csv' -TenantDomain:'[tenant].onmicrosoft.com' 

Replace [tenant] with your tenant name.

Once the script has completed, and search has picked up your changes, you will find your people showing up in Search / Delve etc.

In this blog post we have imported user photos into SharePoint mysites, and updated the user profiles for these users. In the next post I will be showing you how to turn on 365 Auditing, and assigning only a couple of users to view these audit logs.

Setting up a O365 Dev Tenant – Part 3 – Set User Photos in Exchange Online


Introduction

In this series of posts, I will explain how you can set up a Development O365 Tenant quickly. Using PowerShell scripts, at the end of this process, you will have:

  • A O365 Development Tenant with 25 “DEVELOPERPACK” Licenses.
  • 25 Users assigned with license
  • A total of 274 Users added to the Tenant
    • Set up for multiple offices
    • Organisational structured
  • All users will be MFA enabled
  • All users will have photos added to their accounts
  • Enabling Office 365 Auditing
  • Setting up the SharePoint Tenant Settings and enabling Public CDN for SPFX

Unfortunately, I have found it impossible to do the following via PowerShell scripts, and these would need to be done manually. I haven’t included this information within these blog post.

  • Create a Tenant App Catalog
  • Set Organisation Details
  • Set Login Branding
  • Set Tenant Branding

In my previous post, I walked you through creating users in AzureAD from a CSV file, set them up with MFA and a default password. Assigned the first 25 users a license, and uploaded their pictures into Azure AD

In this post I will be running you through the PowerShell script to import Pictures into Exchange. You might ask why we are doing this if we have previously uploaded the pictures into Azure AD, the reason is because your profile picture will sometimes show up in some places and not in others. E.g. Delve might show a picture, where SharePoint doesn’t. So, the next few posts are about uploading pictures to the tenant. These scripts upload to every possible location that have a separate place.

Obtaining the code

I have stored my code on GitHub at the following URL for cloning. https://github.com/pmatthews05/SetupDevTenant.git

Running Set-UserPhotosInExchange.ps1

This script uses the AzureADUser.csv file and the UserImages profile pictures. It will:

  • Find the user in Exchange
  • Check the photo exists in the script location for the user.
  • Uploads the picture.

To run the script, you need to use the Microsoft Exchange Online PowerShell Module. Please follow my previous blog about how to do this correctly. https://cann0nf0dder.wordpress.com/2019/04/14/unable-to-download-the-exchange-online-powershell-module-deployment-and-application-do-not-have-matching-security-zones/

Open Microsoft Exchange Online PowerShell Module. You will need to connect first, before running the script. It allows you to control the signing in.


Connect-EXOPSSession -userPrincipalName [user.name]@[tenant].onmicrosoft.com


Now you are connected, you can call the Set-UserPhotosInExchange.ps1 file.


.\Set-UserPhotosInExchange.ps1 -Path:'.\data\AzureADUsers.csv' -TenantDomain:'[mytenant].onmicrosoft.com' 


Replace [mytenant] with your tenant name.

This script is idempotent, so you can run it again at any point if there was an issue. NOTE: It will only work for the first 25 users that were assigned a license, as the others will not have an email account. (You can cancel the script after the first 25 user – Ctrl+ C)

The only part of this code that does the uploading is on line 46. Its coverts the jpg to bytes and then uploads it for the user.


Set-UserPhoto -Identity $UserCSV.UserPrincipalName -PictureData ([System.IO.File]::ReadAllBytes($pathtoPicture)) -Confirm:$false


Photos appearing in Delve

You will notice now that if you use Delve, the first 25 users in your CSV file will have pictures showing for them.

In this blog post we have imported user photos into exchange. As we could only add 25 user pictures in the next blog post I will be importing the pictures into SharePoint, so they can be used there.