Unlike the subscription level, you cannot just uses Az DevOps command with a management group parameter. This does not appear to be available, the answer is to pass in a json template.
On the above picture, you can see next to the words Tenant Root Group a link (details). You probably do not have the details link clickable at this time. This is because although you have been able to create the initial Tenant Root Group – Management Group, you need to promote your account access to it.
Note: You can only do this as a Global Administrator.
In the left hand navigation under Manage, click Properties
Under Access management for Azure resources switch the button to Yes.
Now if you go back to the Tenant Root Group – Management Group, you will be able to click the details link and have access to the Management group, see deployments made at that level, modify access for others etc.
Switching the button to No will then remove your access.
Programatically
Using Az Cli, log in with you account first az login. The below snippet, on line 2 shows how to give yourself access. Where line 5 & 6 would remove the account.
This file contains bidirectional Unicode text that may be interpreted or compiled differently than what appears below. To review, open the file in an editor that reveals hidden Unicode characters.
Learn more about bidirectional Unicode characters
Running of this code, will create a DevOps project if it doesn’t exist, and then create a Management Group level Service Connection to the Tenant Root Management Group. To apply to a different level management group would require modification to the code to grab the name and ID of the management group you wish to use and pass into the JSON template.
Your account is now set up to run, you will need to first be logged into AZ Cli.
Note: This can be a Service Principal, as long as the account being used is able to list App Registrations, and has ‘User Access Administrator’ RBAC on the Tenant Root Group – Management Group.
You will need to create a ‘management-group.json’ file which is used as a template, and key tokens will be replaced within the script.
This file contains bidirectional Unicode text that may be interpreted or compiled differently than what appears below. To review, open the file in an editor that reveals hidden Unicode characters.
Learn more about bidirectional Unicode characters
(Line 32) – How the authentication works with DevOps. The Personal Access Token is added to the $Env: variable “AZURE_DEVOPS_EXT_PAT”
(Line 61 – 74) – Updating the json template, saving the file as a temp file, and then creating the Service Connection passing in the json template. The json template is the same template used by Azure DevOps when you set up the Management Group Service connection manually, you can see this by watching the network traffic.
This file contains bidirectional Unicode text that may be interpreted or compiled differently than what appears below. To review, open the file in an editor that reveals hidden Unicode characters.
Learn more about bidirectional Unicode characters
To run the above code, you will need to put in your parameters. Replace with your values then run the below script, this will call the script above.
This file contains bidirectional Unicode text that may be interpreted or compiled differently than what appears below. To review, open the file in an editor that reveals hidden Unicode characters.
Learn more about bidirectional Unicode characters
A previous post of mine Connecting to Azure Devops with a Service Principal has been popular since I have written it. Therefore, I’ve decided to extend on the topic and show how you can do it programatically with AZ DevOps.
Sign in and click on User settings -> Personal access tokens
Click New Token
Give it a meaningful name so you know what the PAT token is for in the future. (E.g, Devops Service Connection)
Select your Organization
Select the Expiration date for as long as you need. Maximum 1 Year
Select Scopes at Full access (You might want to tighten your permission in a production environment, for this demo Full access is fine).
Click Create
Once you have clicked Create this is the only chance to grab a copy of the token. Please take a copy of this token as you will require it later.
The Code
You will need to first be logged into Az Cli. You can sign in using a service principal as you might with a pipeline, as long as the account being used is able to list App Registrations, and ‘User Access Administrator’ RBAC role to be able to apply contribute access to the DevOps service principal on the subscription (Line 43) .
The important part to note in the code is how the authentication works with Devops. The Personal Access Token is added to the $Env: variable “AZURE_DEVOPS_EXT_PAT”. (Line 32)
This file contains bidirectional Unicode text that may be interpreted or compiled differently than what appears below. To review, open the file in an editor that reveals hidden Unicode characters.
Learn more about bidirectional Unicode characters
To run the above code, you will need to put in your parameters. Replace with your values then run the script, this will call the script above.
This file contains bidirectional Unicode text that may be interpreted or compiled differently than what appears below. To review, open the file in an editor that reveals hidden Unicode characters.
Learn more about bidirectional Unicode characters
Now that SharePoint Online CSOM is now works with .NET Framework, I thought I would put together a demo using Visual Studio code that connects to SharePoint.
A previous colleague and still good friend of mine Vardhaman Deshpande in June wrote a blog post showing how to connect to SharePoint Online using MSAL. It is so well written that really writing another blog about it seems a little pointless, so I have taken his blog a little further by connecting to a KeyVault in Azure and grabbing the certificate directly from there.
.NET Standard CSOM of SharePoint Online now uses OAuth for authentication. This means an Access Token needs to be grabbed and passed to every call that is made to SharePoint Online. We will do this by grabbing the AppID and Certificate from the KeyVault and then get the Access Token through ConfidentialClientApplicationBuilder. The Access Token will then be passed into the ClientContext so all calls are made with the Access Token to SharePoint Online.
Walk-through Demo
The demo I have put together can be found at my GitHub repository. By using a Azure AD App Registration and a client certificate, I will walk-through the steps here to set up the following:
Create a Resource Group in Azure
Create a KeyVault
Create a Certificate and Store it in the KeyVault
Create an Azure AD App registration
Store the ClientID in the KeyVault Secrets
Grant Azure AD Application permission for SharePoint – Sites.FullControl.All
Console code that connects to SharePoint Online.
Setup
To perform all the steps above as a manual walk-through would take a lot of time to go through. Also, where I can automate things I do. Therefore in the GitHub project under the PowerShell Folder there is a PowerShell file called Install-AzureEnvironment.ps1.
This uses AZ Cli and running the below script will create the above for you in your Azure environment. Replace “Contso” with the name of your tenant.
This file contains bidirectional Unicode text that may be interpreted or compiled differently than what appears below. To review, open the file in an editor that reveals hidden Unicode characters.
Learn more about bidirectional Unicode characters
The above will create the following Azure Resources (using the example of Consto as tenant name)
Resource Group: Contso-SharePointMSAL
App Registration: Contso-SharePointMSAL (Granted with SharePoint > Sites.FullControl.All)
Key Vault: Contso-SharePointMSAL (Will be truncated to 24 characters if longer)
CertificateName stored in KeyVault Certificates: Contso-SharePointMSAL
ClientId stored in KeyVaultSecret: ConstoSharePointMSAL
Console Application
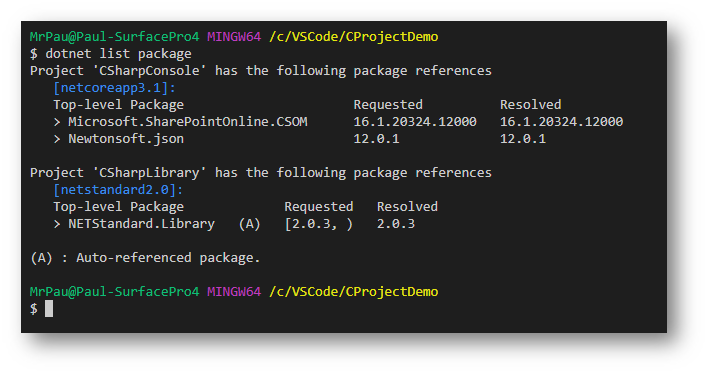
Using Visual Studio Code, I’ve create a .NET Core 3.1 console application and added the following nuget packages. Please see my previous blog post “Basic dotnet commands to create C# project in Visual Studio Code” on how to create a Console application and add nuget packages.
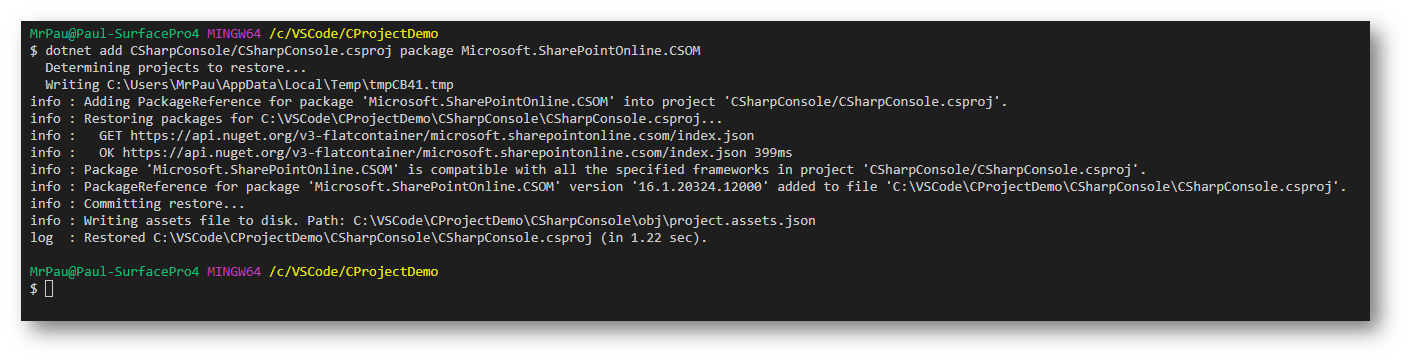
Microsoft.SharePointOnline.CSOM
Used for the SharePoint CSOM calls
Microsoft.Identity.Client
Used for OAuth authentication
Azure.Identity
Used for KeyVault authentication
Azure.Security.KeyVault.Secrets
Used for getting the Secret and Certificate from the vault
Next you will need to create (or update if cloned the github project) the appsettings.json file. Replace the environment and site values for your environment.
This file contains bidirectional Unicode text that may be interpreted or compiled differently than what appears below. To review, open the file in an editor that reveals hidden Unicode characters.
Learn more about bidirectional Unicode characters
Then update the program.cs file with the following code. The code has been written assuming your Azure resources using the .\Install-AzureEnvironment.ps1.
This file contains bidirectional Unicode text that may be interpreted or compiled differently than what appears below. To review, open the file in an editor that reveals hidden Unicode characters.
Learn more about bidirectional Unicode characters
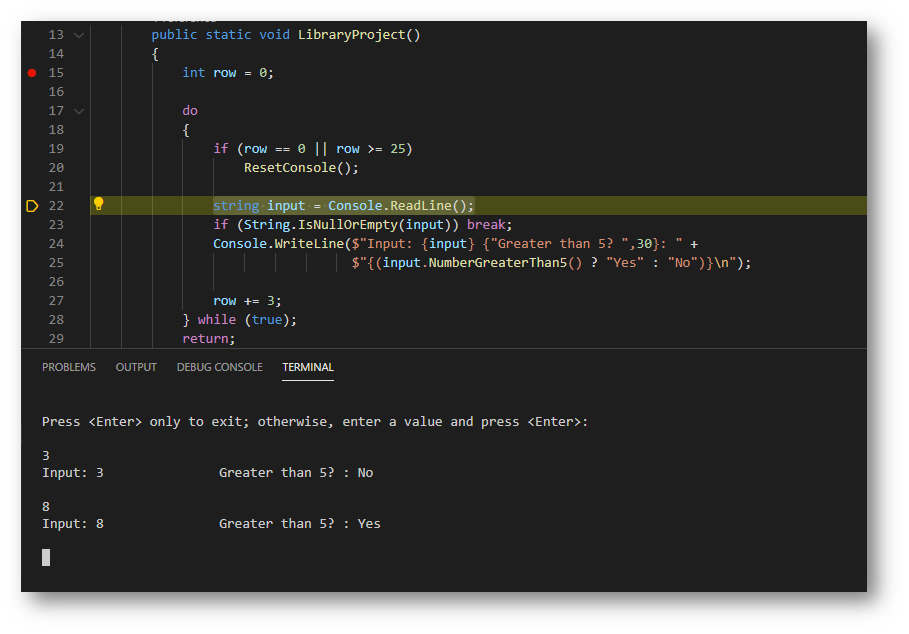
After the code runs it will display the site Title. In my case ‘TestAPISite’.
The important piece of code to get the certificate from Azure Key Vault is GetAppOnlyCertificate function on line 78. This is using the new Azure.Identity and Azure.Security.KeyVault.Secrets libraries.
The key to authentication to the KeyVault is on line 82 using DefaultAzureCredential, as this attempts to connect using different authentication methods. Once connected, it retrieves the certificate value and creates a X509Certificate2 certificate in memory. The only confusing part of the code is using Azure.Security.KeyVault.Secrets to get the value not Azure.Security.KeyVault.Certificates.
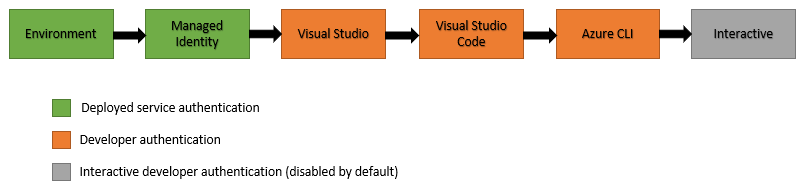
The image below taken from the Microsoft documentation, shows how the DefaultAzureCredential will attempt to authenticate via the following mechanisms in order.
Environment – The DefaultAzureCredential will read account information specified via environment variables and use it to authenticate.
Managed Identity – If the application is deployed to an Azure host with Managed Identity enabled, the DefaultAzureCredential will authenticate with that account.
Visual Studio – If the developer has authenticated via Visual Studio, the DefaultAzureCredential will authenticate with that account.
Visual Studio Code – If the developer has authenticated via the Visual Studio Code Azure Account plugin, the DefaultAzureCredential will authenticate with that account.
Azure CLI – If the developer has authenticated an account via the Azure CLI az login command, the DefaultAzureCredential will authenticate with that account.
Interactive – If enabled the DefaultAzureCredential will interactively authenticate the developer via the current system’s default browser.
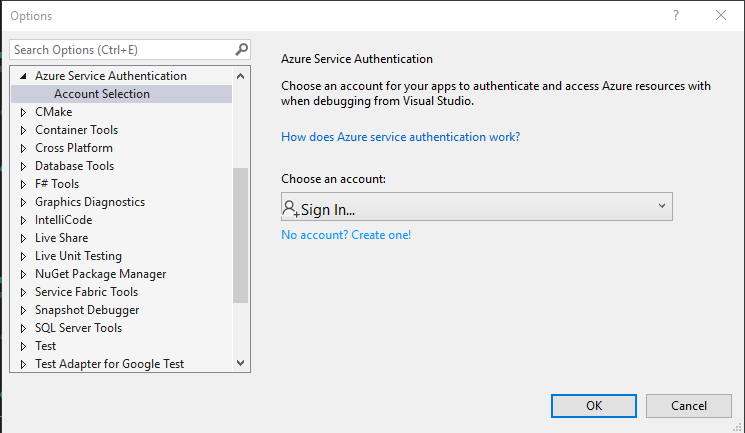
Note: When I first ran my code on Visual Studio Code, I kept getting an authentication issue, it was because I had Visual Studio Enterprise installed on my machine and it was picking up the authentication method selected there which was pointing to a different tenant. You can see this in Visual Studio Enterprise by going into Tools > Options
The great thing about DefaultAzureCredential, is that if this code was within a Azure Function, I could run it first on my computer, then deploy it to Azure Functions with a Managed Identity, and it would still work without any changes to the code.
Since SharePoint Online CSOM is now .NET Core compatible, it means I can start doing all my C# code work in Visual Studio Code and drop the heavy weight application of Visual Studio (Community/Enterprise). Yes, I might need to wait a little longer until SharePointPnPCoreOnline become .NET Core compatible too, but I’m sure that’s not far behind.
Although I have been a developer for many years, and used VS Code for a while for PowerShell and SPFX, I haven’t done any C# projects. This made me realise that I didn’t know how to start a C# project, how to add a reference to another project, add NuGet packet etc., inside VS Code. Does this mean I’m not very good at my job because I don’t know this simple information? No. It just means I’ve never done it before.
This blog post is going to just walkthrough some of the simple steps to get yourself up and running with a C# project using Visual Studio Code. For someone who spent most of his working life inside Visual Studio Community/Enterprise, the steps inside VS Code it is all command line calls and not using GUI’s and wizards. Which sometimes feels frustrating.
You can use Bash / Windows PowerShell / PowerShell 6 / PowerShell 7
Creating a Solution
In the terminal type the following to create a solution. The name of the solution is the name of the folder it sits in, you can use –name to give it a different name.
dotnet new sln
Creating a project
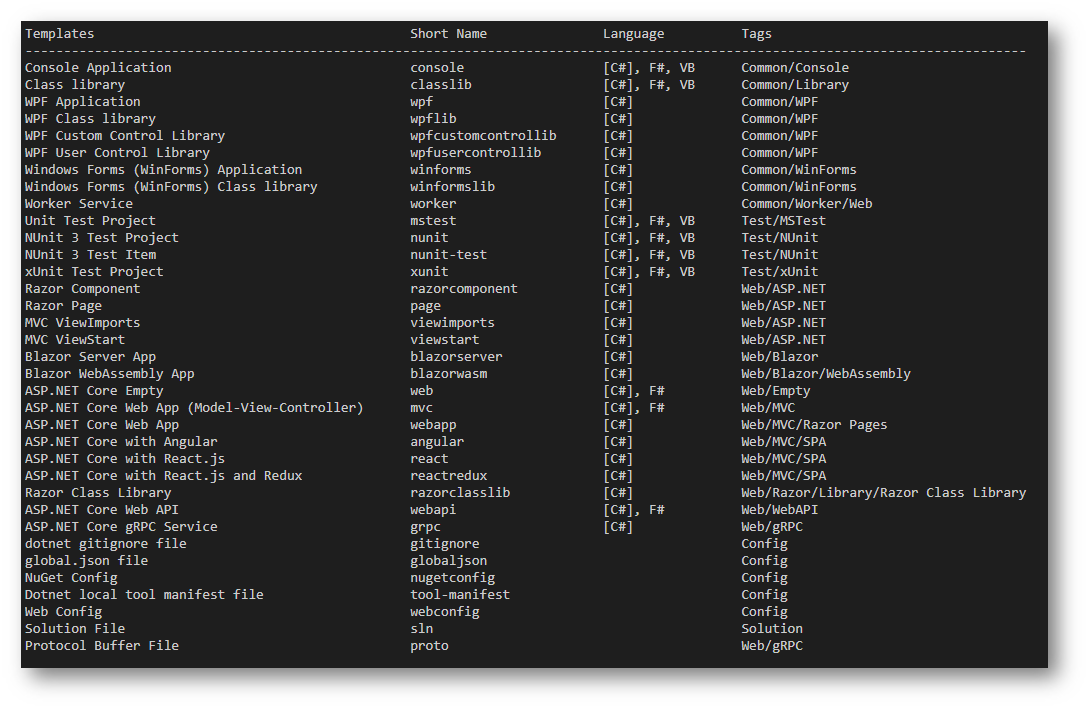
There are loads of project types you can create, and just typing dotnet new –help shows you all the different types. Using the short name creates that type of project.
Let us create a C# Console project, —output is the folder location where the project is going to be put.
dotnet new console –output CSharpConsole
Let us also create a C# Library class project.
dotnet new classlib –output CSharpLibrary
Adding Projects to the Solution
With Visual Studio when you added a project, you automatically added these projects to the solution. This is not the case with VS Code. You must do an additional step to add the projects to the solution.
dotnet sln add CSharpConsole/CSharpConsole.csproj
dotnet sln add CSharpLibrary/CSharpLibrary.csproj
Adding a Project Reference
To add the CSharpLibrary reference to the CSharpConsole we need to call the add the reference
When I was walking through the steps to ensure this blog post is accurate, I didn’t need to do these following steps to get the intellisense to work. They just worked. However, I’m going to still add this here in case you find the intellisense is not working for you.
Ctrl + Shift + p
Type “OmniSharp: Select Project” and press enter
Choose the solution workspace entry
Writing some code
To continue this blog post that you can follow along with , you will require some code.
In the CSharpLibrary project, rename the class.cs to IntLibrary.cs
Paste in the following code, this is a simple method that checks if the string value is greater than 5.
This file contains bidirectional Unicode text that may be interpreted or compiled differently than what appears below. To review, open the file in an editor that reveals hidden Unicode characters.
Learn more about bidirectional Unicode characters
In the CSharpConsole project, paste the following code. This code asks the user for an input and returns true or false if the value is above 5 or not. With a console check for too many rows or empty value to quit.
This file contains bidirectional Unicode text that may be interpreted or compiled differently than what appears below. To review, open the file in an editor that reveals hidden Unicode characters.
Learn more about bidirectional Unicode characters
To run the project you need to pass in the Project file.
dotnet run –project CSharpConsole/CSharpConsole.csproj
Or if you are already in the project’s directory
dotnet run
Publishing the Project
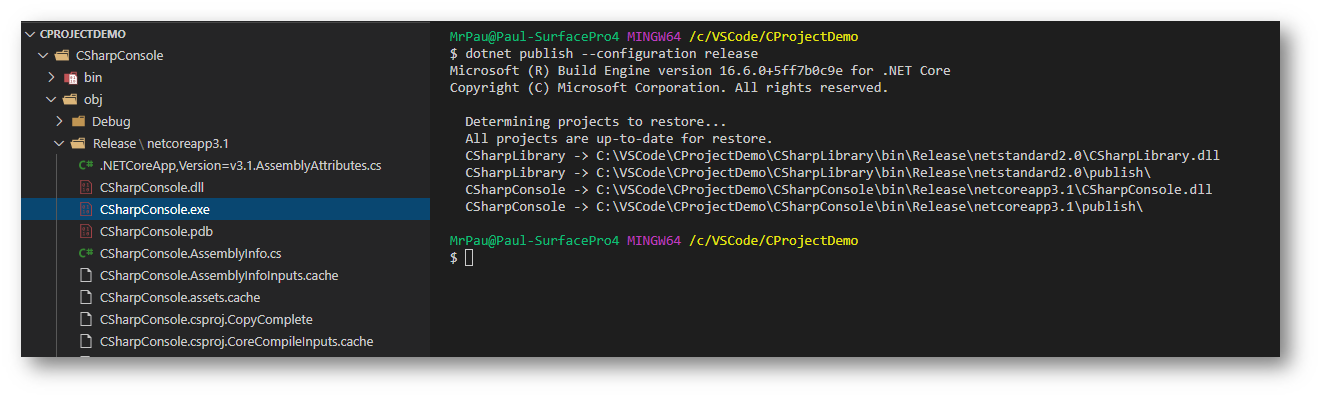
To publish the project to run it as an executable in this console case
dotnet publish –configuration release
Debugging the Project
No matter how good you are, you will need to debug code at somepoint.
Put a breakpoint in your code. Press F5.
First time you will be asked the project type. Select .NET Core. This will create a launch.json file. As this project is a console project, we need to modify the configuration within the launch.json file to make the console point to Integrated terminal, otherwise the line to clear the console will fail.
Change “console”: “internalConsole” on line 15 and change to “console”: “integratedTerminal”
This file contains bidirectional Unicode text that may be interpreted or compiled differently than what appears below. To review, open the file in an editor that reveals hidden Unicode characters.
Learn more about bidirectional Unicode characters
Nearly all projects now will involve adding a NuGet package of some sort. Again with the Command line to add, which I must admit I miss using a GUI. The GUI allowed you to search, now you need to know the name of the package. I’m going to add the SharePoint CSOM package to the console application
This blog post came about because I wanted a way to create new Application Registrations and grant consent for the tenant, all programmatically. This is so I can use Devops pipelines to create and deploy my code without any human interaction or using a person account.
By reading through Sam’s post it helped me understand the connection between Application Registrations, Service Principals and Oauth2permission, and helped me on the quest of understand how to grant the Application permissions through appRoleAssignments.
At my Github project https://github.com/pmatthews05/CFAppOnlyGrantPermissions the README.md will walk you through how to set up and run the code. At the end of the README.md file you should have 2 Application Registration, where the Azure API Registration app would have created the second app (in my case CFCodeApp) for you. This code is idempotent. You can change the permissions for an existing Application Registration by providing it a different Permission.json file.
As the README.md file gives the instruction on how to run the code, I will not replicate it here. I will use the rest of this post to explain how the code works.
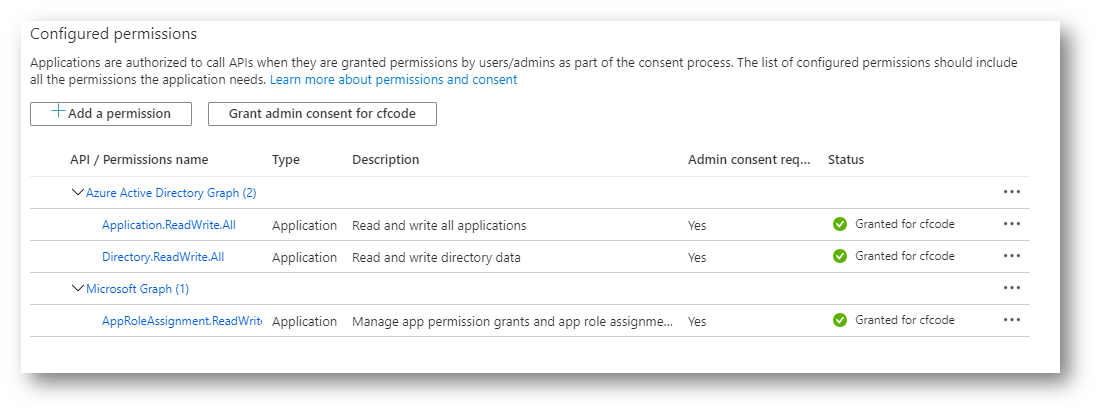
Permissions required for ‘Azure API Registration’
To allow the Azure API Registration to create new Application Registrations using AZ cli it requires to use both the legacy Azure Active Directory Graph and Microsoft Graph permissions. It seems that some of the commands in the az cli still points to https://graph.windows.net when it makes calls, according to some issue notes in the az cli git hub repository, it looks like this is in the process of being changed.
With Azure Active Directory Graph we need 2 permissions
Application.ReadWrite.All – This allows us to read and write the Application Registrations.
Directory.ReadWrite.All – This allows us to read the application registration permission list, and service principal information.
With Microsoft Graph we also need permission.
AppRoleAssignment.ReadWrite.All – This allows us to call the REST API to grant permissions and assign Role assignment permissions.
Steps in the code
Set-AppRegistration
Set-AppCredentials
Set-ServicePrincipalForAppId
Remove-CurrentAppPermissions
Set-DelegatePermissions
Remove-CurrentOauth2PermissionGrants
Set-ApplicationPermissions
Remove-CurrentServicePrincipalGrants
Please note, the snippets of code I am showing here in the blog, are showing the command(s) that are performing the main action, not the full function.
Set-AppRegistration
We need an App Registration to be created first. If the name already exists it just returns the existing App Registration
This file contains bidirectional Unicode text that may be interpreted or compiled differently than what appears below. To review, open the file in an editor that reveals hidden Unicode characters.
Learn more about bidirectional Unicode characters
This file contains bidirectional Unicode text that may be interpreted or compiled differently than what appears below. To review, open the file in an editor that reveals hidden Unicode characters.
Learn more about bidirectional Unicode characters
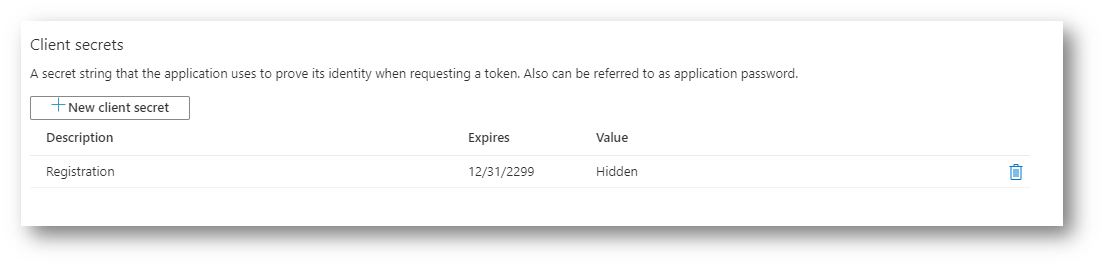
This will create a secret for the App Registration with a random secret with the description set to Registration. There are a couple of override parameters that I am not using, where you can give it your own Description, and provide your own SecureString secret. This returns the appCredentials that supply the appId, name, password and tenantId. In the script it outputs this to screen at the end, however, if using in production environment, you would probably want to put the secret value in a keyvault, without displaying to the user what the value is.
Set-ServicePrincipalForAppId
This file contains bidirectional Unicode text that may be interpreted or compiled differently than what appears below. To review, open the file in an editor that reveals hidden Unicode characters.
Learn more about bidirectional Unicode characters
All App Registrations require a Service Principal behind them. When you manually create an App Registration and assign permissions, it automatically creates a service principal for you. When you create an App Registration programmatically, it is your responsibility to also create the Service Principal. It is the Service Principal that defines the access policy and permissions for the user/application in the Azure AD tenant. A multi-tenant App Registration would have the same app Id in all tenants, but all have a different Service Principal which allows them access within that tenant. For example, in all tenants the AppId for the Microsoft Graph API is ‘00000003-0000-0000-c000-000000000000’ and in your tenant it has an associated Service Principal, which is a different object Id in your tenant compared to mine. When I finally understood this, it made more sense how this all ties together.
The above az command is not idempotent, and therefore a check to see if it already exists is required.
Remove-CurrentAppPermissions
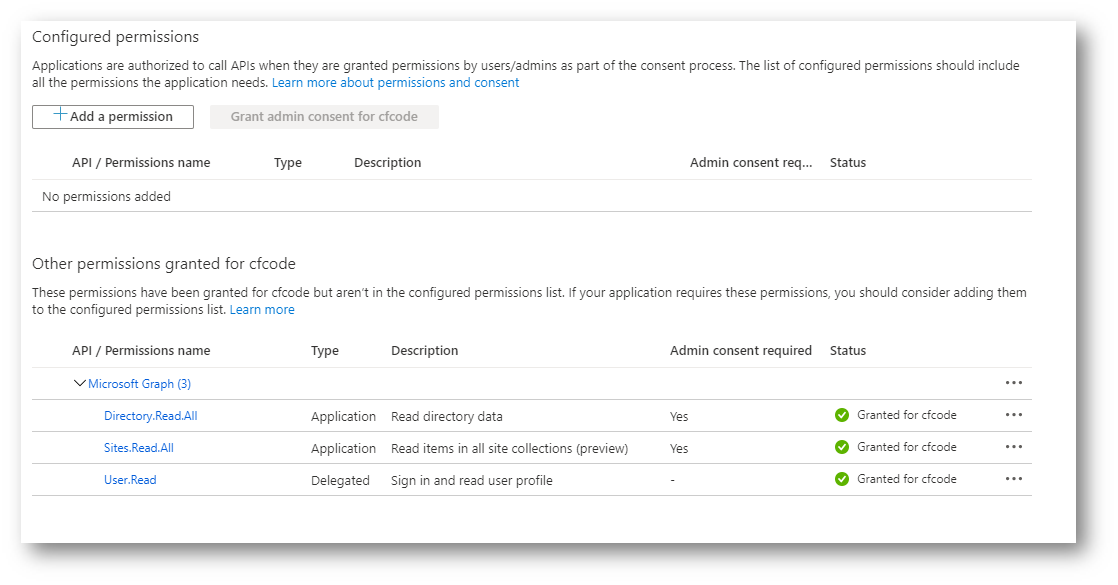
To allow idempotency of my script, I wanted to ensure that it removes all existing permissions before adding them back in. This piece of code does not remove the permission from the service principal, and if you stop the code after this command, you will see that your API Permissions in the GUI would look like this.
Seeing the permissions separated at the bottom of the screen, now understanding the relationship between Application Registrations and Service Principal, it makes a lot more sense to me now. The service principal still has access at this point and calls to these API’s will still work.
This file contains bidirectional Unicode text that may be interpreted or compiled differently than what appears below. To review, open the file in an editor that reveals hidden Unicode characters.
Learn more about bidirectional Unicode characters
The code gets a list of all the permissions assigned to the Application Registration, then loops through each resourceAppId (the objectId value of the API permission service principal e.g, Microsoft Graph, SharePoint)*2 and deletes the permission.
Set-DelegatePermissions
To ensure the code is idempotent the first thing I am doing is removing the delegate permission from the Service Principal. See the next section on how this works.
Now we need to assign the Application Registration permissions for the delegate permissions. We do this by providing the AppID of our Application Registration, the API Permission AppID (the appID of the API Permission service principal e.g, Microsoft Graph)*2 and the oauth2Permissions scope Id*4
This file contains bidirectional Unicode text that may be interpreted or compiled differently than what appears below. To review, open the file in an editor that reveals hidden Unicode characters.
Learn more about bidirectional Unicode characters
This file contains bidirectional Unicode text that may be interpreted or compiled differently than what appears below. To review, open the file in an editor that reveals hidden Unicode characters.
Learn more about bidirectional Unicode characters
clientId: This is the Service Principal Object ID that is tied to your App Registration
consentType: Set to AllPrincipals when granted to the entire tenant, or Principal when granted to an individual user
id: The ID of the oauth2permissiongrants
principalId: This is set to null if using AllPrincipals, otherwise it will contain the objectID of the User that has been granted the permission
resourceId: This is the Serivce Principal Object ID value of the API Permission*2
scope: This is a string array of granted scope values for the given ResourceId. (e.g User.Read Directory.Read.All etc)
If the oauth2permissiongrants with the App Registration Service Principal Object ID and API Permission Service Principal Object ID (clientId and resourceId) doesn’t exist in your tenant, then you will need to POST a new oauth2permissiongrants, otherwise you will require to PATCH an existing oauth2permissiongrants/<id> with the new string array of scope values.
This file contains bidirectional Unicode text that may be interpreted or compiled differently than what appears below. To review, open the file in an editor that reveals hidden Unicode characters.
Learn more about bidirectional Unicode characters
You must add a startTime and expiryTime, it does not matter what the datetime is, as long as expiryTime is later than the startTime.
Remove-CurrentOauth2PermissionGrants
To remove the permissions from the Service Principal for the Delegate Permissions, we need to remove the Oauth2PermissionGrants.
Unfortunately, with App Only permissions you cannot delete an oauth2permissiongrants. You require to access the directory as a person to delete. I found that by setting the scope to empty string, gives the same desired effect as removing them.
This file contains bidirectional Unicode text that may be interpreted or compiled differently than what appears below. To review, open the file in an editor that reveals hidden Unicode characters.
Learn more about bidirectional Unicode characters
Please Note: I am using Invoke-RestMethod instead of az rest because I have not been able to get it to work without an error message.
Set-ApplicationPermissions
To ensure the code is idempotent the first thing I am doing is removing the application permission grants from the Service Principal. See the next section on how this works.
Now we need to assign the Application Registration permissions for the application permissions. We do this by providing the AppID of our Application Registration, the API Permission AppID (the appID of the API Permission service principal e.g, Microsoft Graph)*2 and the AppRoles scope Id*3
This file contains bidirectional Unicode text that may be interpreted or compiled differently than what appears below. To review, open the file in an editor that reveals hidden Unicode characters.
Learn more about bidirectional Unicode characters
Next, we need to assign the Application Registration associated Service Principal AppRoleAssignments to grant these permissions to the tenant.
Using Graph API explorer, you can view all the Application Role Grants for your Application Registration. You will need the Service Principal Object ID*1 and then use the following URL:
This file contains bidirectional Unicode text that may be interpreted or compiled differently than what appears below. To review, open the file in an editor that reveals hidden Unicode characters.
Learn more about bidirectional Unicode characters
Unlike the Oauth2PermissionGrants, where there is only one entry per clientid and resourceId which contains all the scopes, with AppRoleAssignments there is an entry for each scope, and it uses the appRoleId scope Id*3 instead of the scope string value.
id: The ID of the appRoleAssignment
principalId: The Service Principal Object ID that is tied to your App Registration
resourceId: This is the Serivce Principal Object ID value of the API Permission*2
This file contains bidirectional Unicode text that may be interpreted or compiled differently than what appears below. To review, open the file in an editor that reveals hidden Unicode characters.
Learn more about bidirectional Unicode characters
To remove the permission from the Service Principal for the Application Role permissions, we need to remove the AppRoleAssignments ID’s for the service principal
This file contains bidirectional Unicode text that may be interpreted or compiled differently than what appears below. To review, open the file in an editor that reveals hidden Unicode characters.
Learn more about bidirectional Unicode characters
Please Note: I am using Invoke-RestMethod instead of az rest because I have not been able to get it to work without an error message.
Conclusion
That is it. In the Data folder of the github project there is an examplePermission.json file. As you can see that the JSON format is very flexible to add more or remove permissions. The name can be the appDisplayName or the AppId of the API Permission.
Run the Add-RegistrationAndGrantPermissions.ps1 script passing in the name of your App Registration you wish to create / update and your custom permission file. The script will run fine with user logged in, or an App Only with the correct permissions.
Please feel free to use/enhance the github project.
Footnotes
*1 How to find your Service Principal Object ID of your Application Registration
Using the GUI, the quickest way to find your Service Principal Object ID is to first go to the overview of the Application Registration. Then on the right-hand side of the screen, click the name of your Application Registration where Manage application in local directory is.
This will take you to the Service Principal information in your tenant. It is here you can get the ObjectID.
*2 How to find the Service Principal Object Id for the Permission API.
You may already know that Microsoft Graph API appId is 00000003-0000-0000-c000-000000000000, this is the same on all tenants, but the service principal object ID is different in each tenant. This is the resourceId. To find out what the objectID is in your tenant run the following script.
This file contains bidirectional Unicode text that may be interpreted or compiled differently than what appears below. To review, open the file in an editor that reveals hidden Unicode characters.
Learn more about bidirectional Unicode characters
az ad sp list --query "[?appId=='00000003-0000-0000-c000-000000000000'].{appDisplayName:appDisplayName,appId:appId,objectId:objectId}" --all --output table
Remove “?appId== ‘00000003-0000-0000-c000-000000000000′” between the [ ] and it will list all for your tenant.
*3 How to find the Application Role Id of a Permission API Scope.
For each Permission API such as Microsoft Graph API, there are Application Role. No matter what tenant you are in, the id of them is always the same. The below example gets the Application Scope of Directory.Read.All from the Permission API Microsoft Graph.
This file contains bidirectional Unicode text that may be interpreted or compiled differently than what appears below. To review, open the file in an editor that reveals hidden Unicode characters.
Learn more about bidirectional Unicode characters
This file contains bidirectional Unicode text that may be interpreted or compiled differently than what appears below. To review, open the file in an editor that reveals hidden Unicode characters.
Learn more about bidirectional Unicode characters
*4 How to find the oAuth2Permission Id of a Permission API Scope.
For each Permission API such as Microsoft Graph API, there are oauth2Permissions. No matter what tenant you are in, the id of them is always the same. The below example gets the Delegation Scope of Directory.Read.All from the Permission API Microsoft Graph.
This file contains bidirectional Unicode text that may be interpreted or compiled differently than what appears below. To review, open the file in an editor that reveals hidden Unicode characters.
Learn more about bidirectional Unicode characters
This file contains bidirectional Unicode text that may be interpreted or compiled differently than what appears below. To review, open the file in an editor that reveals hidden Unicode characters.
Learn more about bidirectional Unicode characters
In my past two blogs I have shown you how to obtain all the users policies and output to a csv file, and how to create a new policy. In this blog post, I’m going to show you a couple of ways of setting users to new policies.
Change policy for an individual user
Change policy for a group of users
Change policies for group of users using a csv file
Change policy for an individual user
In this example I’m going to stick to just the messaging policy.
This file contains bidirectional Unicode text that may be interpreted or compiled differently than what appears below. To review, open the file in an editor that reveals hidden Unicode characters. Learn more about bidirectional Unicode characters
It can take a while before the change is reflected in the Teams Administration.
Change policy for a group of users
There are a couple of ways you can do this. If you have your people data filled in correctly, such as Department, Office, City etc, you could assign all the people from one of these areas to a given policy. For example the following script grabs everyone from the sales department and assign them the sales policy for messaging:
This file contains bidirectional Unicode text that may be interpreted or compiled differently than what appears below. To review, open the file in an editor that reveals hidden Unicode characters. Learn more about bidirectional Unicode characters
Alternatively you could do it based on a AD Group, you first need to connect to grab the members of the given group, I would connect with AZ cli.
This file contains bidirectional Unicode text that may be interpreted or compiled differently than what appears below. To review, open the file in an editor that reveals hidden Unicode characters. Learn more about bidirectional Unicode characters
Change policies for a group of users using a csv file
In a previous blog post, I showed you how to obtain all the valid users from the tenant with their policies. We are going to use the csv it produces to change users policies.
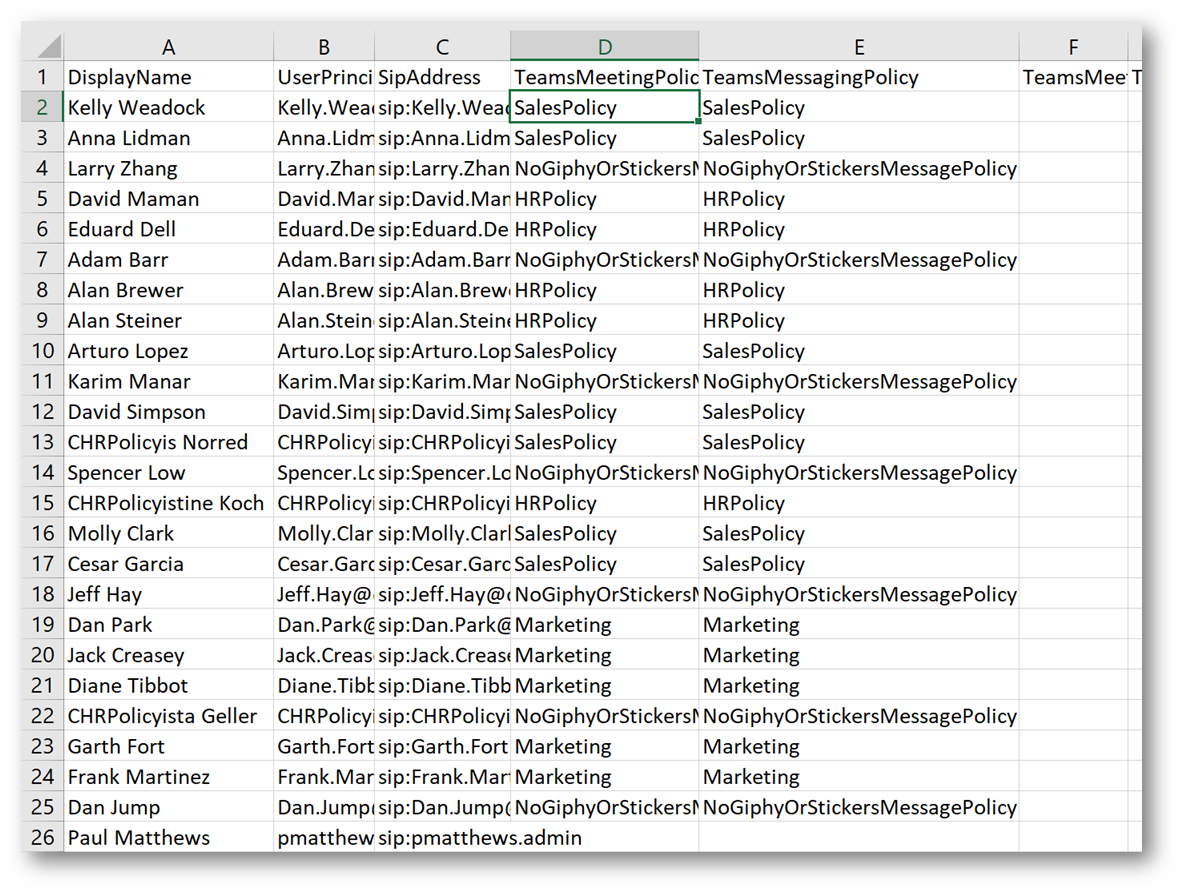
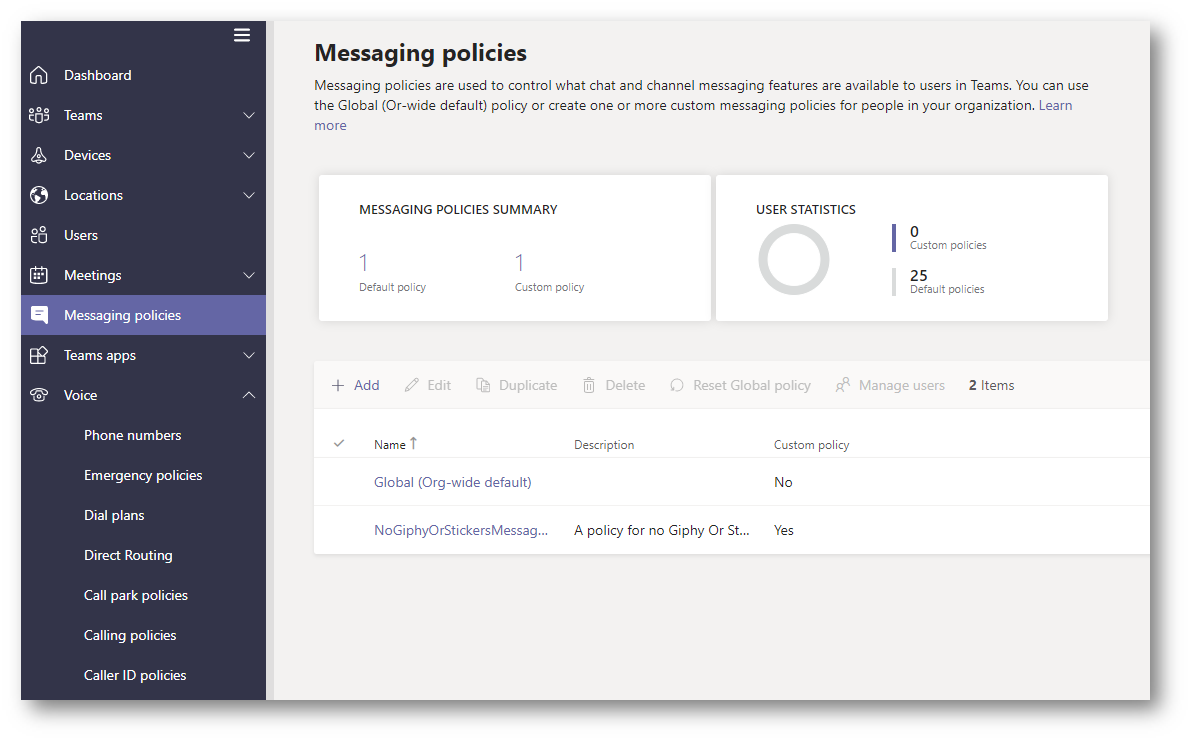
The screen shot below shows my users with licenses, originally when I ran my script I only had DisplayName, UserPrincipalName and SipAddress showing, everything else was blank because my users were all in the global policies.
I have now filled in the CSV file with either SalesPolicy, HRPolicy, or NoGiphyOrStickersMessagePolicy. Left my account as global. These policy have already been created in my environment, help with doing that can be found in this blog post.
The following script requires your MS Teams Administrator username, and the path to the csv file. It loops through each item and then sets the polices for each user.
This file contains bidirectional Unicode text that may be interpreted or compiled differently than what appears below. To review, open the file in an editor that reveals hidden Unicode characters. Learn more about bidirectional Unicode characters
If you have a lot of users to update, the session might timeout. On line 52 – 57 there is a check to see if the session has timed out and then gets you to reauthenticate. If anyone else knows a better way to do this, please add a comment below, or get in touch.
In my previous blog I showed you how to obtain all the policies for users. This blog post, I’m going to show an example of how to create a new Policy for Meeting.
The script I’m providing below is a simple script that will:
Name the policy – Line 1
Import the SkypeOnlineConnector module – Line 4-7
Create the policy if it doesn’t exist – Lines 9 – 12
Set the properties of the Policy – Lines 15 – 31
This policy that is being created will prevent users of this policy creating Giphy, Memes or Stickers in their chats. (Basically, taking the fun out of teams. [insert wicked laugh])
This file contains bidirectional Unicode text that may be interpreted or compiled differently than what appears below. To review, open the file in an editor that reveals hidden Unicode characters. Learn more about bidirectional Unicode characters
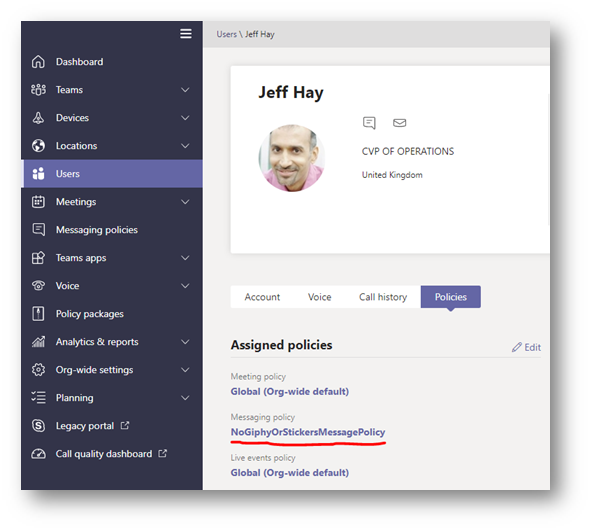
As you can see from the above screen shot, I now have a policy called NoGiphyOrStickersMessagePolicy, and below is a screen shot of the settings within Teams Administration.
My previous blog showed you how to get 13 different policies for each user. Below are the links to those PowerShell Set policy commands with the different parameters.
With everyone working at home at the moment, you might need to grab a report of the User Policies for MS Teams. These few steps will show you how to grab all the users and display in a csv file.
Installing the SkypeOnlineConnector and creating a session
Once you have installed the PowerShell module you will need to import the module and create a PowerShell session.
This file contains bidirectional Unicode text that may be interpreted or compiled differently than what appears below. To review, open the file in an editor that reveals hidden Unicode characters.
Learn more about bidirectional Unicode characters
You will be prompted for MS Teams administrator username and password, you can pass your credentials in with the -credential parameter at the end of New-CsOnlineSession, however this doesn’t work with MFA.
Once connected you will be able to grab all users using the Get-CsOnlineUser cmdlet, or grab one user by providing the users Identity.
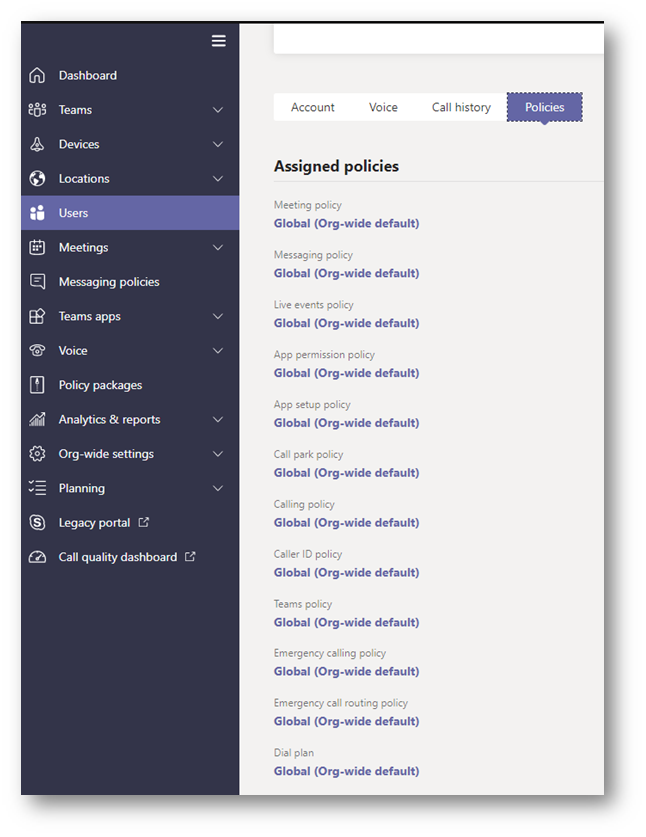
If you call the above for a single user you will see that there are loads of policies that can be set. Not all are MS Teams related. The ones I will be focusing on are the same 12 policies you see when you view Assigned policies for a user in Teams Administration.
These policies are named slightly different in the results compared to the display name shown above.
Display Name
Policy Name
Meeting policy
TeamsMeetingPolicy
Messaging policy
TeamsMessagingPoliy
Live events policy
TeamsMeetingBroadcastPolicy
App permission policy
TeamsAppPermissionPolicy
App setup policy
TeamsAppSetupPolicy
Call park policy
TeamsCallParkPolicy
Calling policy
TeamsCallingPolicy
Caller ID policy
CallerIdPolicy
Teams policy
TeamsChannelsPolicy
Emergency calling policy
TeamsEmergencyCallingPolicy
Emergency call routing policy
TeamsEmergencyCallRoutingPolicy
Dial plan
TenantDialPlan
Teams Upgrade
TeamsUpgradePolicy
The following script will grab all users and their current policy for the above polices, with the provided path it will output to csv file.
Please note: Anything that is set to Global policy will be blank.
This file contains bidirectional Unicode text that may be interpreted or compiled differently than what appears below. To review, open the file in an editor that reveals hidden Unicode characters.
Learn more about bidirectional Unicode characters
In a later blog, I will be using the csv file to update user policies.
Bonus: If you want to get all users for just a single policy you can perform a filter on the Get-CsOnlineUser
This file contains bidirectional Unicode text that may be interpreted or compiled differently than what appears below. To review, open the file in an editor that reveals hidden Unicode characters.
Learn more about bidirectional Unicode characters
This blog post has all come about as the client I was working for was having problems sharing documents in SharePoint with some external users. It turned out that the user was already in Azure AD as a Contact which is part of Exchange. This meant when an internal person attempted to share/Invite into SharePoint/MSTeams it all appeared to work correctly for the external user, but sometimes it didn’t. When looking at external users through the Admin portal, this external user was showing, but their email address was blank. After speaking with Microsoft, it turns out, because the email address was already found within the tenancy, it creates a unique violation when adding the external user to the Active Directory.
I have been working with Microsoft support regarding this, and the resolution was that this is as design!!??! Only by feeding back on the Office 365 uservoice this issue “might” looked at and fixed. See resolution notes below:
Symptom:
When you invite external users who exist as contacts in your environment, their email does not get populated in their guest user ID which results in them not being able to login to your environment and access the shared data. Cause:
The issue is coming from a conflict caused by the email address which is already populated for the mail contact. Resolution:
This is behavior by design as all objects in Azure AD have to be unique.
You cannot have 2 objects with the same email address.
When you invite one of your contacts to your content in O365, it actually creates a completely new guest user object in your environment and since the email address which is supposed to be populated in the email attribute is already in use by the contact, the email address does not get populated.
The only way to resolve this issue at the moment is to eliminate any conflicts that are in place, by removing the conflicting email contact and re-invite the user to your content. More information:
The best thing I can offer to you is the following:
Please go to our UserVoice portal where other people are facing the same behavior and up-vote it, comment and have the whole IT department do the same as well.
This led me to working on a process and script that would remove the users from everywhere.
Locations to remove the External User from:
Contacts
Azure AD Guest Users
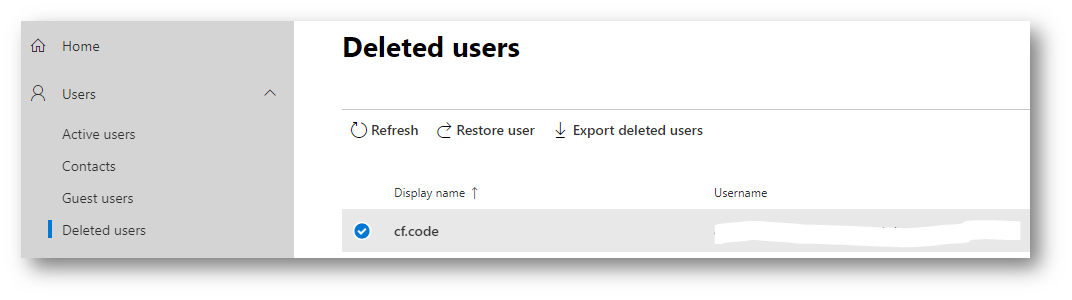
Azure AD Deleted Users
All SharePoint Sites
All SharePoint Hidden User lists
SharePoint User Profile
Contacts
To remove the External User from the contacts you will need to use the MSOL PowerShell module.
This file contains bidirectional Unicode text that may be interpreted or compiled differently than what appears below. To review, open the file in an editor that reveals hidden Unicode characters.
Learn more about bidirectional Unicode characters
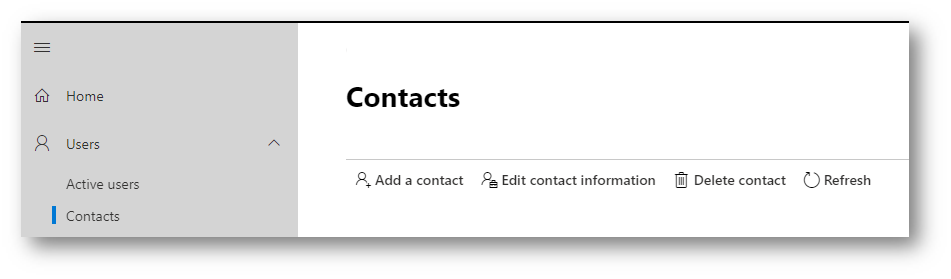
Or you can manually do this by going to admin.microsoft.com and under Users -> Contacts select the user and click Delete contacts.
Azure AD
To remove the External User from Azure AD you will still require using the MSOL PowerShell module. In fact, this script and the above script could be merged.
This file contains bidirectional Unicode text that may be interpreted or compiled differently than what appears below. To review, open the file in an editor that reveals hidden Unicode characters.
Learn more about bidirectional Unicode characters
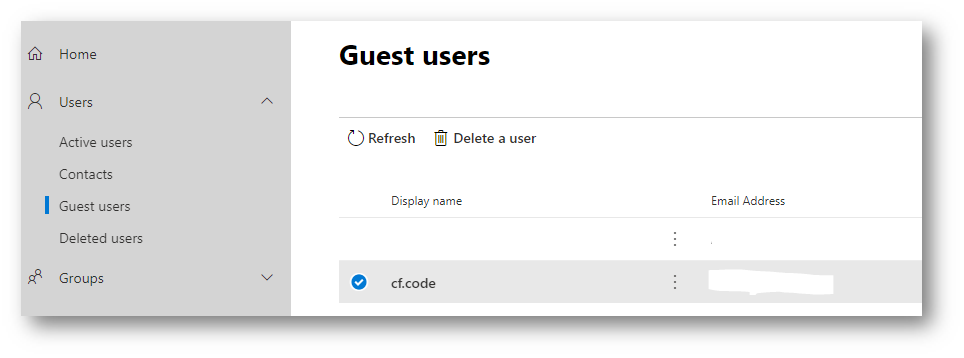
To do this manually, in admin.microsoft.com under Users -> Guest Users, select the user and click delete.
Then go into Users -> Deleted users and remove them from there.
Remove from SharePoint
To remove from SharePoint, if you have a large tenancy and you don’t know all the places where the external user could have been shared with, then you will have to use the following script. This script will remove the external user from the SharePoint Site, ensure that they are removed from the User Information list, and then lastly it will clear the person from the SharePoint User Profile.
I discovered that if I didn’t remove them from the User Profile, when attempted to reshare a document with that user, the people picker would grab the internal userprincipalname (<ExternalUserEmail>#EXT#@<Tenant>.onmicrosoft.com) as the email address and then prevent me clicking the Sharing button. This is because the people picker uses Graph API /Me/People and grabs the value from there. Once removed from everywhere, including the User Profile this no longer happens.
The following script uses SPO PowerShell Module and you will need to connect first using Connect-SPOService. The account that you use, needs to be a SharePoint Global Administrator.
The script checks if it can find the ExternalUser, and if it can remove the user using Remove-SPOExternalUser.
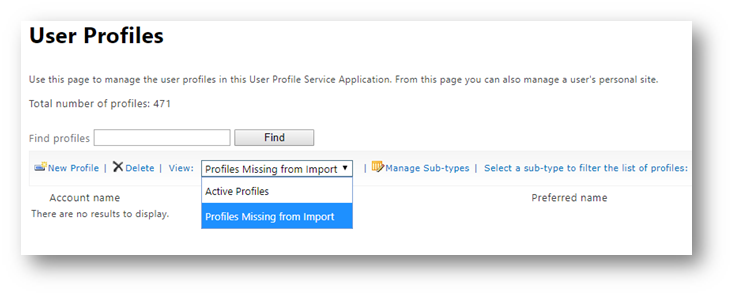
Then it loops through every site collection and looks for the user using Get-SPOUser with the internal userprincipalname. If found it removes the user using Remove-SPOUser. Once it has looped through all SharePoint sites, it then checks the SharePoint User Profile and removes the user from UserProfile Remove-SPOUserProfile. This command will remove a user from the UserProfile if they in the “Active Profiles” or the “Profiles Missing from Import”
This file contains bidirectional Unicode text that may be interpreted or compiled differently than what appears below. To review, open the file in an editor that reveals hidden Unicode characters.
Learn more about bidirectional Unicode characters
Loops through the SharePoint sites of the tenant, looking for the external user and removing them.
You need to have already connected to the Tenant as a SharePoint Global Adminstrator using Connect-SPOService -url:https://<tenant>-admin.sharepoint.com
If the plan is to add the external person back into your tenant, once the script has run, you will need to wait at least a few hours (maybe leave it for a day to be sure) to ensure all back end processes of Microsoft have completed.
When you share a document/folder with the external user they will get the invited link and enter a code experience, this way they do not turn up inside you Azure AD. However, if you share a site with them, or add them to a MS Teams, they will appear in your Azure AD correctly.
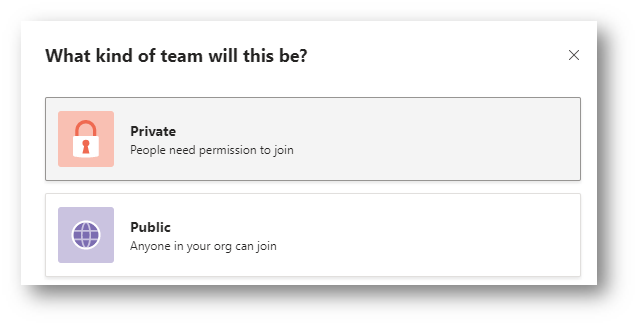
When you create a O365 Group or Teams you get given the option for Privacy. Either Public or Private. When an O365 group is created a Modern SharePoint Team site is created, but how is the site affected depending on the privacy?
Private Privacy
In a “Private” group, in the SharePoint site, the members of the O365 Group get added to the SharePoint Members Group.
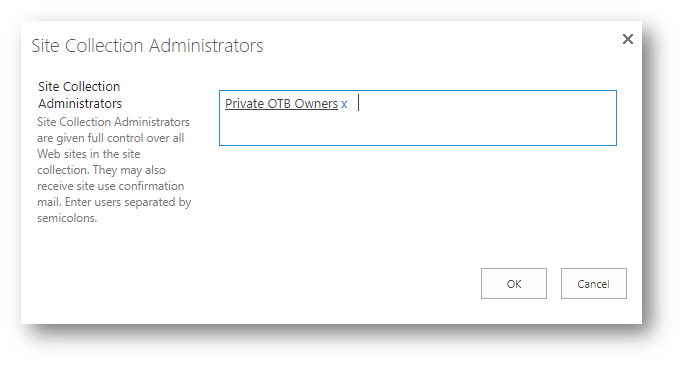
And the owners of the O365 Group get added to the Site Collection Administrators.
Public Privacy
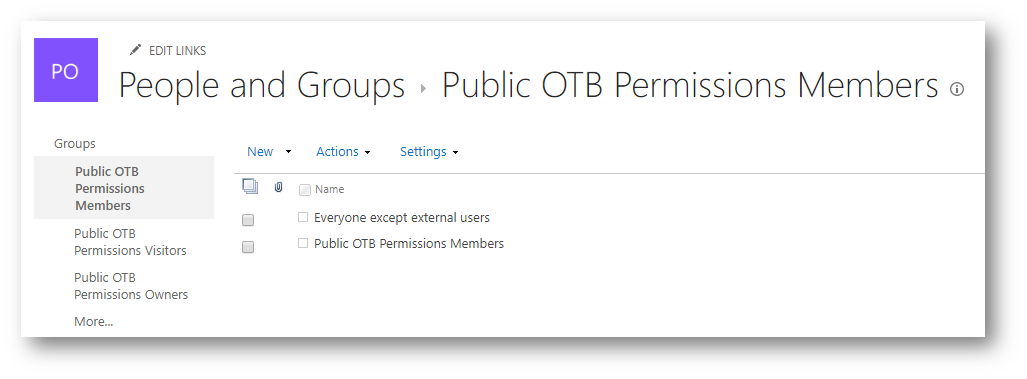
In a public site, the Members and Owners of the group get added to the SharePoint Members group and Site Collection Administrators respectively. The extra difference I have noticed, is that the “Everyone except external users” group is also added to the SharePoint members group.
What does this mean?
A private site is what it says. It is private. If it’s joined to a Teams anyone who is not a member of the group, cannot see MS Teams, search for site or documents inside it, or have access to the SharePoint site.
A public site is different. If it’s joined to Teams, a person who isn’t a member to the group will not see the MS Teams, meaning they cannot see channel chats, but can search to join it.
The documents however are available to them. They can search for these documents, access the SharePoint Site contribute on the documents too if they like.
Testing this
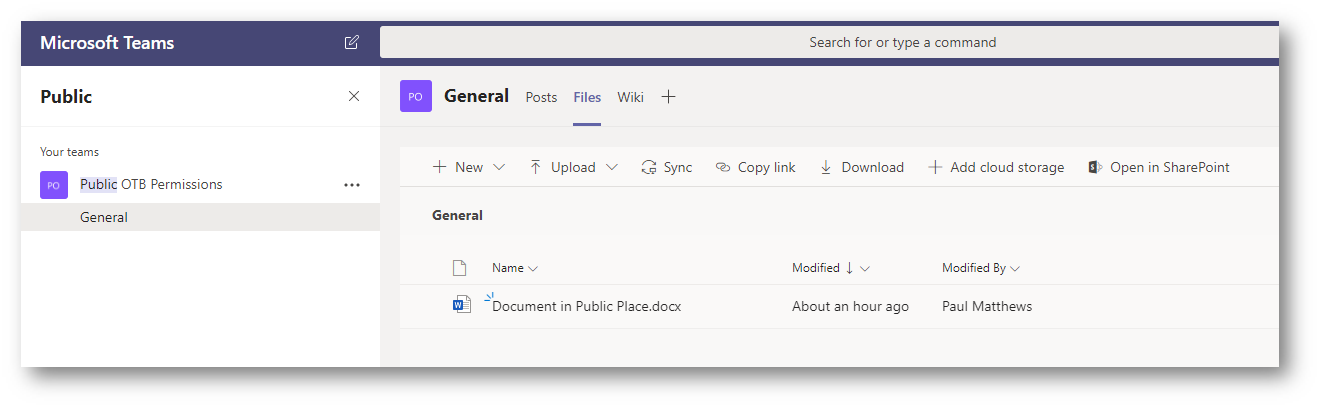
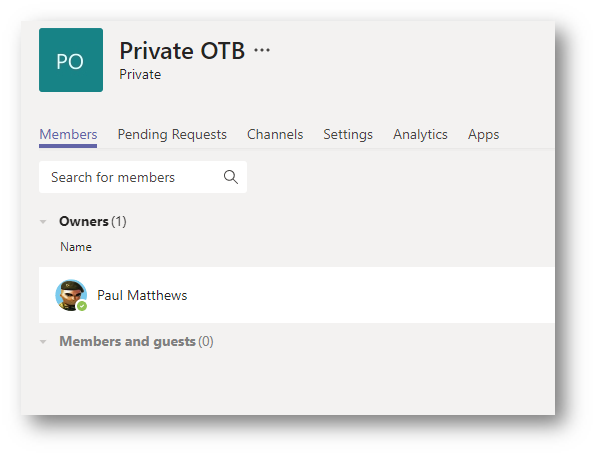
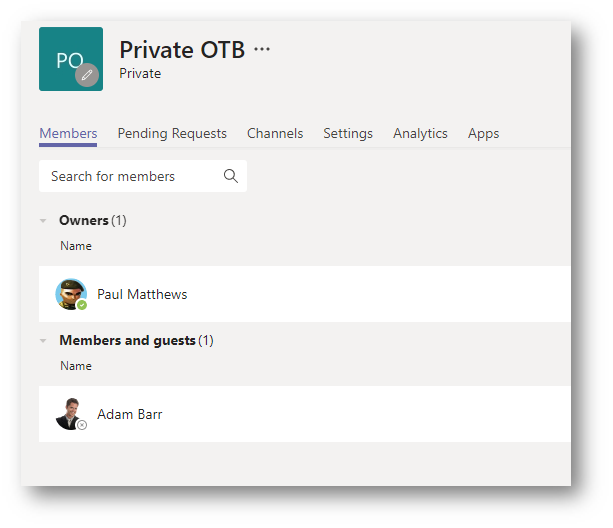
I have created two MS Teams. The first one is called Public OTB Permissions and set the privacy to Public. I am the only member of this site. The second site is called Private OTB and set the privacy to Private. Again, I am the only member of this site. In both “General” channels I have uploaded a Word document.
Public Privacy
Private Privacy
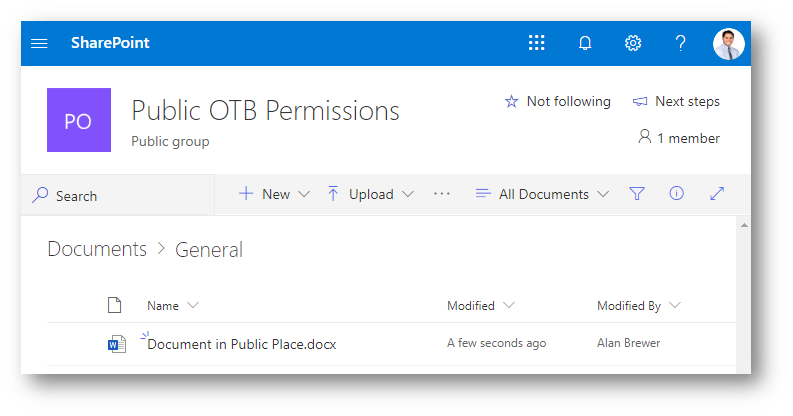
I have a second user called Alan Brewer, and in SharePoint I’m going to search for the word “Place” as this word is in both test documents.
Alan can only see the document from the public site, and when clicked through can access the document, contribute towards it. He can even view the whole SharePoint site. This is because he is being let into the site via the “Everyone except external users” claim that has been added to the SharePoint Members group for the site.
Just to complete this, I have added another user called Adam Barr to the Private site.
If I now sign in as Adam and perform the search “Place” like before, Adam can see both documents.
What happens when I switch the privacy for the O365 group.
When you decided you want to make a “Private site” public or a “Public site” Private, there is a process that happens in the back end which will either add/remove the “Everyone Except External users” to the SharePoint members group. I’ve noticed this can take up to 15 minutes or so before it is reflected in the SharePoint site.
Should I remove/change the “Everyone Except External users” from a public SharePoint site?
You can, but I don’t recommend it. If like me, personally it might be better to have the Everyone Except External Users in the Visitors group. Allowing the site to still be public, but you must be a member to contribute or change anything. The trouble with this, the site would be set up they way you want it, but then if an Owner decides to change the O365 Groups Privacy to Private, the backend process does not remove the “Everyone Except External Users” from the SharePoint Visitors Group, leaving the documents open to all. Then if they decided to switch it back or change an O365 Group from Private to Public Privacy, the backend process would add the “Everyone Except External Users” to the SharePoint members group. Making the site now open and everyone can contribute again. You could train all owners to ensure they remove/add this group if they switch the privacy, but who will remember to do that!
You could, if you are a developer, have a webhook using MS Graph that is attached to monitor O365 Group changes. https://docs.microsoft.com/en-us/graph/webhooks. Although possible, you would need to ensure that there is a delay from capturing the O365 Group webhook privacy change, and updating SharePoint, as you need to run after the backend process has been and flipped the “Everyone Except External Users”. If switching from Public to Private policy, any process you develop, if runs too late would leave the site open for a given amount of time, or if it fails could leave the site open where the users believe it is all locked down.