Unlike the subscription level, you cannot just uses Az DevOps command with a management group parameter. This does not appear to be available, the answer is to pass in a json template.
On the above picture, you can see next to the words Tenant Root Group a link (details). You probably do not have the details link clickable at this time. This is because although you have been able to create the initial Tenant Root Group – Management Group, you need to promote your account access to it.
Note: You can only do this as a Global Administrator.
In the left hand navigation under Manage, click Properties
Under Access management for Azure resources switch the button to Yes.
Now if you go back to the Tenant Root Group – Management Group, you will be able to click the details link and have access to the Management group, see deployments made at that level, modify access for others etc.
Switching the button to No will then remove your access.
Programatically
Using Az Cli, log in with you account first az login. The below snippet, on line 2 shows how to give yourself access. Where line 5 & 6 would remove the account.
This file contains bidirectional Unicode text that may be interpreted or compiled differently than what appears below. To review, open the file in an editor that reveals hidden Unicode characters.
Learn more about bidirectional Unicode characters
Running of this code, will create a DevOps project if it doesn’t exist, and then create a Management Group level Service Connection to the Tenant Root Management Group. To apply to a different level management group would require modification to the code to grab the name and ID of the management group you wish to use and pass into the JSON template.
Your account is now set up to run, you will need to first be logged into AZ Cli.
Note: This can be a Service Principal, as long as the account being used is able to list App Registrations, and has ‘User Access Administrator’ RBAC on the Tenant Root Group – Management Group.
You will need to create a ‘management-group.json’ file which is used as a template, and key tokens will be replaced within the script.
This file contains bidirectional Unicode text that may be interpreted or compiled differently than what appears below. To review, open the file in an editor that reveals hidden Unicode characters.
Learn more about bidirectional Unicode characters
(Line 32) – How the authentication works with DevOps. The Personal Access Token is added to the $Env: variable “AZURE_DEVOPS_EXT_PAT”
(Line 61 – 74) – Updating the json template, saving the file as a temp file, and then creating the Service Connection passing in the json template. The json template is the same template used by Azure DevOps when you set up the Management Group Service connection manually, you can see this by watching the network traffic.
This file contains bidirectional Unicode text that may be interpreted or compiled differently than what appears below. To review, open the file in an editor that reveals hidden Unicode characters.
Learn more about bidirectional Unicode characters
To run the above code, you will need to put in your parameters. Replace with your values then run the below script, this will call the script above.
This file contains bidirectional Unicode text that may be interpreted or compiled differently than what appears below. To review, open the file in an editor that reveals hidden Unicode characters.
Learn more about bidirectional Unicode characters
A previous post of mine Connecting to Azure Devops with a Service Principal has been popular since I have written it. Therefore, I’ve decided to extend on the topic and show how you can do it programatically with AZ DevOps.
Sign in and click on User settings -> Personal access tokens
Click New Token
Give it a meaningful name so you know what the PAT token is for in the future. (E.g, Devops Service Connection)
Select your Organization
Select the Expiration date for as long as you need. Maximum 1 Year
Select Scopes at Full access (You might want to tighten your permission in a production environment, for this demo Full access is fine).
Click Create
Once you have clicked Create this is the only chance to grab a copy of the token. Please take a copy of this token as you will require it later.
The Code
You will need to first be logged into Az Cli. You can sign in using a service principal as you might with a pipeline, as long as the account being used is able to list App Registrations, and ‘User Access Administrator’ RBAC role to be able to apply contribute access to the DevOps service principal on the subscription (Line 43) .
The important part to note in the code is how the authentication works with Devops. The Personal Access Token is added to the $Env: variable “AZURE_DEVOPS_EXT_PAT”. (Line 32)
This file contains bidirectional Unicode text that may be interpreted or compiled differently than what appears below. To review, open the file in an editor that reveals hidden Unicode characters.
Learn more about bidirectional Unicode characters
To run the above code, you will need to put in your parameters. Replace with your values then run the script, this will call the script above.
This file contains bidirectional Unicode text that may be interpreted or compiled differently than what appears below. To review, open the file in an editor that reveals hidden Unicode characters.
Learn more about bidirectional Unicode characters
Now that SharePoint Online CSOM is now works with .NET Framework, I thought I would put together a demo using Visual Studio code that connects to SharePoint.
A previous colleague and still good friend of mine Vardhaman Deshpande in June wrote a blog post showing how to connect to SharePoint Online using MSAL. It is so well written that really writing another blog about it seems a little pointless, so I have taken his blog a little further by connecting to a KeyVault in Azure and grabbing the certificate directly from there.
.NET Standard CSOM of SharePoint Online now uses OAuth for authentication. This means an Access Token needs to be grabbed and passed to every call that is made to SharePoint Online. We will do this by grabbing the AppID and Certificate from the KeyVault and then get the Access Token through ConfidentialClientApplicationBuilder. The Access Token will then be passed into the ClientContext so all calls are made with the Access Token to SharePoint Online.
Walk-through Demo
The demo I have put together can be found at my GitHub repository. By using a Azure AD App Registration and a client certificate, I will walk-through the steps here to set up the following:
Create a Resource Group in Azure
Create a KeyVault
Create a Certificate and Store it in the KeyVault
Create an Azure AD App registration
Store the ClientID in the KeyVault Secrets
Grant Azure AD Application permission for SharePoint – Sites.FullControl.All
Console code that connects to SharePoint Online.
Setup
To perform all the steps above as a manual walk-through would take a lot of time to go through. Also, where I can automate things I do. Therefore in the GitHub project under the PowerShell Folder there is a PowerShell file called Install-AzureEnvironment.ps1.
This uses AZ Cli and running the below script will create the above for you in your Azure environment. Replace “Contso” with the name of your tenant.
This file contains bidirectional Unicode text that may be interpreted or compiled differently than what appears below. To review, open the file in an editor that reveals hidden Unicode characters.
Learn more about bidirectional Unicode characters
The above will create the following Azure Resources (using the example of Consto as tenant name)
Resource Group: Contso-SharePointMSAL
App Registration: Contso-SharePointMSAL (Granted with SharePoint > Sites.FullControl.All)
Key Vault: Contso-SharePointMSAL (Will be truncated to 24 characters if longer)
CertificateName stored in KeyVault Certificates: Contso-SharePointMSAL
ClientId stored in KeyVaultSecret: ConstoSharePointMSAL
Console Application
Using Visual Studio Code, I’ve create a .NET Core 3.1 console application and added the following nuget packages. Please see my previous blog post “Basic dotnet commands to create C# project in Visual Studio Code” on how to create a Console application and add nuget packages.
Microsoft.SharePointOnline.CSOM
Used for the SharePoint CSOM calls
Microsoft.Identity.Client
Used for OAuth authentication
Azure.Identity
Used for KeyVault authentication
Azure.Security.KeyVault.Secrets
Used for getting the Secret and Certificate from the vault
Next you will need to create (or update if cloned the github project) the appsettings.json file. Replace the environment and site values for your environment.
This file contains bidirectional Unicode text that may be interpreted or compiled differently than what appears below. To review, open the file in an editor that reveals hidden Unicode characters.
Learn more about bidirectional Unicode characters
Then update the program.cs file with the following code. The code has been written assuming your Azure resources using the .\Install-AzureEnvironment.ps1.
This file contains bidirectional Unicode text that may be interpreted or compiled differently than what appears below. To review, open the file in an editor that reveals hidden Unicode characters.
Learn more about bidirectional Unicode characters
After the code runs it will display the site Title. In my case ‘TestAPISite’.
The important piece of code to get the certificate from Azure Key Vault is GetAppOnlyCertificate function on line 78. This is using the new Azure.Identity and Azure.Security.KeyVault.Secrets libraries.
The key to authentication to the KeyVault is on line 82 using DefaultAzureCredential, as this attempts to connect using different authentication methods. Once connected, it retrieves the certificate value and creates a X509Certificate2 certificate in memory. The only confusing part of the code is using Azure.Security.KeyVault.Secrets to get the value not Azure.Security.KeyVault.Certificates.
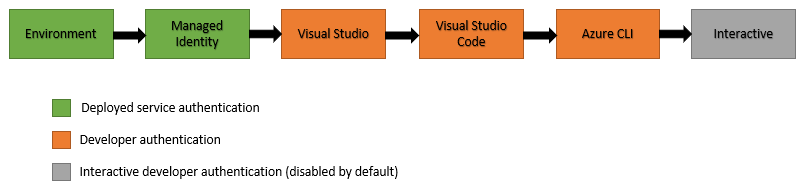
The image below taken from the Microsoft documentation, shows how the DefaultAzureCredential will attempt to authenticate via the following mechanisms in order.
Environment – The DefaultAzureCredential will read account information specified via environment variables and use it to authenticate.
Managed Identity – If the application is deployed to an Azure host with Managed Identity enabled, the DefaultAzureCredential will authenticate with that account.
Visual Studio – If the developer has authenticated via Visual Studio, the DefaultAzureCredential will authenticate with that account.
Visual Studio Code – If the developer has authenticated via the Visual Studio Code Azure Account plugin, the DefaultAzureCredential will authenticate with that account.
Azure CLI – If the developer has authenticated an account via the Azure CLI az login command, the DefaultAzureCredential will authenticate with that account.
Interactive – If enabled the DefaultAzureCredential will interactively authenticate the developer via the current system’s default browser.
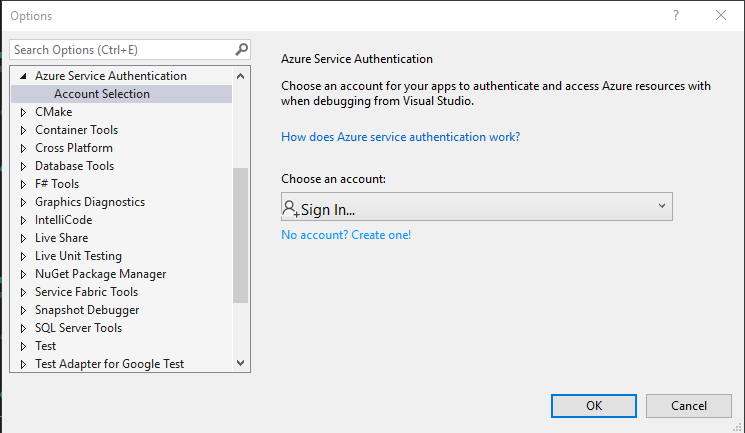
Note: When I first ran my code on Visual Studio Code, I kept getting an authentication issue, it was because I had Visual Studio Enterprise installed on my machine and it was picking up the authentication method selected there which was pointing to a different tenant. You can see this in Visual Studio Enterprise by going into Tools > Options
The great thing about DefaultAzureCredential, is that if this code was within a Azure Function, I could run it first on my computer, then deploy it to Azure Functions with a Managed Identity, and it would still work without any changes to the code.
This blog post came about because I wanted a way to create new Application Registrations and grant consent for the tenant, all programmatically. This is so I can use Devops pipelines to create and deploy my code without any human interaction or using a person account.
By reading through Sam’s post it helped me understand the connection between Application Registrations, Service Principals and Oauth2permission, and helped me on the quest of understand how to grant the Application permissions through appRoleAssignments.
At my Github project https://github.com/pmatthews05/CFAppOnlyGrantPermissions the README.md will walk you through how to set up and run the code. At the end of the README.md file you should have 2 Application Registration, where the Azure API Registration app would have created the second app (in my case CFCodeApp) for you. This code is idempotent. You can change the permissions for an existing Application Registration by providing it a different Permission.json file.
As the README.md file gives the instruction on how to run the code, I will not replicate it here. I will use the rest of this post to explain how the code works.
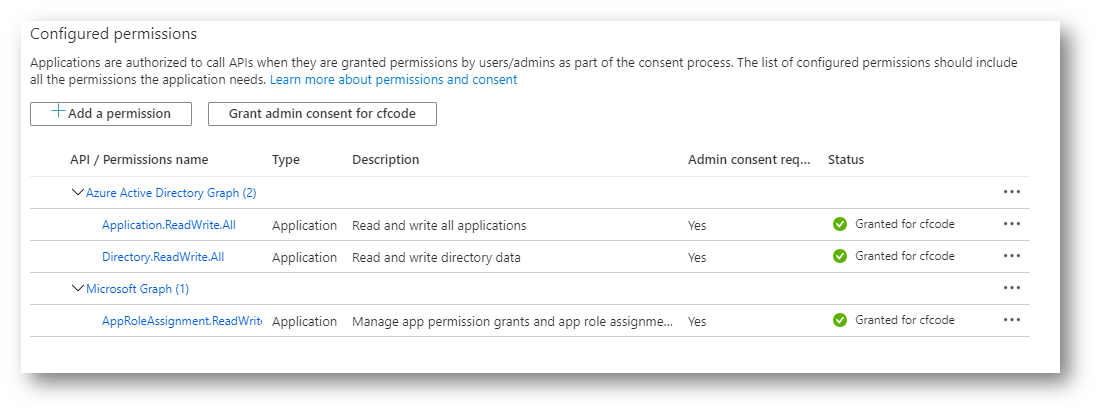
Permissions required for ‘Azure API Registration’
To allow the Azure API Registration to create new Application Registrations using AZ cli it requires to use both the legacy Azure Active Directory Graph and Microsoft Graph permissions. It seems that some of the commands in the az cli still points to https://graph.windows.net when it makes calls, according to some issue notes in the az cli git hub repository, it looks like this is in the process of being changed.
With Azure Active Directory Graph we need 2 permissions
Application.ReadWrite.All – This allows us to read and write the Application Registrations.
Directory.ReadWrite.All – This allows us to read the application registration permission list, and service principal information.
With Microsoft Graph we also need permission.
AppRoleAssignment.ReadWrite.All – This allows us to call the REST API to grant permissions and assign Role assignment permissions.
Steps in the code
Set-AppRegistration
Set-AppCredentials
Set-ServicePrincipalForAppId
Remove-CurrentAppPermissions
Set-DelegatePermissions
Remove-CurrentOauth2PermissionGrants
Set-ApplicationPermissions
Remove-CurrentServicePrincipalGrants
Please note, the snippets of code I am showing here in the blog, are showing the command(s) that are performing the main action, not the full function.
Set-AppRegistration
We need an App Registration to be created first. If the name already exists it just returns the existing App Registration
This file contains bidirectional Unicode text that may be interpreted or compiled differently than what appears below. To review, open the file in an editor that reveals hidden Unicode characters.
Learn more about bidirectional Unicode characters
This file contains bidirectional Unicode text that may be interpreted or compiled differently than what appears below. To review, open the file in an editor that reveals hidden Unicode characters.
Learn more about bidirectional Unicode characters
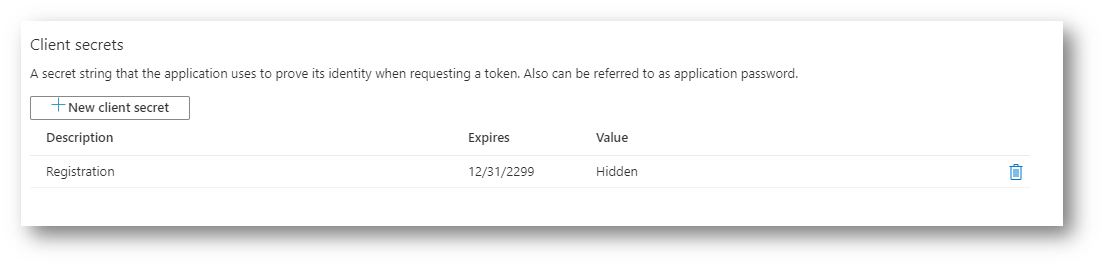
This will create a secret for the App Registration with a random secret with the description set to Registration. There are a couple of override parameters that I am not using, where you can give it your own Description, and provide your own SecureString secret. This returns the appCredentials that supply the appId, name, password and tenantId. In the script it outputs this to screen at the end, however, if using in production environment, you would probably want to put the secret value in a keyvault, without displaying to the user what the value is.
Set-ServicePrincipalForAppId
This file contains bidirectional Unicode text that may be interpreted or compiled differently than what appears below. To review, open the file in an editor that reveals hidden Unicode characters.
Learn more about bidirectional Unicode characters
All App Registrations require a Service Principal behind them. When you manually create an App Registration and assign permissions, it automatically creates a service principal for you. When you create an App Registration programmatically, it is your responsibility to also create the Service Principal. It is the Service Principal that defines the access policy and permissions for the user/application in the Azure AD tenant. A multi-tenant App Registration would have the same app Id in all tenants, but all have a different Service Principal which allows them access within that tenant. For example, in all tenants the AppId for the Microsoft Graph API is ‘00000003-0000-0000-c000-000000000000’ and in your tenant it has an associated Service Principal, which is a different object Id in your tenant compared to mine. When I finally understood this, it made more sense how this all ties together.
The above az command is not idempotent, and therefore a check to see if it already exists is required.
Remove-CurrentAppPermissions
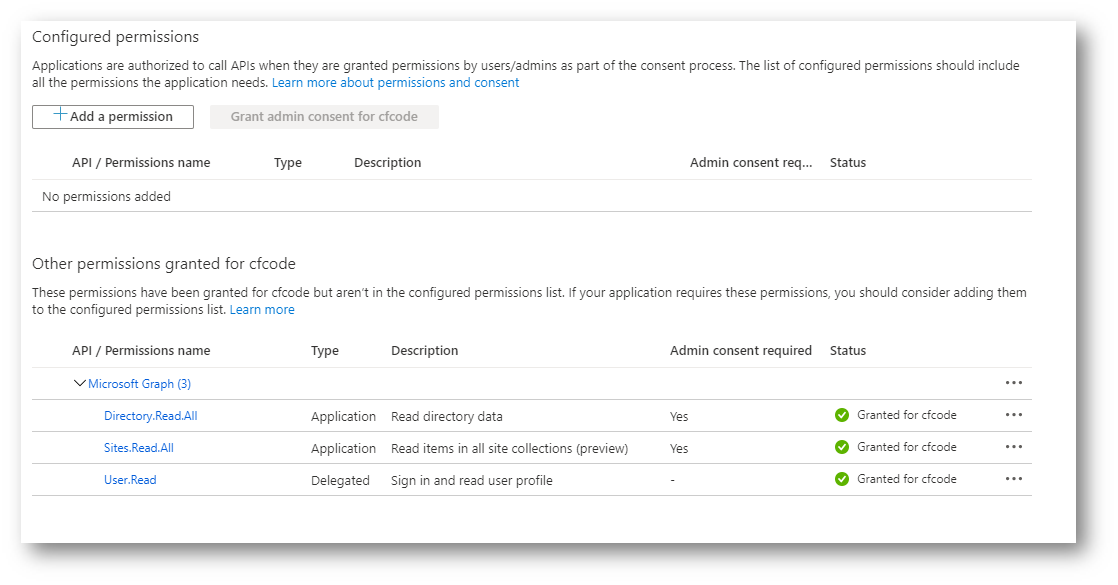
To allow idempotency of my script, I wanted to ensure that it removes all existing permissions before adding them back in. This piece of code does not remove the permission from the service principal, and if you stop the code after this command, you will see that your API Permissions in the GUI would look like this.
Seeing the permissions separated at the bottom of the screen, now understanding the relationship between Application Registrations and Service Principal, it makes a lot more sense to me now. The service principal still has access at this point and calls to these API’s will still work.
This file contains bidirectional Unicode text that may be interpreted or compiled differently than what appears below. To review, open the file in an editor that reveals hidden Unicode characters.
Learn more about bidirectional Unicode characters
The code gets a list of all the permissions assigned to the Application Registration, then loops through each resourceAppId (the objectId value of the API permission service principal e.g, Microsoft Graph, SharePoint)*2 and deletes the permission.
Set-DelegatePermissions
To ensure the code is idempotent the first thing I am doing is removing the delegate permission from the Service Principal. See the next section on how this works.
Now we need to assign the Application Registration permissions for the delegate permissions. We do this by providing the AppID of our Application Registration, the API Permission AppID (the appID of the API Permission service principal e.g, Microsoft Graph)*2 and the oauth2Permissions scope Id*4
This file contains bidirectional Unicode text that may be interpreted or compiled differently than what appears below. To review, open the file in an editor that reveals hidden Unicode characters.
Learn more about bidirectional Unicode characters
This file contains bidirectional Unicode text that may be interpreted or compiled differently than what appears below. To review, open the file in an editor that reveals hidden Unicode characters.
Learn more about bidirectional Unicode characters
clientId: This is the Service Principal Object ID that is tied to your App Registration
consentType: Set to AllPrincipals when granted to the entire tenant, or Principal when granted to an individual user
id: The ID of the oauth2permissiongrants
principalId: This is set to null if using AllPrincipals, otherwise it will contain the objectID of the User that has been granted the permission
resourceId: This is the Serivce Principal Object ID value of the API Permission*2
scope: This is a string array of granted scope values for the given ResourceId. (e.g User.Read Directory.Read.All etc)
If the oauth2permissiongrants with the App Registration Service Principal Object ID and API Permission Service Principal Object ID (clientId and resourceId) doesn’t exist in your tenant, then you will need to POST a new oauth2permissiongrants, otherwise you will require to PATCH an existing oauth2permissiongrants/<id> with the new string array of scope values.
This file contains bidirectional Unicode text that may be interpreted or compiled differently than what appears below. To review, open the file in an editor that reveals hidden Unicode characters.
Learn more about bidirectional Unicode characters
You must add a startTime and expiryTime, it does not matter what the datetime is, as long as expiryTime is later than the startTime.
Remove-CurrentOauth2PermissionGrants
To remove the permissions from the Service Principal for the Delegate Permissions, we need to remove the Oauth2PermissionGrants.
Unfortunately, with App Only permissions you cannot delete an oauth2permissiongrants. You require to access the directory as a person to delete. I found that by setting the scope to empty string, gives the same desired effect as removing them.
This file contains bidirectional Unicode text that may be interpreted or compiled differently than what appears below. To review, open the file in an editor that reveals hidden Unicode characters.
Learn more about bidirectional Unicode characters
Please Note: I am using Invoke-RestMethod instead of az rest because I have not been able to get it to work without an error message.
Set-ApplicationPermissions
To ensure the code is idempotent the first thing I am doing is removing the application permission grants from the Service Principal. See the next section on how this works.
Now we need to assign the Application Registration permissions for the application permissions. We do this by providing the AppID of our Application Registration, the API Permission AppID (the appID of the API Permission service principal e.g, Microsoft Graph)*2 and the AppRoles scope Id*3
This file contains bidirectional Unicode text that may be interpreted or compiled differently than what appears below. To review, open the file in an editor that reveals hidden Unicode characters.
Learn more about bidirectional Unicode characters
Next, we need to assign the Application Registration associated Service Principal AppRoleAssignments to grant these permissions to the tenant.
Using Graph API explorer, you can view all the Application Role Grants for your Application Registration. You will need the Service Principal Object ID*1 and then use the following URL:
This file contains bidirectional Unicode text that may be interpreted or compiled differently than what appears below. To review, open the file in an editor that reveals hidden Unicode characters.
Learn more about bidirectional Unicode characters
Unlike the Oauth2PermissionGrants, where there is only one entry per clientid and resourceId which contains all the scopes, with AppRoleAssignments there is an entry for each scope, and it uses the appRoleId scope Id*3 instead of the scope string value.
id: The ID of the appRoleAssignment
principalId: The Service Principal Object ID that is tied to your App Registration
resourceId: This is the Serivce Principal Object ID value of the API Permission*2
This file contains bidirectional Unicode text that may be interpreted or compiled differently than what appears below. To review, open the file in an editor that reveals hidden Unicode characters.
Learn more about bidirectional Unicode characters
To remove the permission from the Service Principal for the Application Role permissions, we need to remove the AppRoleAssignments ID’s for the service principal
This file contains bidirectional Unicode text that may be interpreted or compiled differently than what appears below. To review, open the file in an editor that reveals hidden Unicode characters.
Learn more about bidirectional Unicode characters
Please Note: I am using Invoke-RestMethod instead of az rest because I have not been able to get it to work without an error message.
Conclusion
That is it. In the Data folder of the github project there is an examplePermission.json file. As you can see that the JSON format is very flexible to add more or remove permissions. The name can be the appDisplayName or the AppId of the API Permission.
Run the Add-RegistrationAndGrantPermissions.ps1 script passing in the name of your App Registration you wish to create / update and your custom permission file. The script will run fine with user logged in, or an App Only with the correct permissions.
Please feel free to use/enhance the github project.
Footnotes
*1 How to find your Service Principal Object ID of your Application Registration
Using the GUI, the quickest way to find your Service Principal Object ID is to first go to the overview of the Application Registration. Then on the right-hand side of the screen, click the name of your Application Registration where Manage application in local directory is.
This will take you to the Service Principal information in your tenant. It is here you can get the ObjectID.
*2 How to find the Service Principal Object Id for the Permission API.
You may already know that Microsoft Graph API appId is 00000003-0000-0000-c000-000000000000, this is the same on all tenants, but the service principal object ID is different in each tenant. This is the resourceId. To find out what the objectID is in your tenant run the following script.
This file contains bidirectional Unicode text that may be interpreted or compiled differently than what appears below. To review, open the file in an editor that reveals hidden Unicode characters.
Learn more about bidirectional Unicode characters
az ad sp list --query "[?appId=='00000003-0000-0000-c000-000000000000'].{appDisplayName:appDisplayName,appId:appId,objectId:objectId}" --all --output table
Remove “?appId== ‘00000003-0000-0000-c000-000000000000′” between the [ ] and it will list all for your tenant.
*3 How to find the Application Role Id of a Permission API Scope.
For each Permission API such as Microsoft Graph API, there are Application Role. No matter what tenant you are in, the id of them is always the same. The below example gets the Application Scope of Directory.Read.All from the Permission API Microsoft Graph.
This file contains bidirectional Unicode text that may be interpreted or compiled differently than what appears below. To review, open the file in an editor that reveals hidden Unicode characters.
Learn more about bidirectional Unicode characters
This file contains bidirectional Unicode text that may be interpreted or compiled differently than what appears below. To review, open the file in an editor that reveals hidden Unicode characters.
Learn more about bidirectional Unicode characters
*4 How to find the oAuth2Permission Id of a Permission API Scope.
For each Permission API such as Microsoft Graph API, there are oauth2Permissions. No matter what tenant you are in, the id of them is always the same. The below example gets the Delegation Scope of Directory.Read.All from the Permission API Microsoft Graph.
This file contains bidirectional Unicode text that may be interpreted or compiled differently than what appears below. To review, open the file in an editor that reveals hidden Unicode characters.
Learn more about bidirectional Unicode characters
This file contains bidirectional Unicode text that may be interpreted or compiled differently than what appears below. To review, open the file in an editor that reveals hidden Unicode characters.
Learn more about bidirectional Unicode characters
This blog post has all come about as the client I was working for was having problems sharing documents in SharePoint with some external users. It turned out that the user was already in Azure AD as a Contact which is part of Exchange. This meant when an internal person attempted to share/Invite into SharePoint/MSTeams it all appeared to work correctly for the external user, but sometimes it didn’t. When looking at external users through the Admin portal, this external user was showing, but their email address was blank. After speaking with Microsoft, it turns out, because the email address was already found within the tenancy, it creates a unique violation when adding the external user to the Active Directory.
I have been working with Microsoft support regarding this, and the resolution was that this is as design!!??! Only by feeding back on the Office 365 uservoice this issue “might” looked at and fixed. See resolution notes below:
Symptom:
When you invite external users who exist as contacts in your environment, their email does not get populated in their guest user ID which results in them not being able to login to your environment and access the shared data. Cause:
The issue is coming from a conflict caused by the email address which is already populated for the mail contact. Resolution:
This is behavior by design as all objects in Azure AD have to be unique.
You cannot have 2 objects with the same email address.
When you invite one of your contacts to your content in O365, it actually creates a completely new guest user object in your environment and since the email address which is supposed to be populated in the email attribute is already in use by the contact, the email address does not get populated.
The only way to resolve this issue at the moment is to eliminate any conflicts that are in place, by removing the conflicting email contact and re-invite the user to your content. More information:
The best thing I can offer to you is the following:
Please go to our UserVoice portal where other people are facing the same behavior and up-vote it, comment and have the whole IT department do the same as well.
This led me to working on a process and script that would remove the users from everywhere.
Locations to remove the External User from:
Contacts
Azure AD Guest Users
Azure AD Deleted Users
All SharePoint Sites
All SharePoint Hidden User lists
SharePoint User Profile
Contacts
To remove the External User from the contacts you will need to use the MSOL PowerShell module.
This file contains bidirectional Unicode text that may be interpreted or compiled differently than what appears below. To review, open the file in an editor that reveals hidden Unicode characters.
Learn more about bidirectional Unicode characters
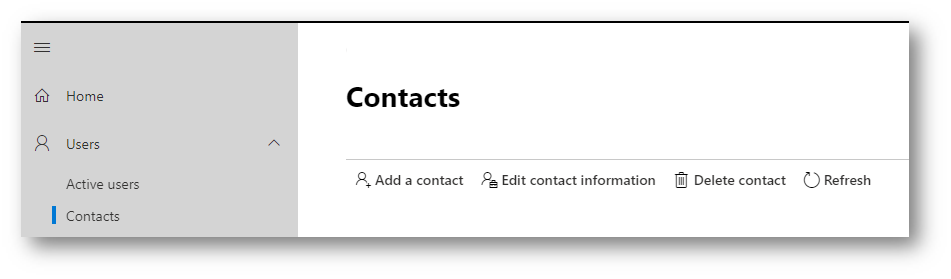
Or you can manually do this by going to admin.microsoft.com and under Users -> Contacts select the user and click Delete contacts.
Azure AD
To remove the External User from Azure AD you will still require using the MSOL PowerShell module. In fact, this script and the above script could be merged.
This file contains bidirectional Unicode text that may be interpreted or compiled differently than what appears below. To review, open the file in an editor that reveals hidden Unicode characters.
Learn more about bidirectional Unicode characters
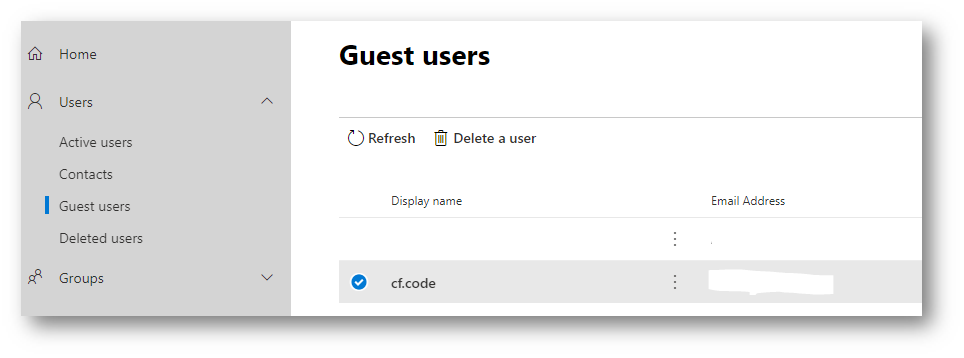
To do this manually, in admin.microsoft.com under Users -> Guest Users, select the user and click delete.
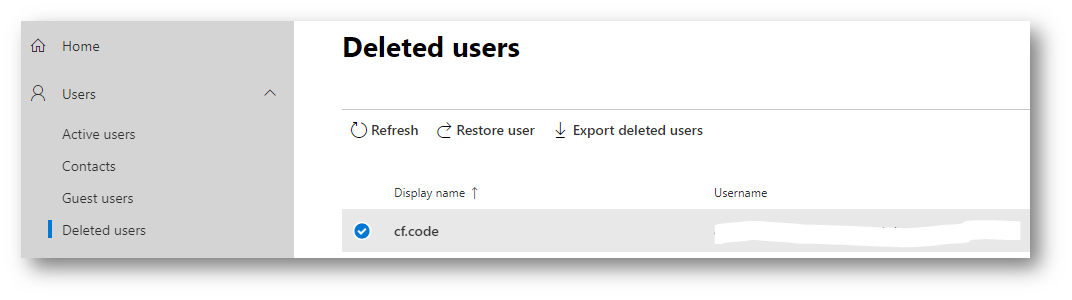
Then go into Users -> Deleted users and remove them from there.
Remove from SharePoint
To remove from SharePoint, if you have a large tenancy and you don’t know all the places where the external user could have been shared with, then you will have to use the following script. This script will remove the external user from the SharePoint Site, ensure that they are removed from the User Information list, and then lastly it will clear the person from the SharePoint User Profile.
I discovered that if I didn’t remove them from the User Profile, when attempted to reshare a document with that user, the people picker would grab the internal userprincipalname (<ExternalUserEmail>#EXT#@<Tenant>.onmicrosoft.com) as the email address and then prevent me clicking the Sharing button. This is because the people picker uses Graph API /Me/People and grabs the value from there. Once removed from everywhere, including the User Profile this no longer happens.
The following script uses SPO PowerShell Module and you will need to connect first using Connect-SPOService. The account that you use, needs to be a SharePoint Global Administrator.
The script checks if it can find the ExternalUser, and if it can remove the user using Remove-SPOExternalUser.
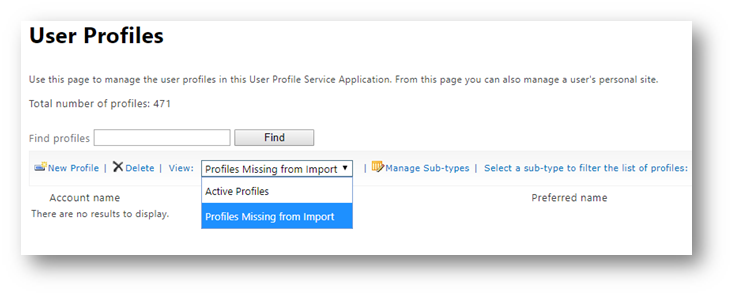
Then it loops through every site collection and looks for the user using Get-SPOUser with the internal userprincipalname. If found it removes the user using Remove-SPOUser. Once it has looped through all SharePoint sites, it then checks the SharePoint User Profile and removes the user from UserProfile Remove-SPOUserProfile. This command will remove a user from the UserProfile if they in the “Active Profiles” or the “Profiles Missing from Import”
This file contains bidirectional Unicode text that may be interpreted or compiled differently than what appears below. To review, open the file in an editor that reveals hidden Unicode characters.
Learn more about bidirectional Unicode characters
Loops through the SharePoint sites of the tenant, looking for the external user and removing them.
You need to have already connected to the Tenant as a SharePoint Global Adminstrator using Connect-SPOService -url:https://<tenant>-admin.sharepoint.com
If the plan is to add the external person back into your tenant, once the script has run, you will need to wait at least a few hours (maybe leave it for a day to be sure) to ensure all back end processes of Microsoft have completed.
When you share a document/folder with the external user they will get the invited link and enter a code experience, this way they do not turn up inside you Azure AD. However, if you share a site with them, or add them to a MS Teams, they will appear in your Azure AD correctly.
Dive into the code for O365 Audit Log webhooks to see how it works – (This Post)
The previous blog post showed how to get you up and running with O365 Audit logs and webhooks. In this blog post I’m going to show and explain parts of the code that ties everything together.
PowerShell to initialize the Webhook to the Audit logs
This file contains bidirectional Unicode text that may be interpreted or compiled differently than what appears below. To review, open the file in an editor that reveals hidden Unicode characters.
Learn more about bidirectional Unicode characters
From inside the PowerShell folder (.\O365AuditWebhook\PowerShell) there is a PowerShell file called Set-AuditLogs.ps1 This PowerShell file Starts a subscription to the given Audit Content Type. This is done by calling:
The above call is a POST call and uses the ClientID and Secret to authenticate against the tenant. The body is a Json object
This file contains bidirectional Unicode text that may be interpreted or compiled differently than what appears below. To review, open the file in an editor that reveals hidden Unicode characters.
Learn more about bidirectional Unicode characters
authId – Optional string that will be included as the WebHook-AuthID header in notifiations sent to the webhook as a means of identifying and authorizing the source of the request to the webhook
expiration – Optional datetime that indicates the datatime after which notifications should no longer be sent to the webhook. By leaving it empty, indicates the subscription will be active for the next 180 days.
address – Required HTTPS endpoint that can receive notifications. A test message will be sent to the webhook to validate the webhook before creating the subscription.
When the /start operation is called, the webhook URL specified in the address will be sent a validation notification to validate that an active listener can accept and process notifications.
The Azure Function AuditWebhook found in the O365AuditWebhook.cs file has two parts to it.
This file contains bidirectional Unicode text that may be interpreted or compiled differently than what appears below. To review, open the file in an editor that reveals hidden Unicode characters.
Learn more about bidirectional Unicode characters
The first part, as shown above, handles the validation. It looks for a validation code within the content, and if found it response back with a 200 status (OK) and includes the validation code.
If an OK is not received back, then the webhook will not be added and the subscription will remain unchanged.
The second part of the AuditWebhook Azure function is explained in the next section.
Webhook handling O365 notifications
After the initial validation, notifications will be sent to the webhook as the content logs become available.
From the first part of the AuditWebHook Azure Function, notifications do not have the validationCode, this allows us to determine that notifications have been sent, instead of a new subscription.
The content of these notifications contains an array of one or more JSON objects that represent the available content blobs.
This file contains bidirectional Unicode text that may be interpreted or compiled differently than what appears below. To review, open the file in an editor that reveals hidden Unicode characters.
Learn more about bidirectional Unicode characters
On line 5 of the above code, show where I handle the content of deserialize json object (notifications) to a list of AuditContentEntity.
The notification/AuditContentEntity contains the following:
tenantId – The GUID of the tenant to which the content belongs
clientId – The GUID of your application that created the subscription
contentType – Indicates the content type
contentId – An opaque string that uniquely identifies the content
contentUri – The URL to use when retrieving the content
contentCreated – The datetime when the content was made available
contentExpiration – The datetime after which the content will no longer be available for retrieval.
At this point you do not have any log information, you just have a collection of contentUri which when called will provide you with the logs. To ensure that the webhook response quickly so that it can continue to handle incoming requests, we place the contentUri, contentType, and TenantId onto an Azure Storage Queue. This allows a different Azure function to handle getting the actual logs.
Lines 9-16 will set up the storage queue if it doesn’t exist.
Lines 19-26 prepares my queue object and serialize it to a json string.
Line 28 adds the message to the Azure Storage Queue.
Once all notifications/AuditContentEntity have been processed, a 200 status (OK) is passed back. The subscription that calls our webhook is waiting for an OK response. If it encounters failure, it has a built in retry mechanism that will exponentially increase the time between retries. If the subscription continues to receive failure response, the subscription can disable the webhook and stop sending notifications. The subscription will need to be started again to re-enable the disabled webook.
Processing the Storage Queue AuditContentUri
As items are put on the Storage Queue the Azure Function AuditContentUri found in the O365AuditWebhook.cs file fires.
This file contains bidirectional Unicode text that may be interpreted or compiled differently than what appears below. To review, open the file in an editor that reveals hidden Unicode characters.
Learn more about bidirectional Unicode characters
First you need an authorization token to read the audit logs, we do this with AcquireTokenForApplication method. This uses the Tenant Name, ClientId and Secret that is stored within your Azure configurations. See ‘How to acquire token for application?’ below.
It grabs the ContentUri and then goes into a do loop. This is because the logs that come back, if it is a very busy tenant, not all the logs will be returned, and there will be a NextPageUri value in the header of the response to allow you to obtain the next page of logs.
Line 7 – This adds your tenantID to the end of the URI as a PublisherIdentifier. This parameter is used for throttling the request rate. Make sure this parameter is specified in all issued requests to get a dedicated quota. All requests received without this parameter will share the same quota. The IF statement ensures it is added to the end of the URI correctly.
Line 9 – This calls the ContentUri and gets a results and request headers. You can see the file .\O365AuditWebHook\AuditWebHook\Utilities\RestAPI.cs The Method GetRestDataAsync is very similar to the GetRestData call you find within PNP Core code. Creates a HttpWebRequest, passing in Authorization Token, and calling the ContentUri. Only difference in my code is that I’m grabbing the response.Headers to find out if there are additional logs, and passes them back with the results.
Line 10 – This parse the results into a JArray. (Json Array object). Here you can manipulate what comes back. For example, instead of grabbing all results and then displaying them out, you can query the results for a particular log type.
In the example code below, this would be using the Audit.General logs, and it will grab any logs that are of RecordType 25 (Indicates Microsoft Teams event) where the operation is creating a new channel, and the Channel type is Private. I then convert the JArray to an object list of AuditGeneralEntity.
Line 17 – If there are any additional pages, then this will return a value, and the loop will loop until no more pages are found.
How to acquire token for application?
In the previous section, I called a method AcquireTokenForApplication. This is a helper class and method that I use quite often, when I need to obtain an AccessToken. You can find this in the repo at .\O365AuditWebHook\AuditWebHook\Utilities\AuthenticationHelper.cs. This solution has a cut down version of the helper class I use. It is cut down as it just gets an access token for Audit Logs using AppId and Secret.
This file contains bidirectional Unicode text that may be interpreted or compiled differently than what appears below. To review, open the file in an editor that reveals hidden Unicode characters.
Learn more about bidirectional Unicode characters
Above is a snippet, as you can see it is wrapped in a retry method in case there is throttling.
PowerShell to stop the Audit logs
Within the PowerShell folder I have also included a file called Remove-AuditLogs.ps1
This file contains bidirectional Unicode text that may be interpreted or compiled differently than what appears below. To review, open the file in an editor that reveals hidden Unicode characters.
Learn more about bidirectional Unicode characters
Once the subscription is stopped, no notifications will be sent to your webhook, and you will not be able to retrieve available content. Please note, if you decide to start the subscription again later using the Set-AuditLogs.ps1 you will not receive any content that was available between the stop and start time of the subscription.
This is quite a heavy post; I hope it has helped you in some way. It is just a starter, as you will probably want to do something with the logs instead of just writing them out to the Azure Logs. Maybe capturing a given process to then implement some logic to react. You might also want to put different Audit content types ContentUri onto different Azure Storage queue, so that different Azure Functions can process the ContentUri.
In this blog post I’m going to show you how to get the O365 Audit logs using WebHooks. The full code can be found at my Github repo https://github.com/pmatthews05/O365AuditWebHook. My post will show you how to set up with screenshots and the expected results. In my next blog post I will dive into the important parts of the code to get this Audit WebHook connected and working.
Set up – Walkthrough
Creating an App Only Token
Once you have downloaded a copy from my Repo you will need to set up your environment. First thing we are going to do is create an App Only Token that will be able to read the Audit Logs.
Click Grant Admin Consent for [tenant] and accept the permissions.
Click on Certificates & Secrets
Click New Client Secret
Description: Audit Web Hook
Expires: Never
Take a copy of the Secret value
Setting up Azure
You will need to set up your Azure Environment, this will consist of the following:
Resource Group
Azure Function V1
Applications Insights
Storage Account
I like to automate where I can, also it saves me creating loads of screenshots which are probably all out of date after 2 months. I have written an Az CLI PowerShell script that will create the above for you in your Azure Environment. In the next blog post I will explain the code.
Using a PowerShell window – Sign into your Azure Environment using ‘az login’
If you have multiple subscriptions, ensure you are pointing to the correct subscription ‘az account set –subscription [SubscriptionName]‘
Change the directory to .\O365AuditWebhook\powershell
Run the following: ‘.\Install-AzureEnvironment.ps1 -Environment “[Environment]” -Name:”AuditWebHook”‘ replacing the [Environment] with your tenant name. For example, I’ve used cfcodedev.
Once the script has run, you will have the basic template Azure resources you need within the Resource group named [Environment]-AuditWebHook
Deploying Azure Function from Visual Studio 2019
Firstly, you don’t have to deploy this way. If you prefer to use Visual Studio code, create an AZ install script or manually deploy using Kudu, that is your choice, and all are valid. My choice of doing this is simplicity for screen shots and steps.
Open the solution using Visual Studio Code 2019
Right click on the project AuditWebHook and select Publish
From the Pick a publish target dialog (click Start if you are not seeing a dialog), and under Azure Functions Consumption Plan click Select Existing, and select Create Profile.
Sign into your account if you need to, then pick your subscription, resource group, and then you can either search, or just pick the Azure Function. Click OK.
This takes you back to the Summary page. Under Actions click Edit Azure App Service settings
The Application Settings dialog will show you the values Local and what is found within Azure Function in the cloud. You will need to update the Remote value for the following:
FUNCTIONS_EXTENSION_VERSION: ~1
You will need to add the following Settings, by clicking on Add Setting creating the setting name, and put the value in afterwards. Repeat for each setting below.
Tenant: [Name of your Tenant, do not include .onmicrosoft.com]
ClientId: [Client ID created in step ‘Creating an App Only Token’ earlier]
AppSecret: [Secret Value created in step ‘Creating an App Only Token’ earlier]
Click OK
Back on the Publish screen, click the Publish button. This will push the code to your environment, with the correct Application Settings.
By going to your Azure Function at portal.azure.com, you will see 2 Azure Functions
Then clicking on Configuration, it will take you to the Application settings page, click Show Values and you will see your values.
At this point you just have the Azure function as a Webhook in place. Next steps are to tie the O365 Audit log to the WebHook.
Connecting O365 Audit Logs to your webhook
The last step is tying the Audit logs to your webhook. The webhook can be used for the different Audit logs. There are 5 different types of logs.
Audit.AzureActiveDirectory
Audit.Exchange
Audit.SharePoint
Audit.General
DLP.All -Note: DLP sensitive data is only available in the activity feed API to users that have been granted “Read DLP Sensitive Data” permission.
I have written a PowerShell script for you that will register the webhook for you. You will find this in the repo.
Open PowerShell
Change the directory to .\O365AuditWebhook\powershell
Run the following PowerShell script (Run on one line), change the parameters to match your environment. I’ve picked Audit.SharePoint, but you can use any listed above, and run the PowerShell script multiple times to connect all logs to the webhook.
This file contains bidirectional Unicode text that may be interpreted or compiled differently than what appears below. To review, open the file in an editor that reveals hidden Unicode characters.
Learn more about bidirectional Unicode characters
“When a subscription is created, it can take up to 12 hours for the first content blobs to become available for that subscription. The content blobs are created by collecting and aggregating actions and events across multiple servers and datacenters. As a result of this distributed process, the actions and events contained in the content blobs will not necessarily appear in the order in which they occurred. One content blob can contain actions and events that occurred prior to the actions and events contained in an earlier content blob. We are working to decrease the latency between the occurrence of actions and events and their availability within a content blob, but we can’t guarantee that they appear sequentially.“
If you are using a Development environment – like myself – and setup the Audit.SharePoint content type then I suggest you go into SharePoint, and start using SharePoint. Just so the logs start to fill.
Please note, it can take up to 30 minutes or up to 24 hours after an event occurs for the corresponding audit log entry to be displayed in the search results, depending on the service of Office 365. See the table at the bottom of this section Search the audit log in security and compliance – Before you begin
Viewing the AuditWebHook azure function, you will see that it has fired more times since your initial setup.
If you look at your latest call, (note: logs can display out of order in azure functions) you will see that it attempts to find the validation code, which is what it needs to set up the webhook. When it is unable to find the validation code, the code assumes that content contains log information. It grabs the URI of the log that has been created and then it adds it to our Azure Storage Queue for our other azure function to process. Depending on how busy your environment is, this request could hold multiple URL’s to logs. A webhook has to respond quickly back to the calling code with a 200 status code. Therefore we are adding the URI’s of the logs directly to a Storage Queue to allow a different process to interrogate the logs.
The second Azure Function (AuditContentUri) will fire every time an item lands on the Storage Queue. This will grab the information from within the log file by calling the URI.
If we select one of the calls and view the logs of that Azure Function call, every entry within that Audit log file URI will be displayed in a JSON format. Clicking on a row in the logs, will display the full details of the line. At this point in the code, would be where you process the line and do whatever you need to do with the Audit log. I’m just printing it out to the Azure Function Logs.
Remove O365 Audit Logs from your webhook
To remove the webhook from the Audit log just run the following PowerShell script. You will find this in the repo.
Open PowerShell
Change the directory to .\O365AuditWebhook\powershell
Run the following PowerShell script (Run on one line), change the parameters to match your environment. I’ve picked Audit.SharePoint, but you can use any listed above, and run the PowerShell script multiple times to remove all logs to the webhook.
The below codes login with the ClientID and Secret and stops the subscription of the given ContentType audit.
This file contains bidirectional Unicode text that may be interpreted or compiled differently than what appears below. To review, open the file in an editor that reveals hidden Unicode characters.
Learn more about bidirectional Unicode characters
Hopefully, if you have followed this correctly, (and I have written decent enough instructions for you), you should have a basic Audit Log Webhook working in your environment. This isn’t anywhere near production ready code, but it gives you an idea where to start. In my next blog post I will be going though parts of the code, to explain how it all fits together.
I see a lot of blogs and examples on the internet that shows you how to connect to environments using a username and password. This is all well and good for testing, but I believe it is bad for real world scenarios.
I’m a contractor, and my time at the job is defined, after I leave the contract and move onto the next one, the company should disable my account. What happens next? Everything I have built using a username/password, stops working. Yes, I could argue, it ensures I get a call back, but most contracts I’ve been involved in have a clause that any bugs found will be fixed for free up to 3-6 months after the job is done. Also, I like to leave a place with them thinking “That guy is awesome, lets get him back for the next project!”.
This post is going to show you how to set up a Service Principal for your Azure Devops CI/CD. At the end, I will give a very basic deployment that creates a Resource Group in Azure. Please note, this example is to show how to set up when your Azure Devops is not part of the same Directory as your Azure Resource Tenant. When it is part of the same tenant.
First, we need to start in Azure and create a Service Principal. The Service Principal will need to be a contributor on the Subscription or the Resource group that your Devops project is going to manage.
Supported account types: Accounts in this organizational directory only (Single Tenant)
Redirect URI: (Leave blank)
Click Register
Make a note of Application (client) ID and your Directory (tenant) ID.
Create a Secret for the Service Principal
In the App Registration for the above app, click Certificates & secrets.
Under Client secrets, click New client secret
Description: DEVOPS
Expires: Never
Click Add
Make note of the secret
Assign Service Principal permission to Subscription
Open Azure Portal
Navigate to Subscriptions and select your subscription
Click Access control (IAM)
Click Add -> Add role assignment
Role: Contributor
Assign access to: Azure AD user, group, or service principal
Select: <Name of service Principal>
Click Save
From the Overview blade, grab the Subscription ID and Subscription Name.
You can also add API permissions, such as Graph, and then make direct calls to Graph API using PowerShell using this service principal within the pipeline. Now this side has all been set up, we can head over to our Devops.
Create Service Connection in Devops
Go into your project.
At the bottom left of your screen click Project Settings
Within Project settings, underneath Pipelines click Service connections*. If you have a star next to the Service connections word, it means that you are viewing the preview version. I’m going to show the following screens using a preview version.
Click Create service connection
Select Azure Resource Manager, click Next
Select Service principal (manual), click Next
On the New Azure service connection blade, (replace values with your values you grabbed earlier)
Environment: Azure Cloud
Scope Level: Subscription
Subscription Id: <SubscriptionID>
Subscription Name: <Subscription Name>
Service Principal Id: <Application (client) ID>
Credential: Service principal key
Service Principal Key: <Secret>
Tenant ID: <Directory (tenant) ID>
Details (This section is your choice)
Service connection name: <Name of Tenant>-<SubscriptionName>
Description:
Security: Tick – Grant access permission to all pipelines.
Click Verify, a Verification Succeeded should show if all the details are correct, and the service account has permission.
Click Verify and save
The Service Principle is now connected
Proving the Service Principal connections works
Within your Dev Ops project, click on Pipelines and select releases. We are going to create a Resource Group within our subscription.
Close the stage window. We don’t need any artifacts for this as I’m going to write AZ CLI code inline. Click on 1 Job, 0 task.
Add an Azure CLI task.
Task verison: 2*
Azure Resource Manager connection: Pick the subscription you have created in the previous section.
Script Type: PowerShell
Inline script: Inline Script
Inline script: az group create –name “Demo-rg” –location uksouth
Click Save and create a release. After the release has run, and you have received success, an empty resource group should have been created within the subscription.
I had to write a simple PowerShell script that added items to a Storage queue. Once the items were added to a queue an Azure function picked up the items and processed them.
#Login
az login
#Get the connection string
$connectionString = az storage account show-connection-string --name "mystorageaccountname" –resource-group "MyResourceGroup" --query connectionString | ForEach-Object { $PSItem -join '' } | ConvertFrom-Json
#Create message
$message = "{""Name"":""Paul"",""LastName"":""Matthews"",""ID"":""d4b2ffc9-4380-46e4-a0bf-8a9ca58734d2""}"
#Add item to the queue
az storage message put --content $message --queue-name "myQueueName" --connection-string $connectionString
This fires successfully and I can see the item on the queue. However, when my Azure Function starts to run, I get the error message:
“The input is not a valid Base-64 string as it contains a non-base 64 character, more than two padding characters, or an illegal character among the padding characters.”
To solve this problem you just need to convert the string.
#Login
az login
#Get the connection string
$connectionString = az storage account show-connection-string --name "mystorageaccountname" –resource-group "MyResourceGroup" --query connectionString | ForEach-Object { $PSItem -join '' } | ConvertFrom-Json
#Create message
$message = "{""Name"":""Paul"",""LastName"":""Matthews"",""ID"":""d4b2ffc9-4380-46e4-a0bf-8a9ca58734d2""}"
#Encode to bytes
$b = [System.Text.Encoding]::UTF8.GetBytes($message)
#Convert to Base64String
$message64Base = [System.Convert]::ToBase64String($b)
#Add item to the queue
az storage message put --content $message64Base --queue-name "myQueueName" --connection-string $connectionString
Amazingly the value you push upto the queue is something like below:
Are you fed up when you go to sign into your SharePoint Online sites, that you see the default picture that Microsoft provides? Wouldn’t it be nice that the sign in page matched your branding, gave your users a consistence look and feel? Well this article is going to show you how to do that.
Note: A branded sign-in page only appears when you visit a service with a tenant-specific URL such as https://outlook.com/contoso.com. When you visit a service with non-tenant specific URLs (e.g https://myapps.microsoft.com) a non-branded sign-in page appears until you have entered your User ID.
The following screen shot shows an example of the Office 365 sign-in page on a desktop after a customisation:
The following screen shot shows an example of the Office 365 sign-in page on a mobile device after customisation:
What can you customise?
On the screenshot below I have highlighted the areas that you can customise.
Large Image / Background colour – You can change the image, or show a background colour which will be used in place of the image on low bandwidth or narrow screens.
Logo – Your logo can be shown at the top right of the screen instead of the Office 365 logo.
Sign-in Page Text – Although not showing on the above picture, you can supply sign-in page text. This text could be used to display a legal statement, simple instructions, or even contact information for your help desk.
SharePoint Online Tenant
To customise your sign-in page, you need to do this through Azure AD. If you have just a SharePoint Online tenant of the domain *.onmicrosoft.com and never used Azure, you will find that you cannot get to Azure. Luckily this isn’t too much of a problem if you have a credit card. (Don’t worry it doesn’t cost any money).
Sign into your Azure classic portal (https://manage.windowsazure.com) as an administrator of the directory you want to customise, and select your directory.
Along the menu/toolbar list, Click Configure.
Under Directory properties click Customize Branding.
Modify the elements listed below. All fields are optional. See below for screenshots and details of all customisable elements.
Banner Logo
Sign-in Page Text
Sign-in Page Illustration
Sign-In Page Background colour.
Click Save.
Note: If you have applied changes to your sign-in page, it can take up to an hour for the changes to appear. Mine happen within a few minutes.
Any time you wish to change your customisation, just by going back and clicking the Customize Branding button again. It is also here where you can add different branding settings for a specific language.
Different Branding for different languages
After you have configured your default branding settings, by going back and clicking the Customize Branding button, the first screen you are presented with is changing existing settings (which if you have just followed this blog, only see Default here) or you can add branding settings for a specific language. Select the language and then click the arrow button, and upload pictures/text as you did before. Once set, this branding will only show for the given browser language.
Customisable elements details
Below you will find the screen shot of the customising branding wizard with descriptions that you would find if you click the help tool tip icon.
Banner Logo (60 x 280 pixels) – The banner logo is displayed on the Azure AD sign-in page, when users sign in to cloud application that use this directory. It’s also used in the Access Panel service.
Max pixel size: 60px by 300px
Recommended to keep under 30 pixels high to avoid introducing scrollbars on mobile devices.
Recommended file size: 5-10kb
Use a PNG image with a transparent background if possible.
Avoid using a logo with small text on it, as the image may be resized to fit smaller screens.
Square Logo (240 X 240 pixels) – The square logo (previously referred to as “Title Logo”) is used to represent user accounts in your organization, on Azure AD web UI and in Windows 10.
Max pixel size: 240px by 240px
Recommended file size: 5-10kb
Use a PNG image with a transparent background if possible.
Avoid using a logo with small text on it, as the image may be resized to fit smaller screens.
Square Logo, Dark Theme (240 x 240 pixels) – If configured, this image will be used instead of the “Square Logo” image in combination with dark backgrounds, such as Windows 10 Azure AD Joined screens in the out-of-box experience.
If your logo already looks good on white and on dark blue/black backgrounds, there’s no need to configure a separate Dark Theme logo.
User ID Placeholder – This will replace “someone@example.com” that’s shown as a hint in the user ID input field on the Azure AD login page.
Important: you should only configure this if you only support internal users. If you expect external users to sign in to your app(s), we recommend you leave this blank (Azure AD will show “someone@example.com”).
Sign-In Page Text Heading – Add a heading above your customized sign-in page text. If not configured, this space is left blank on Azure AD web login pages, and replaced by “Need help” on Azure AD Join experience on Windows 10.
Plain text only.
Don’t exceed 30 characters.
Sign-In Page Text – This text appears at the bottom of the Azure AD sign in page, on the web, in apps and in the Azure AD Join experience on Windows 10. Use this space to convey instructions, terms of use and help tips to your users.
Plain text only.
Can’t be longer than 500 characters (250-300 characters recommended).
Remember, anyone can see your login page so you shouldn’t use this space to convey sensitive info!
Sign-In Page Illustration – This large image is displayed on the side of the Azure AD sign in page. By design, this image is scaled and cropped to fill in the available space in the browser window.
Use an abstract illustration or picture. Since the image gets resized and cropped, avoid using rasterized text and keep the “interesting” part of the illustration in the top-left corner.
Sign-In Page Background Colour – On high latency connections, the sign-in page illustration may not load, in which case the login page will fill in the space with a solid colour.
Enter an RGB colour code in hex format (e.g. #FFFFFF).
Hide KMSI (Keep Me Signed In) – Choose whether your users can see the “Keep me signed in” check box on the Azure AD sign-in page. This option has no impact on session lifetime, and only allows users to remain signed in when they close and reopen their browser.
Important: some features of SharePoint Online and Office 2010 have a dependency on users being able to check this box. If you hide this option, users may get additional and unexpected sign in prompts.
Post Logout Link Label – If this is configured, Azure AD will show a link to a web site of your choice, after users sign out of Azure AD web applications.
Make sure to configure both the label and URL properties!
Link can be plain text only.
URL can be HTTP or HTTPS.
Post Logout Link URL – If this is configured, Azure AD will show a link to a web site of your choice, after users sign out of Azure AD web applications.
Make sure to configure both the label and URL properties!


